# Welcome! Start Here

FieldEdge documentation — guides for canvassing, phone banking, and campaign management with NationBuilder

## What is FieldEdge?

#### FieldEdge is a suite of tools that empowers leaders and movements to engage their community “on the ground” – built exclusively for NationBuilder.

FieldEdge offers a range of tools to help grow your support. We offer a mobile app and HQ Dashboard to complement NationBuilder's existing database tools.

### **In the Field**

Our iOS and Android apps offer 3 core tools

<table data-view="cards"><thead><tr><th align="center"></th><th></th><th></th></tr></thead><tbody><tr><td align="center"></td><td><strong>👣 Canvassing</strong></td><td>A powerful yet intuitive mobile canvassing app designed to streamline voter outreach at the door</td></tr><tr><td align="center"></td><td><strong>💬 Mobile CRM</strong></td><td>A mobile CRM that connects users to the NationBuilder database from a phone or tablet</td></tr><tr><td align="center"></td><td><strong>☎️ Call Time</strong></td><td>A simple way to make calls to voters, constituents, supporters, and prospects.</td></tr></tbody></table>

### **Campaign Management**

FieldEdge also offers a HQ Dashboard to help you manage your field operations and analyze the performance of the campaign.

### Create a quick canvass/call time to test FieldEdge

{% embed url="<https://www.youtube.com/watch?v=WFCxUcy5tuY>" %}

## FieldEdge x NationBuilder

FieldEdge is built to work exclusively with NationBuilder which provides tremendous advantages:

* Concepts and terminology are shared by both platforms
* Ability to log in to the mobile app with your NationBuilder account
* Use NationBuilder's powerful segmenting abilities to create targeted lists
* Seamless real-time syncing of data
* Personal data only ever exists in NB and locally on your device (not stored on our servers)
* NationBuilder permissions are extended to FieldEdge

## How to use this documentation

We've tried to split the documentation into two types:

* **Guides:** practical content aimed to get you up and running quickly, see:
  * [Quick Start: Field User](/quick-start-for-field-users)
  * [Canvass Management](#campaign-management)
* **Product Tours:** a detailed breakdown of all features, see:
  * [Mobile App](/product-tour-or-mobile-app/overview)
  * [HQ Dashboard](/product-tour-or-hq/dashboard-overview)


# Quick Start for Field Users

The fastest way to get started with FieldEdge

## Downloading the App

The FieldEdge mobile app can be downloaded on a phone or tablet through the Apple App Store or Google Play.

{% hint style="info" %}
[**Download Here**](https://felink.me/go3)

Or go to <https://felink.me/go3>
{% endhint %}

*Alternatively, or search for "FieldEdge 3" in the respective app store.*

## Logging In

#### Step 1: Start by entering your NationBuilder slug/URL (supplied by the campaign) and tap `Next`.

<div align="left"><figure><img src="https://3317596624-files.gitbook.io/~/files/v0/b/gitbook-x-prod.appspot.com/o/spaces%2Fmd1HR6LZFUYuK3fPHLXC%2Fuploads%2FZnxqxIdInv1dc3c1bQDr%2Ffe3-enter%20slug.jpg?alt=media&amp;token=7a210eda-11e0-461f-823b-50d525f031db" alt="" width="188"><figcaption></figcaption></figure></div>

#### Step 2: **Do you have a NationBuilder account?**

<details>

<summary>Yes, I have a NationBuilder account</summary>

1. Click the `Login with NationBuilder Account` button.
2. You will be redirected to the login page of your nation.
3. You can log in with your email and password or a social account.
4. Once logged into NationBuilder, you will be redirected back FieldEdge and logged in.

</details>

<details>

<summary>No, but I've been invited to use FieldEdge</summary>

1. Click the `Accountless Login` button.
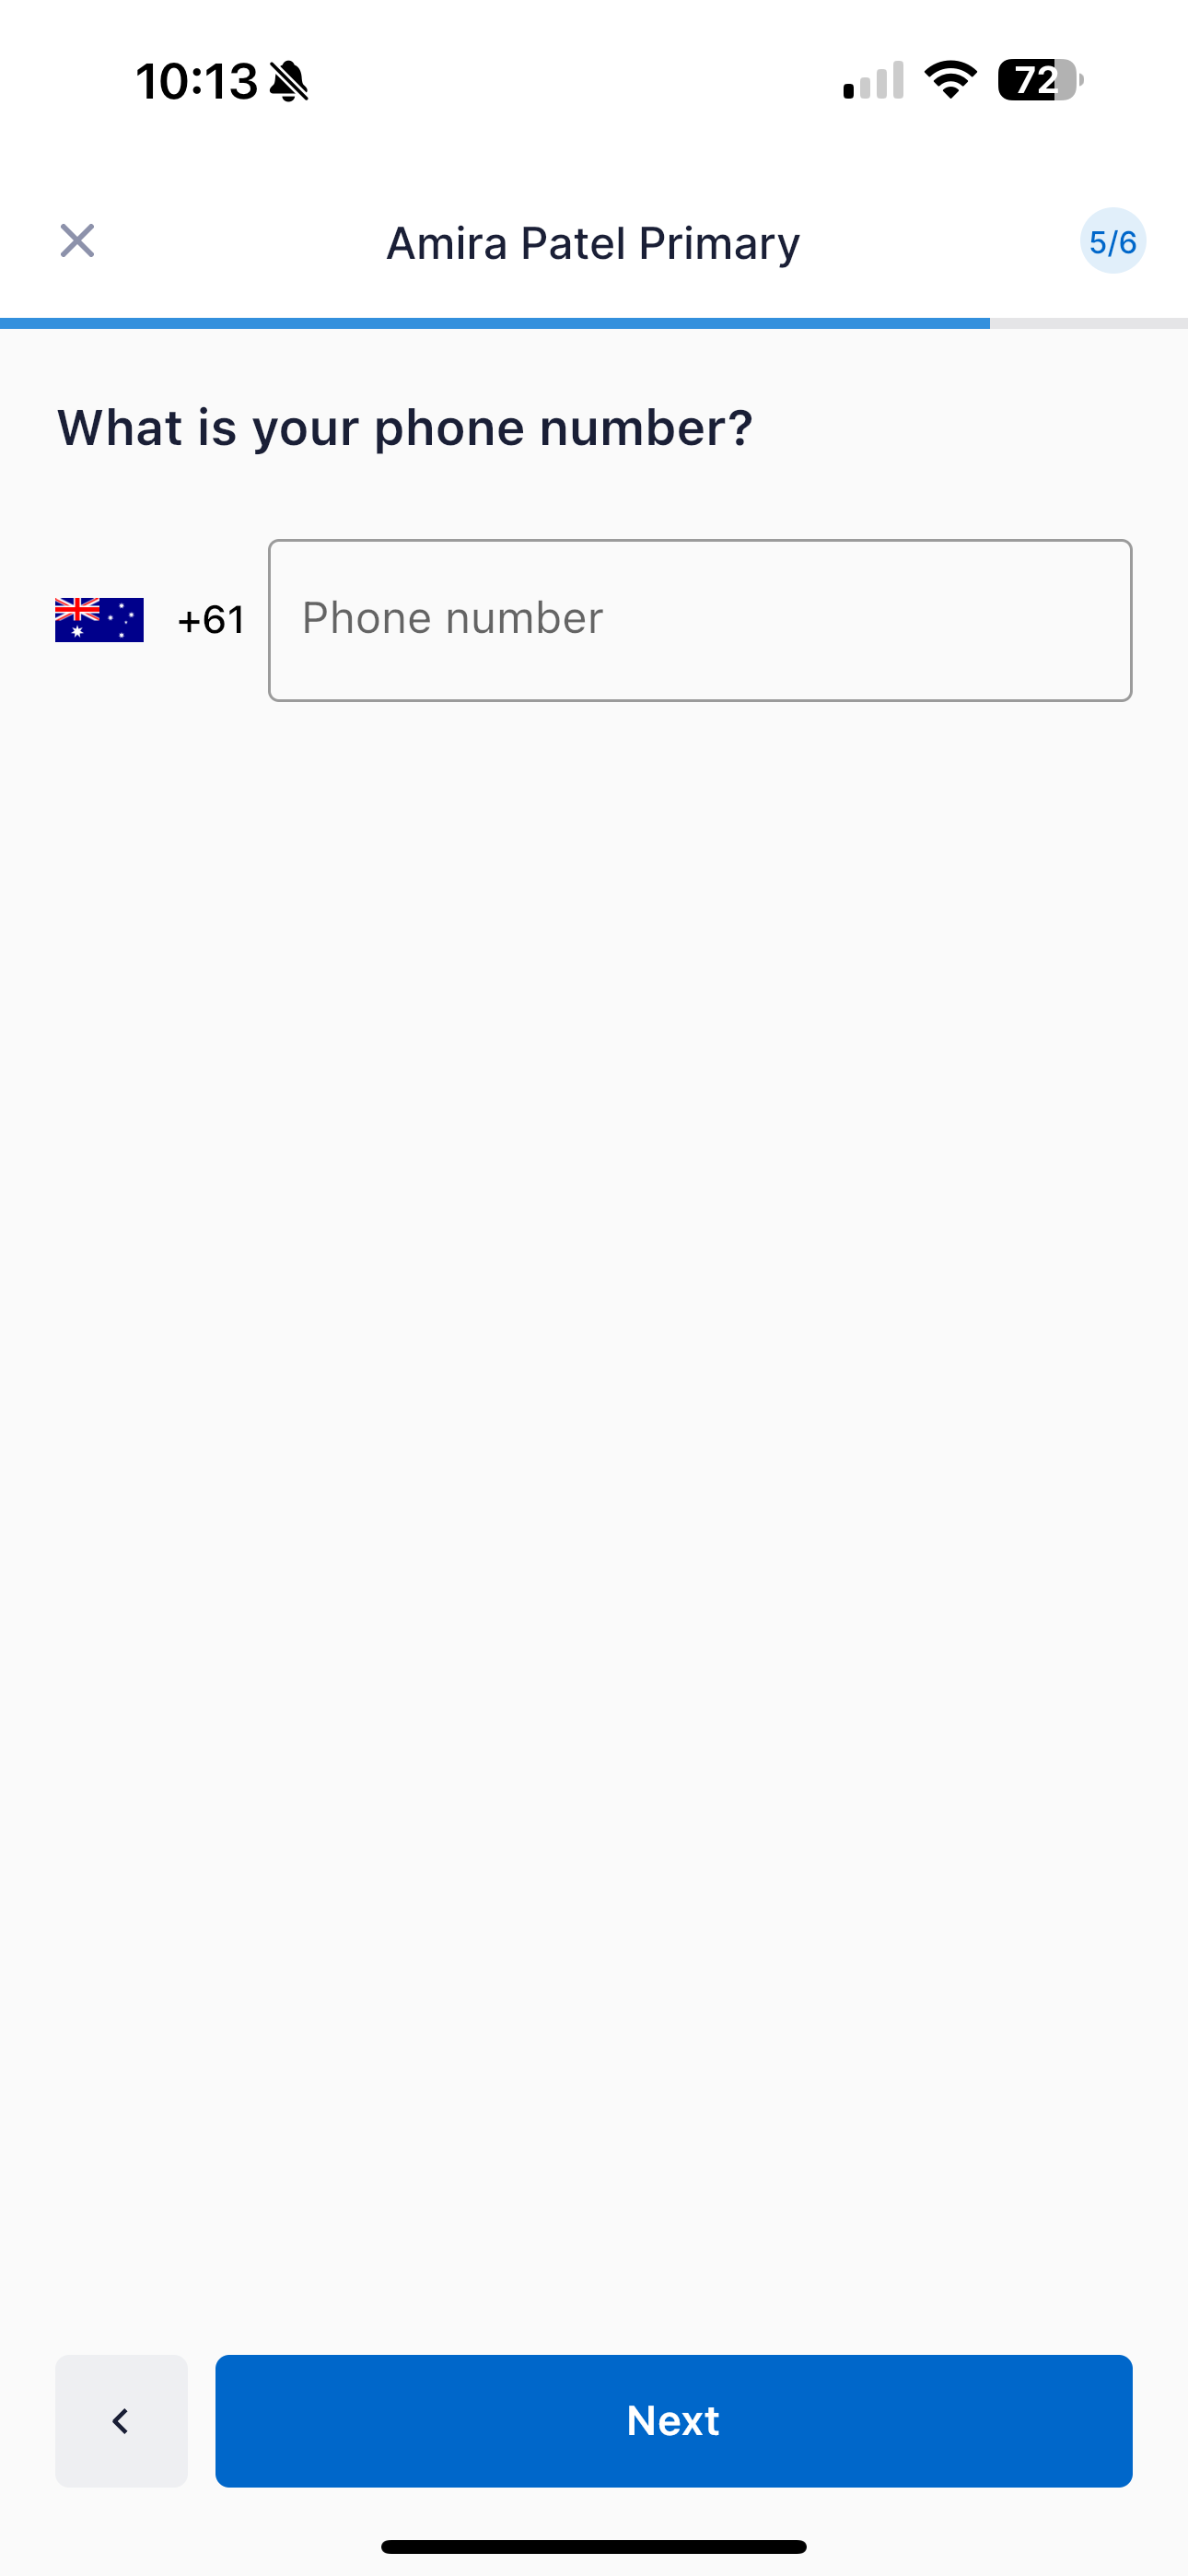
2. Enter your mobile phone number (don't forget the country code) and tap `Next`.
3. You will receive an SMS with your login code.
4. Enter the login code into the boxes provided.
5. After a few seconds, you will be logged in.

Note: Your code lasts for one hour. If you unexpectedly receive the `incorrect code` error, you may not be set up for accountless login.

</details>

{% hint style="info" %}
Having trouble logging in? See our [troubleshooting guide here](/everything-else/other-guides/trouble-logging-in).
{% endhint %}

## Canvassing

### 10 steps to canvass with FieldEdge

1. Select `Canvass` in the bottom menu.<br>
2. Press the `+ New Walk` button.<br>
3. Select the list you have been assigned.<br>
4. Tap `Start Walk`.<br>
5. Allow FieldEdge to access your location.<br>
6. The Blue *dot* is your current location – the Blue *pin* is the next household the app suggests to be canvassed – the Redish pins are households that are yet to be canvassed. *You can tap any household to switch to canvass it next.*<br>
7. Tap the Address in the bottom bar (or swipe up) to see whose behind the door.<br>
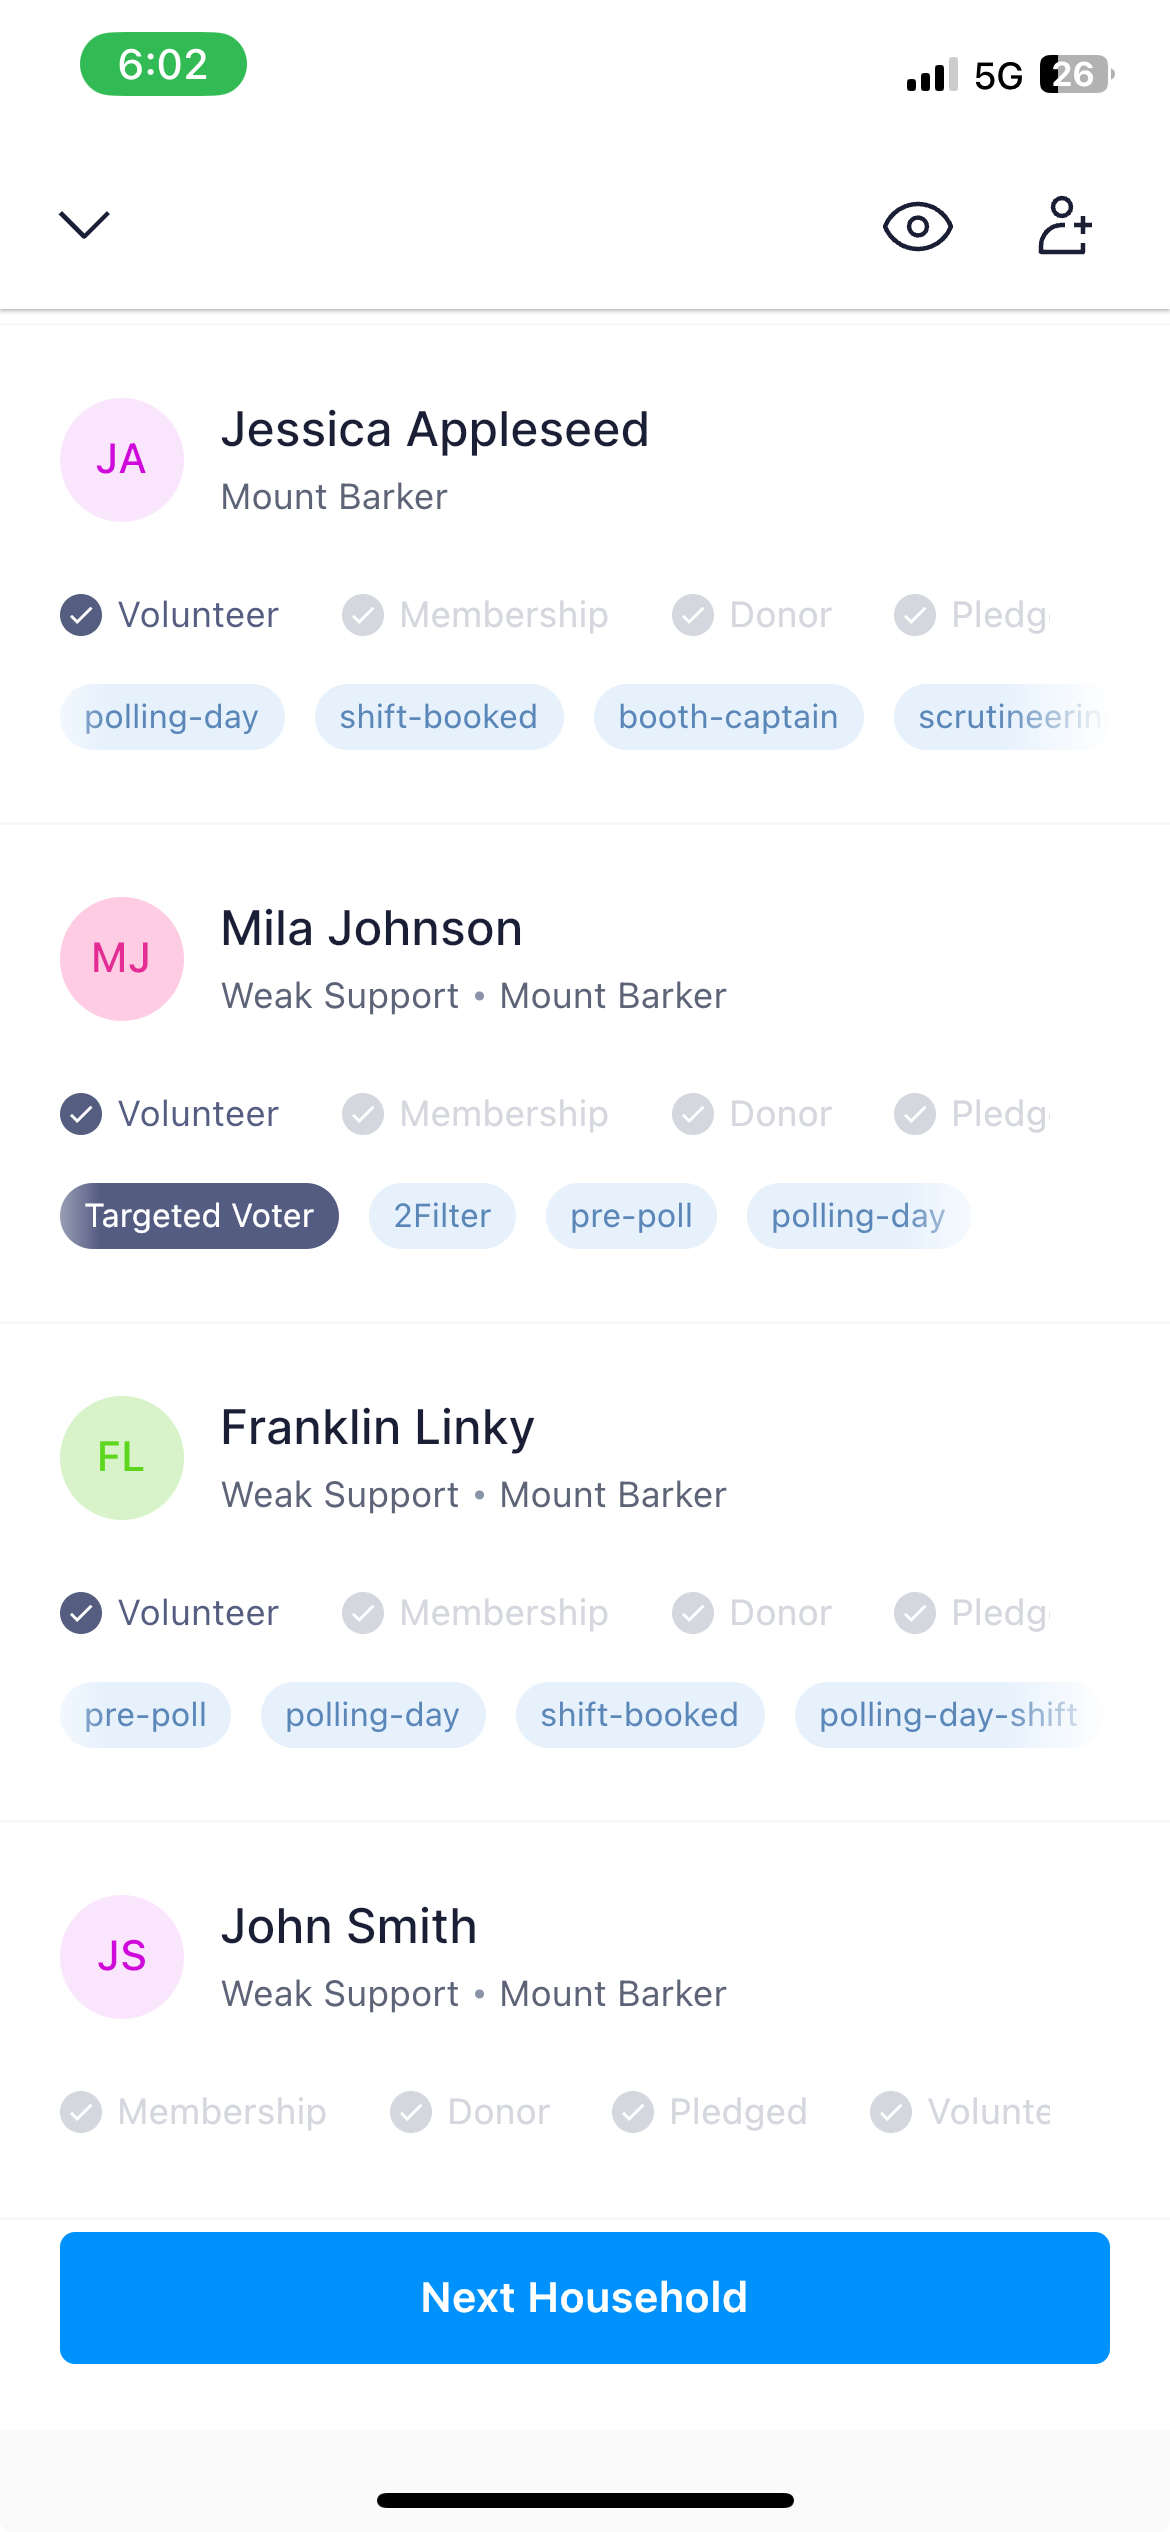
8. Tap `Start Household Canvass` to start canvassing without knowing who you're speaking / to canvass multiple people at once OR select the individual who answers the door.<br>
9. At the top of the screen, you will see the basic details of the person. Underneath, you can select the Contact Status (outcome), complete a survey, set the person's support level, and add notes as instructed by your campaign. Tap `Complete`.<br>
10. Tap `Next Household`. If you haven't canvassed everyone in the Household, you will be prompted to skip them.\ <br>

{% hint style="info" %}
The blue pin uses straight-line (“as the crow flies”) distance, not walking routes along streets—so if a closer door on foot is not suggested, tap that household on the map. More detail: [Route suggestions while canvassing](/everything-else/other-guides/route-suggestions-while-canvassing).
{% endhint %}

{% hint style="info" %}
**Want to customize this guide?** [**Download it on Google Docs here**](https://docs.google.com/document/d/18ibe2xPp4-NvLTCD9kGoqhCddQESP4mpIUk0-jGHetw/edit?usp=sharing)

After opening the doc go to the `File` menu and select `Make a copy`
{% endhint %}

## Making Calls

If you're using FieldEdge to make calls, you'll want to navigate to the `Call Time` menu. See our [**Product Tour**](/product-tour-or-mobile-app/call-time) to explore the app's capabilities.

## Mobile CRM

If you're using FieldEdge as a mobile CRM, you'll want to navigate to the `People` menu. See our [**Product Tour**](/product-tour-or-mobile-app/people) to explore the app's capabilities.


# Team Setup

Learn how to get your team up and running with FieldEdge

{% hint style="warning" %}
Due to the limitations that our tight integration with NationBuilder imposes, understanding how teams work and how FE + NB can be customized to suit your needs, can be a little tricky. We do our best to demystify it as much as possible.
{% endhint %}

FieldEdge is designed to work exclusively with NationBuilder and heavily relies on its native login system to allow direct data sync between your nation and your teams' devices. This means each person on your FieldEdge Team will require a NationBuilder login with control panel access or be set up as an Accounteless user.

FieldEdge users can fall into 3 different buckets. Each type comes with unique functionality and is suitable for different roles in your campaign.

Each user type can have a separate App Customization experience.

{% hint style="info" %}
Accountless login is not available on all plans
{% endhint %}

## **Users Types**

**We recommend reviewing the 3 user types below to understand which best fits your needs:**

<details>

<summary>Default (NationBuilder)</summary>

**For users with a NationBuilder login who don’t need access to the FieldEdge HQ Dashboard**

* Anyone with a login to your Nation (and permission set that [**meets our minimum requirements**](/team-setup/permission-sets)) can log in to FieldEdge and will be considered a Default User.
* Their access to Contacts will be influenced by their NationBuilder permission set.
* Does not need to be added or invited outside of NationBuilder.
* Lists are assigned in NationBuilder – restricting access can be nuanced and cumbersome.
* The same list cannot be assigned to multiple users simultaneously.

</details>

<details>

<summary>Campaign Manager</summary>

**For users who need access to the FieldEdge HQ Dashboard and optionally the mobile app with their NationBuilder login**

* To login to the mobile app: requires a NationBuilder login with a permission set that [**meets our minimum requirements**](/team-setup/permission-sets) (the Admin permission set meets these requirements by default) to log in to the mobile app.
* Needs to be invited by another Campaign Manager.
* Best for regular, trusted staff with the Admin permission set in NationBuilder

</details>

<details>

<summary>Accountless</summary>

**For users without a NationBuilder account**

* User will sign in with their mobile number.
* Needs to be added by a Campaign Manager in FieldEdge HQ Dashboard.
* Best for volunteers who should have a heavily filtered experience.
* Lists are assigned via NB Dashboard.
* The same list can be assigned to multiple users simultaneously.
* Not available on all plans.

</details>

### Deciding which User Type is right for each of your user types

<table><thead><tr><th width="159">...</th><th>Accountless</th><th>NationBuilder: Default</th><th>NationBuilder: Field Manager</th></tr></thead><tbody><tr><td></td><td><strong>For users without a NationBuilder account</strong></td><td><strong>For users with a NationBuilder login who don’t need access to the FieldEdge HQ Dashboard</strong></td><td><strong>For users who need access to the FieldEdge HQ Dashboard and optionally the mobile app</strong></td></tr><tr><td>Best suited to</td><td>Transient Volunteers</td><td>Trusted Volunteers &#x26; Staff</td><td>Managers &#x26; Candidates</td></tr><tr><td>Benefits</td><td>✅ Login without a NB account – no need to invite, create password, etc.<br><br>✅ Easily add people to your campaign from a mobile device (in the field).<br><br>✅ Restricted access by default.<br><br>✅ Easy to manage list assignment.<br><br>✅ A lists can easily be assigned to more than one person at a time.</td><td>✅ Reuse existing NationBuilder login.<br><br>✅ Assign lists in NB as you create them.</td><td>Same as Default.</td></tr><tr><td>Trade-offs &#x26; Considerations</td><td>❌ All Activity in NationBuilder will be logged/shown as from the master account you used to connect to FiedEdge.<br><br>✅ FieldEdge reports will show individual user data.<br><br>🔶 Can't access Mobile CRM and open full profiles<br><br>❌ In some <em>rare</em> cases, a nation can disconnect from FieldEdge, breaking Accountless login until it is reconnected manually by a Field Manager.</td><td>🔶 Requires a NationBuilder account in your nation. Some customers choose to pre-create logins for transient volunteers.<br><br>❌ Hard to add people from a mobile device (in the field).<br><br>❌ Has to be invited via email using NB and has accept the invite by creating a password<br><br>❌ A lists can only be assigned to multiple people using Groups or Permission sets</td><td>Same as Default.</td></tr></tbody></table>

## Adding Users

### Default User

1. Ensure your [Permission Sets are compatible](/team-setup/permission-sets) with FieldEdge.
2. If you haven't done so already, [invite your users to NationBuilder](https://support.nationbuilder.com/en/articles/2360435-manage-control-panel-users).
3. Optionally, you can [send them an SMS](/product-tour-or-hq/team-management/default-users) with the mobile app download link, from the HQ Dashboard.

### Campaign Manager

To upgrade someone from a Default User to a Campaign Manager (thereby granting them access to FieldEdge HQ Dashboard, and providing them with any Campaign Manager-specific customization in the mobile app):

1. Ensure your [Permission Sets are compatible](/team-setup/permission-sets) with FieldEdge. The Admin permission set is compatible by default. Other permissions will need to be customized.
2. [Send them an invite via the FieldEdge HQ Dashboard](/product-tour-or-hq/team-management/campaign-managers). Optionally, you can [send them an SMS](/product-tour-or-hq/team-management/campaign-managers) with the mobile app download link at the same time.

{% hint style="success" %}
Note that Campaign Managers can be invited and log in to the FieldEdge HQ Dashboard using only their email address (NB account not required) – this can be useful for giving finance teams access to download invoices.
{% endhint %}

### Accountless User^

1. [Add the user as an Accountless user](/product-tour-or-hq/team-management/accountless-users), using their mobile phone number via the FieldEdge HQ Dashboard

^Not available on all plans

For further information, see:

{% content-ref url="/pages/YMzXjtMp7BQ4dt1OBjp5" %}
[Team Management](/product-tour-or-hq/team-management)
{% endcontent-ref %}

{% content-ref url="/pages/v8RKFiOxIVIyuLVivJAm" %}
[Permission Sets](/team-setup/permission-sets)
{% endcontent-ref %}

{% content-ref url="/pages/VO92lxFx8iDDkV9HeNTj" %}
[App Customization](/product-tour-or-hq/app-customization)
{% endcontent-ref %}

**If you would like more help with determining the right method for your security needs, please reach out to our friendly support team.**


# Permission Sets

Configure your NationBuilder Permission sets to work with FieldEdge

A NationBuilder Permission Set dictates what a group of Control Panel users can and can’t do within your Nation (and FieldEdge). In this article, you will learn the different Permission Set configurations we recommend based on your NationBuilder plan, use case, and requirements.

To ensure your (non-Admin) users can access the FieldEdge app, we need to ensure your Permission Sets [**meet the minimum configuration requirements**](#h_5f8ebd56ee).

## Creating/Modifying Your Permission Sets <a href="#h_41bd07acd9" id="h_41bd07acd9"></a>

NationBuilder has two default Permission sets: *Admin* and *Staffer*. By default, a user with the *Admin* set will have access to FieldEdge however a user with the ***Staffer*****&#x20;Set will not**.

The recommended permission set configuration is different depending on what NationBuilder Plan your organization is on:

#### **Pro or Enterprise Plan** <a href="#h_ffb5693dd1" id="h_ffb5693dd1"></a>

You have the ability to create custom Permission Sets, so we recommend you use the following configuration:

* For canvassers: create a new Permission Set called "Canvasser"
* For (non-Admin) staff: modify the existing "Staffer" Permission Set

This is just a simple recommendation and you do have the option to create additional Permission Sets to fit your unique situation (such as Paid vs Volunteer canvassers). If you would like any further advice, feel free to reach out.

#### Starter Plan <a href="#h_c108c7887b" id="h_c108c7887b"></a>

You do not have the ability to create custom Permission Sets, so we recommend adjusting the Staffer permission set to allow FieldEdge access for non-Admin users.

## The minimum Permission Set requirements <a href="#h_5f8ebd56ee" id="h_5f8ebd56ee"></a>

There are **3 minimum requirements/adjustments required** for a Permission Set to be suitable for use with FieldEdge:

1. The **`People`** dropdown must be set to **`Everyone`** or **`Assigned`** (more on this below)
2. Under the **`API`** heading, **`Sign into apps`** must be ticked
3. Under the **`Website`** heading, **`Create and edit pages`** (more on this below)

![](https://downloads.intercomcdn.com/i/o/453105841/c0af079443eb75ba4ccc8559/Screen+Shot+2022-01-18+at+2.10.17+pm.png)

**Important note about using the "Create and edit pages" permission:**

NationBuilder explains this permission as so:

*"The ability to create and edit new website pages. Includes the ability to edit pages for which you are the author. Does not include the ability to publish pages or edit pages written by control panel users."*

What does this mean? A user with this permission could log in to the NationBuilder website and create a new page. However, this page couldn't be published on your website. If your NationBuilder website happens to have Public Profiles, they could edit other people's profiles. We consider this a very low-risk trade-off.

***

## Restricting access (for volunteers and other users) <a href="#restrict-access-for-volunteers-and-other-users" id="restrict-access-for-volunteers-and-other-users"></a>

To help secure your data and offer user-friendly experience, FieldEdge/NationBuilder offer the ability to restrict contacts and fields based on the user type. Please see our [Restricting Access](/team-setup/restricting-access) guide.

<br>


# Restricting Access

Restrict access to the Contacts and data users can access

Restricting access to the Contacts and data users can access is an advanced topic with many moving parts between FieldEdge and NationBuilder.

Depending on how the users logs in, contacts are assigned differently. To help understand the advantages and disadvantanges of each login type, [see our Team Setup guide](/team-setup).

If you would like more help with determining the right method for your security needs, please reach out to our friendly support team.<br>

## Restricting Data Fields

NationBuilder does not provide a way to show or hide specific fields. That's why FieldEdge created our App Customization. If you wish to hide certain fields, see [App Customization](https://docs.fieldedgeapp.com/en/articles/5358535-customized-app-experience-beta).

## Restricting Contacts in Database

Depending on how the users logs in, access to Contacts is restricted differently:

### Accountless Login

Accountless users can be assigned *all lists* (not recommended), *specific lists or no lists* via the FieldEdge HQ Dashboard. [You can find more info here](/guide-to-canvassing-and-calls/setup-and-core-workflows/assigning-walk-lists#accountless-users).\
\
They will only have access to the Contacts on the lists that have been assigned to them and they can only access those lists via Canvass Walks and Call Time sessions. The Mobile CRM (People tab) is turned of for Accountless users.

### NationBuilder Login

{% hint style="info" %}
While this method provides extra security, it adds a lot of overhead and other complexities to managing lists and access to data due to some limitations of NationBuilder. We hope NB will solve this complexity soon.
{% endhint %}

If you plan to have casual volunteers use FieldEdge and have decided against Accountless users, but still wish to minimize the number of contacts they have access to, read on...

To achieve this, you can customize a Permission Set to turn off access to NationBuilder on the web and only show the people in your nation who are assigned to them (they are the point person).

Head to the Permission Set you are editing, find the "People" dropdown (right at the top), and switch it to “Assigned”. Now, untick all other options aside from the minimum Permission Set requirements mentioned above.

**Important notes about using the "Assigned" feature:**

1. To make people visible in FieldEdge (and NationBuilder), you’ll need to ensure that the user is set as the point person for each person on their list. The easiest way to do this is to do a batch update on the list (see below).<br>
2. While a list can be shared with a whole permission set (a group of people), each person on a list can only be assigned a single point person. This means that if using the "Assigned" feature, you will need to create a different list for each user. That list can however contain the same people.

### Assign people on your list a point person

**NationBuilder currently requires this when using the "Assigned" permission set feature**

The “Assigned” permission set option in NationBuilder gives those people the ability to see and interact only with profiles assigned to them in the People section.

If you’re using the “Assigned” feature with FieldEdge, you’ll need to ensure that the user is set as the point person for each person on their list.

While the point person can assigned via the Edit tab of a person, we can can update an entire list at once by using the Batch Update feature:

1. Edit the list (for example, the one you are assigning to a canvasser)
2. Head to the Batch Update tab
3. Find the Point person field and select the canvasser in the list
4. Now, hit “Update All” button to apply the change to everyone on the list.

All of the people in that list are now assigned to the canvasser and will be visible in FieldEdge.

Note: While a list can be shared with a whole permission set (a group of people), each person on a list can only be assigned a single point person. This means that if using the “Assigned” feature, you will need to create a different list for each canvasser. That list can however contain the same people.

{% hint style="info" %}
**A note on NationBuilder Groups + FieldEdge**

With NationBuilder's Group feature, you can create one or more Groups of control panel users. A Group can be assigned one or more lists. When restricting access (using the "restricted" permission), a Group can provide access to the people on the Group's Lists.

While this is an amazing feature in theory for restricting access in the field – unforteuntly, as of today, NationBuilder doesn't provide access to the list itself which breaks traditional list based canvassing. We hope in the future this will be rectified so FieldEdge customers can use the power and ease of Groups.
{% endhint %}


# Migrating to v3

Guide to migrating from FieldEdge v2 to v3

{% hint style="warning" %}
As of **Nov 1, 2023 FieldEdge 2 may no longer be available in the Google Play Store** (and may be deleted from any existing device). We highly recommend migrating the v3 before that date.
{% endhint %}

{% hint style="success" %}
As of **Oct 17, 2023** **your FieldEdge 2 account has been migrated to FieldEdge 3**. You will be able to login to the HQ Dashboard using your email address and connect your nation.
{% endhint %}

The FieldEdge team has been working tirelessly to ensure a smooth transition to FieldEdge 3 for our existing customers. The following guide provides more details about how the transition will work.<br>

## **🚀 Making to Transition to 3.0**

### **In two simple steps...**

### **1. Connect Your Nation**

To get started, you will need to login to the new HQ Dashboard and connect/authenticate your nation. From Oct 17, you or anyone who previously had access to the FieldEdge Dashboard for your nation can login to our new HQ Dashboard here using an email address.

### **2. Download the App**

You and your users will need to download the FieldEdge 3 app from either the Apple App Store or Google Play Store. We recommended downloading the app yourself and logging in to make sure all is well before notifying your users.

The new app can be found by searching "FieldEdge 3" or you can [send yourself and your teammates a download link.](/product-tour-or-hq/team-management/default-users)

{% hint style="info" %}
**Please note:** FieldEdge 3 isn't fully backward compatible with FieldEdge 2. If you are sharing lists, we recommend moving all users to FieldEdge 3 at the same time to maintain household completion status across teams.
{% endhint %}

## Billing

**Our promise to you**: your pricing will remain the same for 6 months. You will now have access to our new, “Pro” plan which includes nearly all of our new features. After 6 months, you will have the option to downgrade to our “Starter” plan which includes the same features as our (now legacy) "Campaigner" plan.\
\
If you are currently on our Core plan (without canvassing) or canvassing year round, you may benefit from our new pricing that offers substantial discounts for annual upfront payments. Please reach out to learn more.

## 🦸 Exploring your new capabilities

FieldEdge 3 comes with many new power features. We encourage you to explore the product tours from the menu to learn more. Please bare with us while we update these tours and guides over the coming weeks.

## Thank you for support 🙏

We greatly appreciate your support and please remember, we are here to help.


# Migration Emails

<details>

<summary>Important Update: Transition to FieldEdge 3 Before Nov 1st | Sent Friday Oct 6, 2023</summary>

I am writing to let you know about critical changes to the FieldEdge app that may affect your campaign.

We very recently were made aware of a Google Play policy change that makes maintaining the current FieldEdge 2 Android app in the store untenable after Nov 1, 2023. For this reason, we will be recommending all customers transition to our all new platform, FieldEdge 3, before that date.

We understand that this information comes on short notice and potentially mid-campaign so we wanted to let you know right away to give you more time to prepare as needed. Detailed information about the transition process will be shared with you within the next 7 days.

Please know we are 100% committed to helping you complete a smooth transition.

* We anticipate the process should be fairly simple but will require your canvassers to download a new version of the mobile app.
* An easy to follow process is being devised and instructions will be provided.
* Our team will provide hands-on support and assistance, where required to make your move from FieldEdge 2 to FieldEdge 3 as seamless as we can.
* We will guarantee fair pricing for our customers who are transitioning to FieldEdge 3.

FieldEdge 3 has been in development for over 12 months and is the culmination of over 7 years of experience and feedback from the NationBuilder community. Built from the ground up for increased stability, Fieldedge 3 introduces powerful features for campaign managers as well as an upgraded, intuitive design that remains familiar to experienced FieldEdge users.

You can discover the new and powerful features of the [FieldEdge 3 platform here](https://3.fieldedgeapp.com/).

Should you have any questions or concerns, please don't hesitate to reach out to our support team. We appreciate your understanding and continued trust in our service.

Our team will be available to help you every step of the way. Please keep an eye out for our next email within the next 7 days where we will provide more details on how to successfully complete your transition.\
\
Does someone else need to know about these changes? [Sign-up for updates here.](https://asaildst.paperform.co/)<br>

Kind regards,

Ryan Anderson

</details>

<details>

<summary>FieldEdge 3 Transition Details for Oct 17 | Sent Friday Oct 13, 2023</summary>

[Following our last email](https://guides.fieldedgeapp.com/migrating-to-v3/migration-emails/important-update-transition-to-fieldedge-3-before-nov-1st), the team has been working tirelessly to ensure a smooth transition to FieldEdge 3 for our existing customers like you.

This new “FE3” platform is an exciting evolution which brings with it enhanced campaigning capabilities.

After the transition, you’ll get access to improved features such as expanded customization options, user permissions, reporting, offline capabilities, multiple lingual, accountless login, cold canvassing and more!<br>

So here’s the plan:

#### 1. Account Transition <a href="#h_b41d005cd2" id="h_b41d005cd2"></a>

Your FieldEdge 2 account will be migrated to FieldEdge 3 and ready for you to use from Oct 17.

To get started, you will need to login to the new HQ Dashboard and connect/authenticate your nation.

After which, you and anyone from your nation will be able to login to the mobile app using your NationBuilder account. The FieldEdge HQ Dashboard will be accessible to you and any other existing Dashboard users by signing in here using your email address.<br>

#### 2. App Download <a href="#h_5c90d312e6" id="h_5c90d312e6"></a>

Once you’ve confirmed you can login, prompt your team to download the FieldEdge 3 app. It can be found in the app stores by searching “FieldEdge 3” or you can send them a download link via the HQ Dashboard.

#### 3. Plans & Pricing <a href="#h_c42560c52c" id="h_c42560c52c"></a>

Our promise to you: your pricing will remain the same for 6 months. You will have access to our new, “Pro” plan which includes nearly all of our new features. After 6 months, you will have the option to downgrade to our “Starter” plan which includes the same features you have access to now at a similar or lower price or stay on the Pro plan at the regular pricing for this plan.

To summarize, from Tuesday Oct 17, your account will be available on FieldEdge 3. Two simple steps are required to get started:

1. Login to the HQ Dashboard and connect/authenticate your nation<br>
2. Have your team download the FieldEdge 3 app from the app stores

For further details, please [see our transition guide here](https://guides.fieldedgeapp.com/migrating-to-v3).

We're dedicated to supporting you throughout this transition and our team stands ready to answer your questions.

Here's to a powerful new chapter in your campaigning with FieldEdge 3!

Best,

Ryan Anderson\
Founder

<br>

PS. Does someone else need to know about these changes? [Sign-up for updates here](https://asaildst.paperform.co/)

</details>

<details>

<summary>Important: Your FieldEdge account has been migrated | Sent 18 Oct 2023</summary>

Your FieldEdge 2 account has now been migrated to FieldEdge 3.\
\
FieldEdge 3 brings with it new features such as expanded customization options, user permissions, reporting, offline capabilities, multiple lingual, accountless login, cold canvassing and more!\
\
If this is the first time hearing of the transition, please [see our previous emails here](https://guides.fieldedgeapp.com/migrating-to-v3/migration-emails).\
\
To complete your transition, please follow these steps:\
\
1\) You will need to login to the [new HQ Dashboard](https://hq.fieldedgeapp.com/login) and connect/authenticate your nation.\
\
After which, you and anyone from your nation will be able to login to the mobile app using your NationBuilder account. The FieldEdge HQ Dashboard will be accessible to you and any other existing Dashboard users by [signing in here using your email address](https://hq.fieldedgeapp.com/login).\
\
2\) Once you’ve confirmed you can login, prompt your team to download the FieldEdge 3 app.\
\
It can be found in the app stores by searching “FieldEdge 3” or you can send them a download link via the HQ Dashboard.\
\
\
For further details, please [see our transition guide here](https://guides.fieldedgeapp.com/migrating-to-v3).\
\
We have taken care in migrating each account, however, we can't be 100% sure everything was migrated perfectly so if you do have any issues at all, please reach out and we’ll make sure to get things right away.\
\
And as always, we love your feedback so don’t hesitate to send us your thoughts and ideas about the new platform.\
\
Best,\
\
Ryan Anderson\
\
\&#xNAN;*PS. In case you missed our promise to you regarding billing: your pricing will remain the same for 6 months. You will have access to our new, “Pro” plan which includes nearly all of our new features. After 6 months, you will have the option to downgrade to our “Starter” plan which includes the same features you have access to now at a similar or lower price or stay on the Pro plan at the regular pricing for this plan.*

</details>


# Canvassing Overview

Overview of setting up and running canvass operations with FieldEdge and NationBuilder

FieldEdge heavily leverages NationBuilder's infrastructure and tools to provide a "NationBuilder-native" experience. Setting up your walk happens primarily in NationBuilder. Reporting can be done in NationBuilder or using FieldEdge's FieldEdge Performance reports.

{% embed url="<https://www.youtube.com/watch?v=WFCxUcy5tuY>" %}

## Adding Your Team

If you are making calls with others who are not NationBuilder Admins, it is essential you follow our [Team Setup guide](/team-setup).

{% hint style="info" %}
The Canvass menu can be hidden for some user types in [App Customization](/product-tour-or-hq/app-customization).
{% endhint %}

## Start Canvassing

* To start canvassing a list of people, create a list in NationBuilder and assign it (see below)
* You can also create walk lists on the fly:
  * To canvass people in your nation, based on your current location, you can use our Proximity Walk feature
  * To build your list from scratch, you can use our Cold Walk feature

**Further reading:**

{% content-ref url="/pages/JcDgVIibo16Jdozw6fDZ" %}
[Creating walk lists](/guide-to-canvassing-and-calls/setup-and-core-workflows/creating-walk-lists)
{% endcontent-ref %}

{% content-ref url="/pages/MenW6sqJfa4Lxa0ZdyQM" %}
[Create walk lists on the fly](/guide-to-canvassing-and-calls/setup-and-core-workflows/create-walk-lists-on-the-fly)
{% endcontent-ref %}

## Assigning a traditional list

After you have created your (traditional) walk lists in NationBuilder, you'll want to assign your list to your canvassers. Depending on how the users logs in, lists are assigned differently:

* **NationBuilder login:** assign in NationBuilder
* **Accountless login**: assign in FieldEdge HQ

This will enable them to access the list via the mobile app.\
\
\*Note: NationBuilders Admins will have access to all lists in FieldEdge\
\
We recommend a separate list, under 500 people, be created for each canvasser. It is possible however for multiple people to share a list (when it is assigned to a permission set, group or if using Accountless login).\
\
**Further reading:**

{% content-ref url="/pages/6eZLJCfFmU556hKfjKWr" %}
[Assigning walk lists](/guide-to-canvassing-and-calls/setup-and-core-workflows/assigning-walk-lists)
{% endcontent-ref %}

## Working with surveys

You may want to include a survey as part of your canvassing workflow. FieldEdge uses native NationBuilder surveys. To use your NationBuilder survey in FieldEdge, you'll need to assign it to an unlisted Survey Page.

**Further reading:**

{% content-ref url="/pages/3SZVhjs9kO1TKL33CutY" %}
[Adding a survey](/guide-to-canvassing-and-calls/setup-and-core-workflows/adding-a-survey)
{% endcontent-ref %}

{% content-ref url="/pages/lMq662Odh6QZx1I3Il0h" %}
[Viewing survey results](/guide-to-canvassing-and-calls/reporting/viewing-survey-results)
{% endcontent-ref %}

## Reporting Canvass Activity

Once you start walking, you may want to track who has been canvassed and the performance of your field efforts. This can be done in NationBuilder filters or using FieldEdge's more comprehensive [Performance ](/product-tour-or-hq/performance)reporting.\
\
**Further reading:**

{% content-ref url="/pages/82jnaqjsSuiKrOqivSLO" %}
[Reporting](/guide-to-canvassing-and-calls/reporting)
{% endcontent-ref %}

{% content-ref url="/pages/81skv3NJj2yndoj1ERkb" %}
[Performance](/product-tour-or-hq/performance)
{% endcontent-ref %}


# Call Time Overview

Overview of setting up and running phone banking sessions with FieldEdge and NationBuilder

FieldEdge heavily leverages NationBuilder's infrastructure and tools to provide a "NationBuilder-native" experience. Setting up your call lists happens primarily in NationBuilder. Reporting can be done in NationBuilder or using FieldEdge's FieldEdge Performance reports.

## Adding Your Team

If you are making calls with others who are not NationBuilder Admins, it is essential you follow our [Team Setup guide](/team-setup).

{% hint style="info" %}
The Call Time menu can be hidden for some user types in [App Customization](/product-tour-or-hq/app-customization).
{% endhint %}

## Start Calling

* To start calling a list of people, create a list in NationBuilder and assign it (see below)

**Further reading:**

{% content-ref url="/pages/nJbNJXUZRjWqAOk0rxbj" %}
[Creating call lists](/guide-to-canvassing-and-calls/setup-and-core-workflows/creating-call-lists)
{% endcontent-ref %}

## Assigning a call list

After you have created your (traditional) call lists in NationBuilder, you'll want to assign your list to your callers. Depending on how the users logs in, lists are assigned differently:

* **NationBuilder login:** assign in NationBuilder
* **Accountless login**: assign in FieldEdge HQ

This will enable them to access the list via the mobile app.

\*Note: NationBuilders Admins will automatically have access to all lists in FieldEdge\
\
We recommend a separate list, under 500 people, be created for each call session. It is possible however for multiple people to share a list (when it is assigned to a permission set, group or if using Accountless login).\
\
**Further reading:**

{% content-ref url="/pages/93hqYJhwEAZlnk8b4JAr" %}
[Assigning call lists](/guide-to-canvassing-and-calls/setup-and-core-workflows/assigning-call-lists)
{% endcontent-ref %}

## Working with surveys

You may want to include a survey as part of your call workflow. FieldEdge uses native NationBuilder surveys. To use your NationBuilder survey in FieldEdge, you'll need to assign it to an unlisted Survey Page.

**Further reading:**

{% content-ref url="/pages/3SZVhjs9kO1TKL33CutY" %}
[Adding a survey](/guide-to-canvassing-and-calls/setup-and-core-workflows/adding-a-survey)
{% endcontent-ref %}

{% content-ref url="/pages/lMq662Odh6QZx1I3Il0h" %}
[Viewing survey results](/guide-to-canvassing-and-calls/reporting/viewing-survey-results)
{% endcontent-ref %}

## Reporting Call Time Activity

Once you start calling, you may want to track who has been called and the performance of your field efforts. This can be done in NationBuilder filters or using FieldEdge's more comprehensive [Performance ](/product-tour-or-hq/performance)reporting.\
\
**Further reading:**

{% content-ref url="/pages/82jnaqjsSuiKrOqivSLO" %}
[Reporting](/guide-to-canvassing-and-calls/reporting)
{% endcontent-ref %}

{% content-ref url="/pages/81skv3NJj2yndoj1ERkb" %}
[Performance](/product-tour-or-hq/performance)
{% endcontent-ref %}


# Setup & Core Workflows

Essential setup steps for canvassing and phone banking with FieldEdge

#### Explore the following articles to understand how to set up your canvass

{% content-ref url="/pages/JcDgVIibo16Jdozw6fDZ" %}
[Creating walk lists](/guide-to-canvassing-and-calls/setup-and-core-workflows/creating-walk-lists)
{% endcontent-ref %}

{% content-ref url="/pages/MenW6sqJfa4Lxa0ZdyQM" %}
[Create walk lists on the fly](/guide-to-canvassing-and-calls/setup-and-core-workflows/create-walk-lists-on-the-fly)
{% endcontent-ref %}

{% content-ref url="/pages/6eZLJCfFmU556hKfjKWr" %}
[Assigning walk lists](/guide-to-canvassing-and-calls/setup-and-core-workflows/assigning-walk-lists)
{% endcontent-ref %}

{% content-ref url="/pages/3SZVhjs9kO1TKL33CutY" %}
[Adding a survey](/guide-to-canvassing-and-calls/setup-and-core-workflows/adding-a-survey)
{% endcontent-ref %}

{% content-ref url="/pages/dhgga5CFJ3ziTG65rvNn" %}
[Batch update a list in NationBuilder](/everything-else/other-guides/batch-update-a-list-in-nationbuilder)
{% endcontent-ref %}


# Creating walk lists

Planning to canvass your people in your database? Learn how to create walk lists in NationBuilder and sync them to FieldEdge

To canvass a pre-defined list of people using FieldEdge, you will need to create a walkable list in NationBuilder and share it will your canvassers.

#### In this article you will learn how to: <a href="#in-this-article-you-will-learn-how-to" id="in-this-article-you-will-learn-how-to"></a>

* Create effective lists for use with FieldEdge
* Use the Map View and Turf Cutter tools in NationBuilder
* Finding people who match your target criteria
* Share your list with different users
* Sync your lists to the FieldEdge mobile app
* Included others from Household in your list

### Our recommendations for effective lists <a href="#h_104803077a" id="h_104803077a"></a>

1. Use the Map View and Turf Cut tool in NB to create your walk lists
2. For optimal performance, keep your lists under 300 people (under 500 max)
3. Create lists for small areas of each neighbor so they can be assigned to a single canvasser at any one time. If the canvasser stops before they are done with the list, simply reassign it to a new canvasser.
4. Assign each list to a person so only they can see that list, this keeps it simple for your canvassers. Alternatively, you can assign the list to a whole Permission Set (eg. "Canvass Volunteers") and simply tell them which list they should be canvassing (eg. "Jane, please canvass the list "Broadway swing voters #1".

### Using the Map View and Turf Cutter <a href="#using-the-map-view-and-turf-cutter" id="using-the-map-view-and-turf-cutter"></a>

Turf cutting is the process of defining customized boundaries on a map. Once you cut turf, you can select the people within the turf and save them to a list that can be used in FieldEdge. This process makes canvassing more manageable.

**Note:** to ensure optimal performance, we recommend keeping your list under 300 people

Watch NationBuilder’s walkthrough of turf cutting:

{% embed url="<https://youtu.be/EUFiNtU1JB0?si=WtisXqVB6bQ1aqfp>" %}

#### Go to the Map View <a href="#go-to-the-map-view" id="go-to-the-map-view"></a>

Login to your nation and click on the People tab/menu at the top.

Now look for the toolbar area and scan along until you see a pin icon – clicking this will take you to the Map View.

<figure><img src="https://fieldedge-9b4d4aa4d5d1.intercom-attachments-1.com/i/o/482844253/1a13fb3afaf09508a0390989/p8yx-2Fpreview-2F45254041-2Fmain_large.gif" alt=""><figcaption></figcaption></figure>

#### Cutting Turf <a href="#cutting-turf" id="cutting-turf"></a>

When you click the `Turf Cut` button, it will turn blue to indicate you are in turf-cutting mode. If you are in cluster view, you can change the boundaries of the clusters. Click the `Clear turfs` button at the bottom of the map and the clusters will disappear. You can define your own turfs, but when you begin, you won't see points on the map.

The easiest way to turf cut is to zoom in until you see points. Then, click the `Turf Cut` button. When you hover over the map, your cursor will look like a cross.

1. Click your mouse once to create the beginning point of the turf, which will display as a white box.
2. Drag your cursor and continue clicking to create the boundaries of your turf - it can be any shape that makes sense for your needs.
3. The points of people included in the turf will be highlighted in white.
4. Double-click to connect your last boundary to your starting point.
5. Repeat steps 2-5 until your entire map is turf-cut.
6. If you begin cutting turf and decide the shape is incorrect, press the escape key to cancel that turf.
7. Turn the turf cut tool off by clicking the `Turf Cut` button - it will turn grey.
8. Save your turfs as lists. To do so, click within the turf area and a pop-up will appear:

<figure><img src="https://fieldedge-9b4d4aa4d5d1.intercom-attachments-1.com/i/o/482844257/d577e0956790aaabed53577d/z8yx-2Fpreview-2F45254051-2Fmain_large.gif" alt=""><figcaption></figcaption></figure>

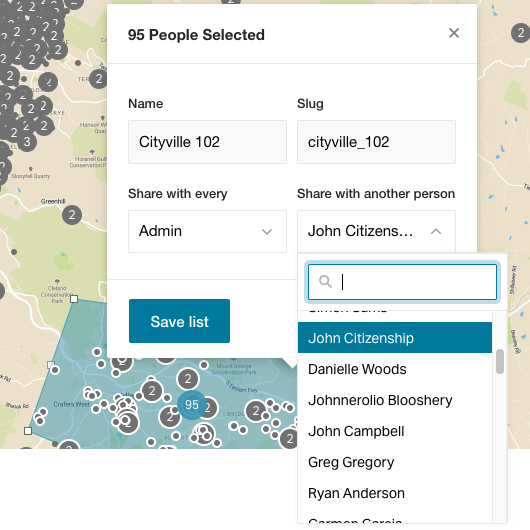
Here you can name the list, provide a slug, and share it with other control panel users. Make sure to click `Save list`**.**

You can find more information on [turf cutting on the NationBuilder website](https://support.nationbuilder.com/en/articles/2306507-how-to-use-map-view-and-turf-cut).

### Finding people who match your target criteria <a href="#h_aeb4be7392" id="h_aeb4be7392"></a>

Before you begin turf cutting and adding people to your list, you can use a filter to only show people on the map people who match your criteria. This may be people with:

* people in a specific district
* have been tagged in a certain way
* match criteria party or priority level
* donation amounts

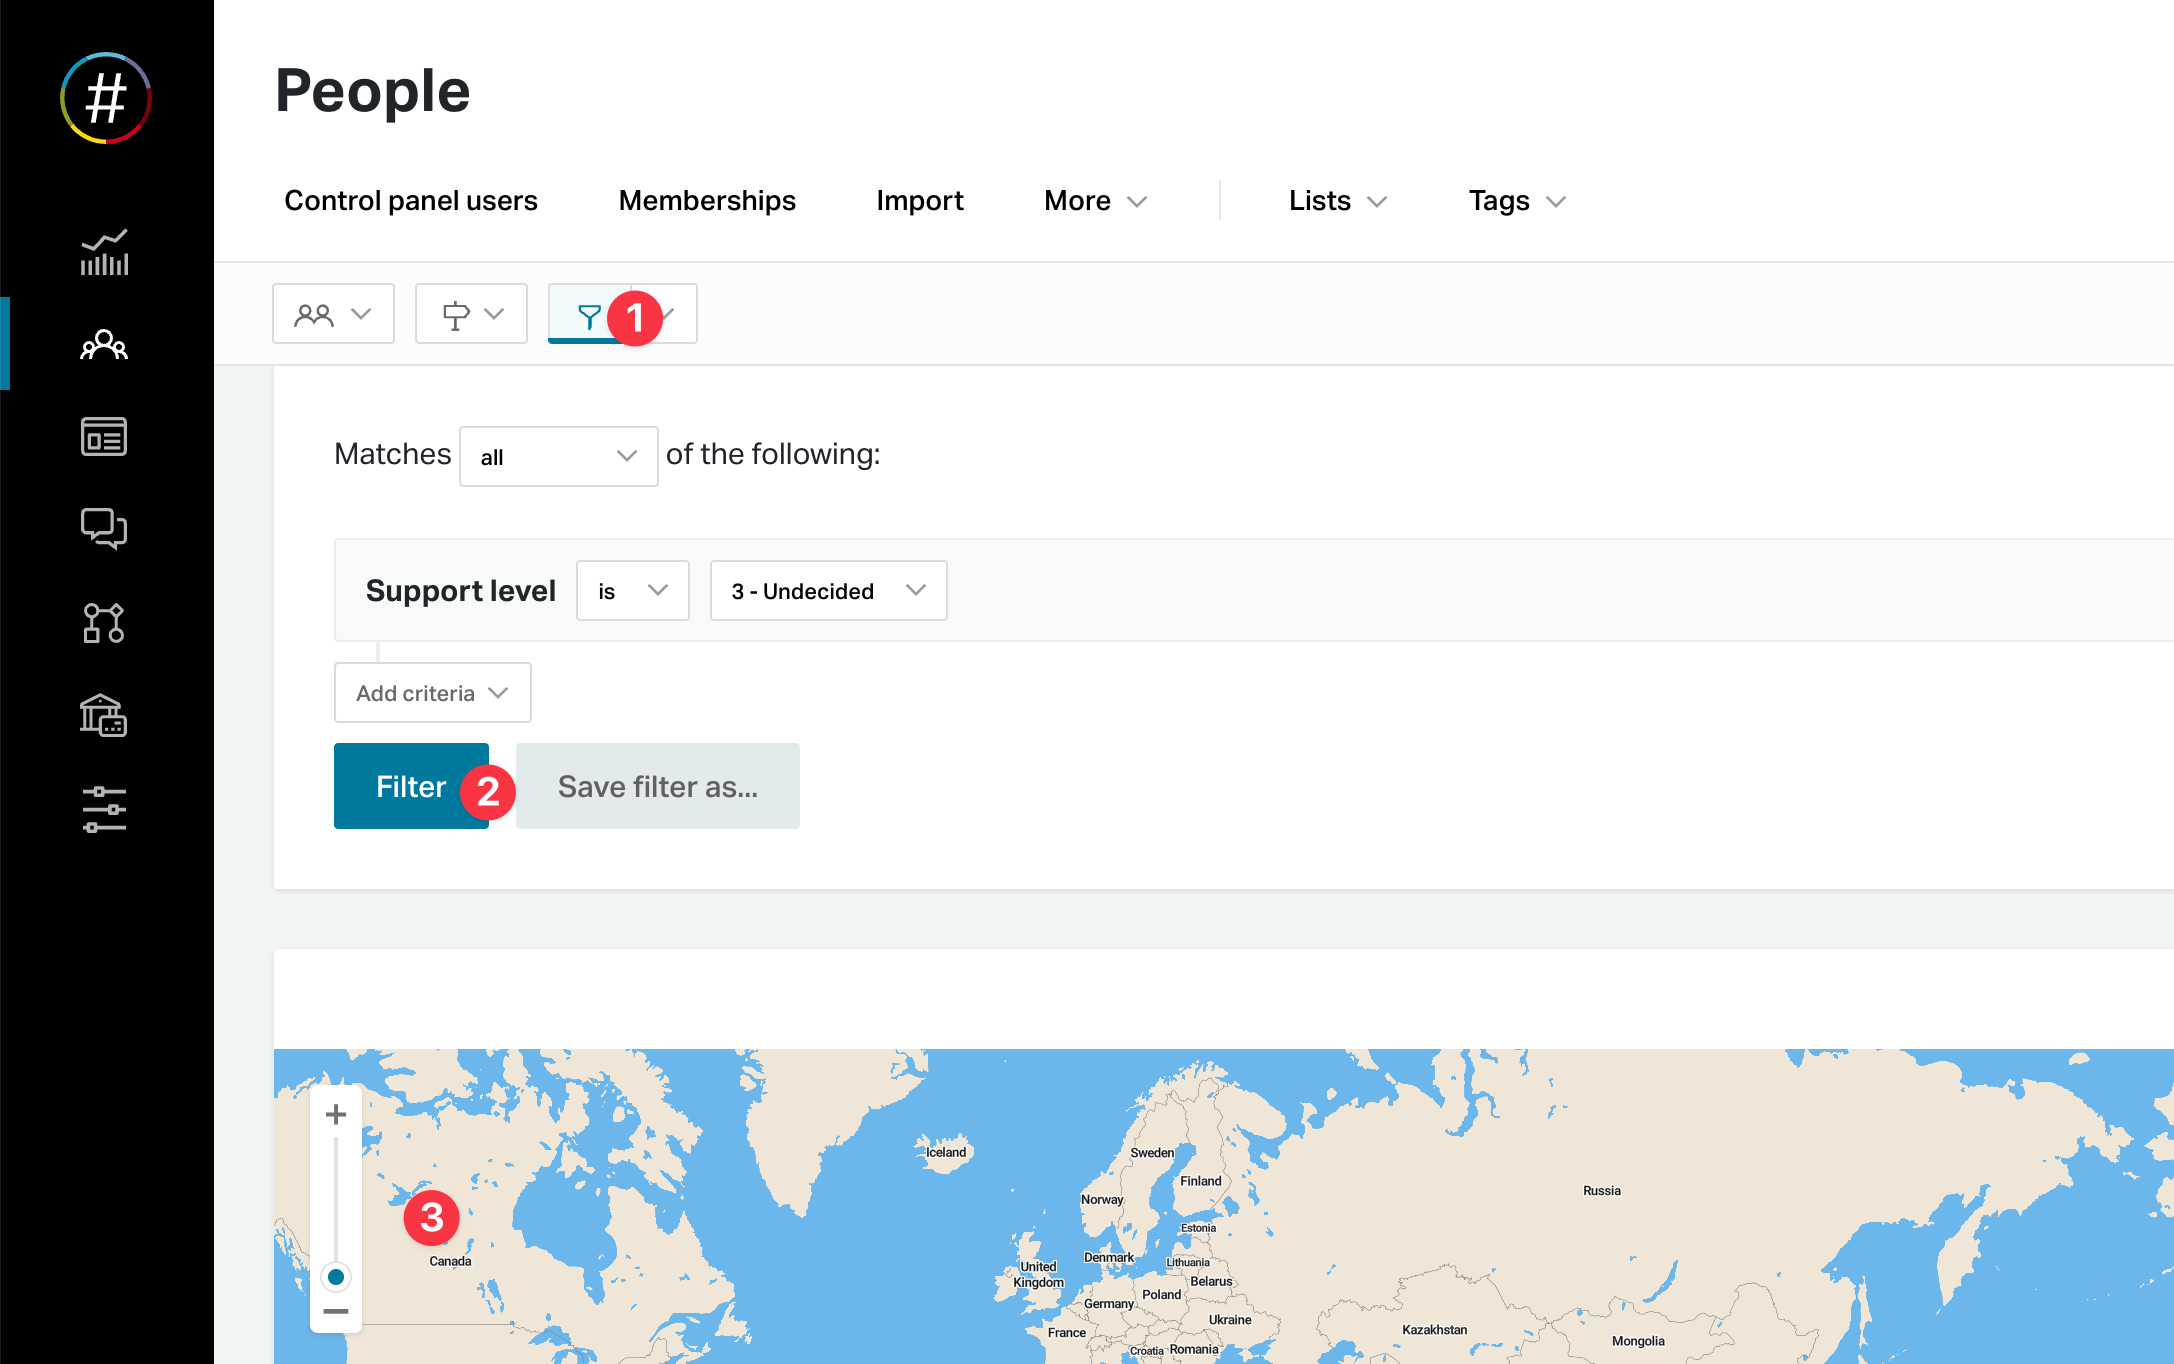
1. Above the map, click on the Filter button.
2. Add your criteria
3. Click filter

<figure><img src="https://3317596624-files.gitbook.io/~/files/v0/b/gitbook-x-prod.appspot.com/o/spaces%2Fmd1HR6LZFUYuK3fPHLXC%2Fuploads%2Fcf5W2A9sJn9mbiiJaud3%2FCleanShot%202024-01-18%20at%2012.40.50%402x.png?alt=media&amp;token=12f93454-c639-4493-8f42-9b0b83bd561e" alt=""><figcaption></figcaption></figure>

The people shown on the map should be filtered and ready to turf cut.

{% hint style="info" %}
Find more about [filtering and targeting people in NationBuilder](https://support.nationbuilder.com/en/articles/2306492-how-to-target-people)
{% endhint %}

### Assigning your list <a href="#h_aeb4be7392" id="h_aeb4be7392"></a>

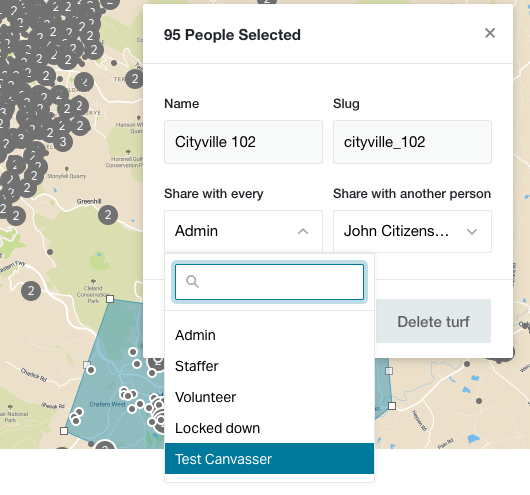
When saving (or editing) your list, you have the option to share your list with a group of people through permission sets or a specific control panel user. Regardless of what the settings are set to, all Admin users will have access to all lists.

When using the "share with another person", you can only assign a single control panel user.

**Learn more about** [**assigning call lists here**](/guide-to-canvassing-and-calls/setup-and-core-workflows/assigning-walk-lists)**.**

### Syncing your lists to the FieldEdge mobile app <a href="#h_2ac883bd95" id="h_2ac883bd95"></a>

Once you create your lists in NationBuilder and assign them to a person or permission set, they will automatically sync to FieldEdge and become available as a list to canvass.

Having trouble with lists? Please reach out to our friendly team, we're always here to help!

### Including other people from the Household <a href="#h_d6d019b9d7" id="h_d6d019b9d7"></a>

If you use filters to create your list, you may end up with households without all the residents who reside in that household.

For example, if you filter out *strong supporters* while turf cutting, you may end up turf cutting a household where the *wife* is a *weak supporter* and the *husband* is a *strong supporter.* When you are at the door, you will only see the *wife* but not the *husband*.

**Solution:** After creating your list, open the list and click on the *Household* tab. Now select the "Add X in households to list":

<figure><img src="https://downloads.intercomcdn.com/i/o/504929506/9d43609a42a43f79cb8498f4/Screen+Shot+2022-04-29+at+12.18.09+pm.png" alt=""><figcaption></figcaption></figure>

Don't see the Household tab? To turn householding in your nation, go to *Settings > Defaults > Basics*. Check the box next to Enable householding and click the Save settings button to save your changes. There is no charge for this feature.

{% hint style="success" %}
You can also create lists on the fly – [see our guide here](/guide-to-canvassing-and-calls/setup-and-core-workflows/create-walk-lists-on-the-fly).
{% endhint %}


# Creating call lists

Planning to make calls to people in your NationBuilder database? Learn how to create call lists in NationBuilder and sync them to FieldEdge

To call a pre-defined list of people using FieldEdge, you will need to create a list in NationBuilder and share it will your callers.

## Generating your list <a href="#create-a-list" id="create-a-list"></a>

### Finding people who match your target criteria <a href="#h_aeb4be7392" id="h_aeb4be7392"></a>

Before creating and adding people to your list, you can use a filter to find the people who match your criteria. This may be people with:

* phone numbers
* have been tagged in a certain way
* match criteria party or priority level
* donation amounts

1. In the People section, click on the Filter button.
2. Add your criteria
3. Click filter

The people shown should be filtered and ready to add to a list.

<figure><img src="https://3317596624-files.gitbook.io/~/files/v0/b/gitbook-x-prod.appspot.com/o/spaces%2Fmd1HR6LZFUYuK3fPHLXC%2Fuploads%2F2myfygB8A18J5li7m7jh%2FCleanShot%202024-01-18%20at%2012.35.27%402x.png?alt=media&amp;token=ff5cc834-92b6-48aa-926e-095dbdf700dc" alt=""><figcaption></figcaption></figure>

{% hint style="info" %}
Find more about [filtering and targeting people in NationBuilder](https://support.nationbuilder.com/en/articles/2306492-how-to-target-people)
{% endhint %}

###

### Creating the list and add people to

{% embed url="<https://www.youtube.com/watch?v=6ldTQE7dxZQ>" %}

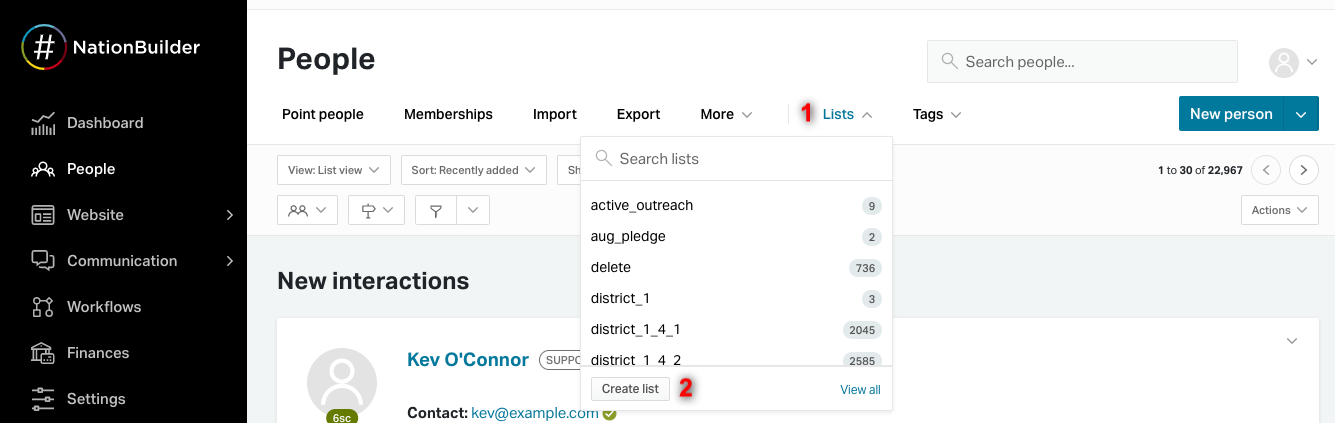
In the People section, when you click on the Lists tab, you can create a list.

1\. If you click on the word Lists, a widget will appear displaying your nation's lists.

<figure><img src="https://3317596624-files.gitbook.io/~/files/v0/b/gitbook-x-prod.appspot.com/o/spaces%2Fmd1HR6LZFUYuK3fPHLXC%2Fuploads%2FmthkHxJpGDsfAODfPBgP%2Fcreate-list-step1.png?alt=media&amp;token=1579e55d-1b3a-4208-bc7b-f13fdc305de1" alt=""><figcaption></figcaption></figure>

2\. Click + Create List.

3\. Type the name of your new list, and press the Create button. Your list will be created and appear in the widget menu.

4\. You can click Edit next to the name of your list to edit its settings or to delete the list. Edit will only appear next to the list names when you hover over its name.

{% hint style="info" %}
You can learn more about [creating/deleting lists & adding/removing people from them via NationBuilder](https://support.nationbuilder.com/en/articles/2305947-create-a-list)
{% endhint %}

## Assigning your list <a href="#h_aeb4be7392" id="h_aeb4be7392"></a>

When saving (or editing) your list, you have the option to share your list with a group of people through permission sets or a specific control panel user. Regardless of what the settings are set to, all Admin users will have access to all lists.

When using the "share with another person", you can only assign a single control panel user.

**Learn more about** [**assigning call lists here**](/guide-to-canvassing-and-calls/setup-and-core-workflows/assigning-call-lists)**.**

## Syncing your lists to the FieldEdge mobile app <a href="#h_2ac883bd95" id="h_2ac883bd95"></a>

Once you create your lists in NationBuilder and assign them to a person or permission set, they will automatically sync to FieldEdge and become available as a list to canvass.

Having trouble with lists? Please reach out to our friendly team, we're always here to help!


# Create walk lists on the fly

Create walk lists on the fly using Proximity Walk or Cold Walk

There are two ways you can allow your canvassers to create a walk list of the fly with no need to create a list in NationBuilder. In both of these scenarios, the end user is in control of creating these lists.

## Proximity Walk

With the Proximity Walk feature, canvassers can create lists on-the-fly based on your NationBuilder database and their current location. The user can set a radius to find people and filter the results by distance, assigned tags, support level, priority level and if the voter is assigned to the canvasser.

Results are shown in a list view or on a map, sorted by distance from your current location. You can then start a walk directly from these results.

## Cold Walk

In the case where you do not (yet) have access to a voter file or database of targets, you may want to build your own data from scratch, by knocking doors in the field and adding them to your nation.

Cold Walk allows you to start a walk without an existing list and add households and people as you walk.

Upon starting a Cold Walk, a NationBuilder list will be created automatically. Canvassers can add houses by tapping the "Add new household button" or by tapping a new household on the map.

After the house and person has been created, the household or person can be canvassed as normal.

{% hint style="info" %}
Creating walk lists on the fly is an [App Customizations](/product-tour-or-hq/app-customization) options and can be turned off for any of your [user types](/product-tour-or-hq/team-management).
{% endhint %}


# Assigning walk lists

Share NationBuilder lists with your canvassers

After you have created your (traditional) walk lists in NationBuilder, you'll want to assign your list to your canvassers. This will enable them to access the list via the mobile app.

**Depending on how the users logs in, lists are assigned differently:**

* [**NationBuilder** ](#nationbuilder-campaign-managers-and-default-users)**login:** assign in NationBuilder
* [**Accountless**](#accountless-users) **login**: assign in FieldEdge HQ

## NationBuilder (campaign managers & default users)

{% hint style="info" %}
If the user is a NationBuilder Admin, they will already have access to all lists in your nation so no action is required. If the user has another permission set, the following applies.
{% endhint %}

A list can be assigned to either an individual or a group.\
\
You can assign a list while turf cutting or after the fact, in the `Settings` tab.

Start by navigating to the `Settings` tab of the list you want to assign. When viewing all lists, you can access the Settings tab by clicking the pencil "edit" icon next to the list's name

Next, look at the top of the list and click on `Settings`.

{% tabs %}
{% tab title="Assign to an individual 🧍🏽‍♂️" %}
**We recommend assigning each list to a person so only they can see that list, this keeps it simple for your canvassers, however, it does require more work for you**.

<figure><img src="https://3317596624-files.gitbook.io/~/files/v0/b/gitbook-x-prod.appspot.com/o/spaces%2Fmd1HR6LZFUYuK3fPHLXC%2Fuploads%2FHBWFw8HENLzKnH3E8jNY%2FScreen%20Shot%202022-11-25%20at%201.24.18%20pm.png?alt=media&amp;token=a297a0fe-7536-4e5d-9074-ab3ce04859a9" alt=""><figcaption><p>In the field labeled 'Share with another person,' enter the person's name you want to share/assign the list to.</p></figcaption></figure>

Be sure to click the Save button :smile:
{% endtab %}

{% tab title="Share with a group 👬" %}
**You can assign the list to a whole Permission Set (eg. "Canvass Volunteers") and simply tell them which list they should be canvassing (eg. "Jane, please canvass the list "Broadway swing voters #1".**

<figure><img src="https://3317596624-files.gitbook.io/~/files/v0/b/gitbook-x-prod.appspot.com/o/spaces%2Fmd1HR6LZFUYuK3fPHLXC%2Fuploads%2FJG7g9WEEzQdxuSAHEG4l%2FShare%20with%20group.png?alt=media&amp;token=ebc7b1b1-9db4-4d71-b2c9-03e12d916988" alt=""><figcaption><p>In the field labeled 'Share with every,' select the permission set you wish to share/assign the list to. This will make the list available to anyone with that permission set.</p></figcaption></figure>

Be sure to click the Save button :smile:
{% endtab %}
{% endtabs %}

{% hint style="warning" %}

#### **Using the "Assigned" Permission**

In some cases, you may want to restrict your users so **they can only see Contacts that have been assigned to them**. This is done using NationBuilder's Permissions Sets. [Learn more about restricting access](/team-setup/restricting-access).

**If you are using the Assigned feature, you will also need to Batch Update the list to assign that person to the list.** [**Learn how here**](/team-setup/restricting-access#assign-people-on-your-list-a-point-person)**.**
{% endhint %}

## Accountless Users

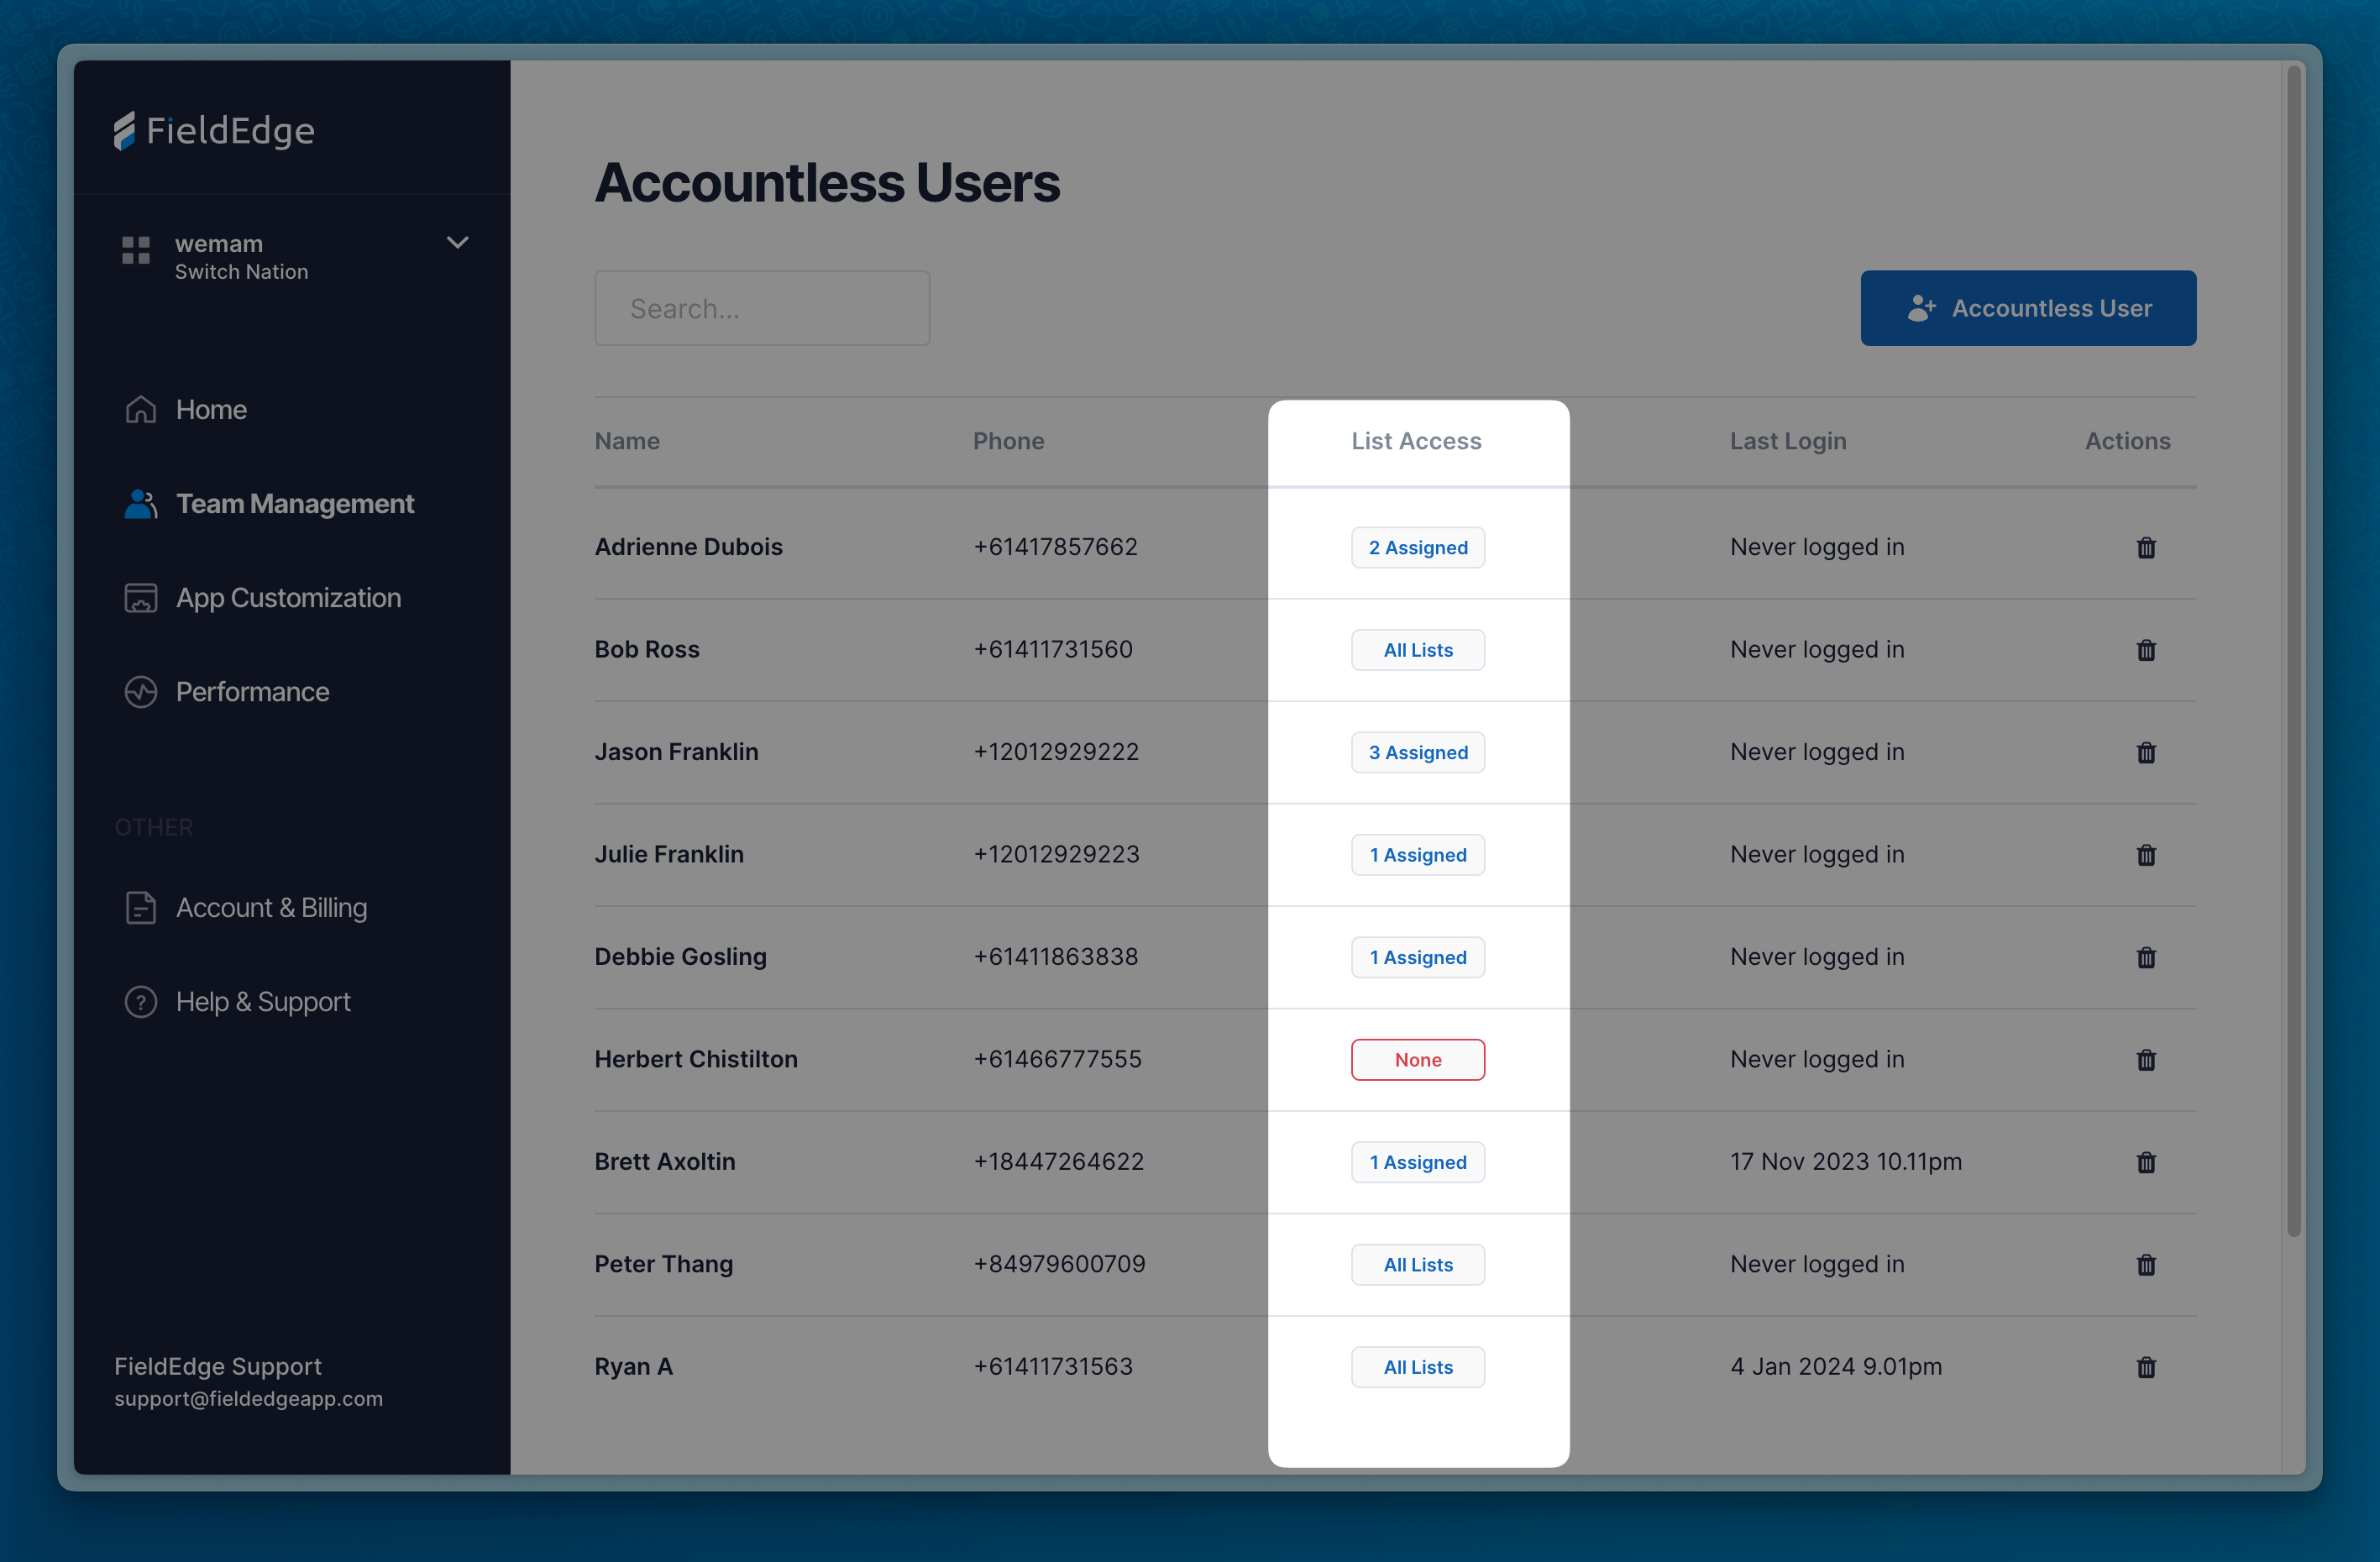
For Accountless users (user with a FieldEdge account but not a NationBuilder account), lists are assigned in the FieldEdge HQ Dashboard.

By default, when an Accountless user is added, they will not have any lists assigned to them. You have the option to assign specific lists or all list from your nation. It is recommended to assign specific lists.

To assign a list, go to [Team Management > Accountless Users](https://hq.fieldedgeapp.com/team?type=mobile_only) (click this link to open it in HQ).

Pay attention to the **List Access** column. To assign a list or change list assignment, click on the button for the user you wish to edit. Select Specific and then assign the lists.

<figure><img src="https://3317596624-files.gitbook.io/~/files/v0/b/gitbook-x-prod.appspot.com/o/spaces%2Fmd1HR6LZFUYuK3fPHLXC%2Fuploads%2FZGPUWu7RuIrgnLZN8rEQ%2FCleanShot%202024-01-09%20at%2010.30.31%402x.png?alt=media&amp;token=953cf596-e8e3-493f-8fa1-115d44a2f874" alt=""><figcaption></figcaption></figure>

<figure><img src="https://3317596624-files.gitbook.io/~/files/v0/b/gitbook-x-prod.appspot.com/o/spaces%2Fmd1HR6LZFUYuK3fPHLXC%2Fuploads%2FrQjO59z31TOY7QJxsASq%2Fteam%20management%20-%20accountless%20users%20select%20list.png?alt=media&amp;token=ab942fdb-ff63-41b2-b14e-e1f34a4bc930" alt=""><figcaption></figcaption></figure>

Your user will now be able to see the lists you have assigned. They may need to fully close the app and reopen it to see the lists assigned to them.

### Syncing your lists to the FieldEdge mobile app <a href="#h_2ac883bd95" id="h_2ac883bd95"></a>

Once you create your lists in NationBuilder and assign them to a person or permission set, they will automatically sync to FieldEdge and become available as a list to canvass.

<br>


# Assigning call lists

Share NationBuilder lists with your callers

After you have created your call lists in NationBuilder, you'll want to assign your list to your callers. This will enable them to access the list via the mobile app.

**Depending on how the users logs in, lists are assigned differently:**

* [**NationBuilder** ](#nationbuilder-campaign-managers-and-default-users)**login:** assign in NationBuilder
* [**Accountless**](#accountless-users) **login**: assign in FieldEdge HQ

## NationBuilder (campaign managers & default users)

{% hint style="info" %}
If the user is a NationBuilder Admin, they will already have access to all lists in your nation so no action is required. If the user has another permission set, the following applies.
{% endhint %}

A list can be assigned to either an individual or a group.\
\
You can assign a list while turf cutting or after the fact, in the `Settings` tab.

Start by navigating to the `Settings` tab of the list you want to assign. When viewing all lists, you can access the Settings tab by clicking the pencil "edit" icon next to the list's name

Next, look at the top of the list and click on `Settings`.

{% tabs %}
{% tab title="Assign to an individual 🧍🏽‍♂️" %}
**We recommend assigning each list to a person so only they can see that list, this keeps it simple for your canvassers, however, it does require more work for you**.

<figure><img src="https://3317596624-files.gitbook.io/~/files/v0/b/gitbook-x-prod.appspot.com/o/spaces%2Fmd1HR6LZFUYuK3fPHLXC%2Fuploads%2FHBWFw8HENLzKnH3E8jNY%2FScreen%20Shot%202022-11-25%20at%201.24.18%20pm.png?alt=media&amp;token=a297a0fe-7536-4e5d-9074-ab3ce04859a9" alt=""><figcaption><p>In the field labeled 'Share with another person,' enter the person's name you want to share/assign the list to.</p></figcaption></figure>

Be sure to click the Save button :smile:
{% endtab %}

{% tab title="Share with a group 👬" %}
**You can assign the list to a whole Permission Set OR a Group (if you have an NB Enterprise account) and simply tell them which list they should be canvassing (eg. "Jane, please canvass the list "Broadway swing voters #1".**

<figure><img src="https://3317596624-files.gitbook.io/~/files/v0/b/gitbook-x-prod.appspot.com/o/spaces%2Fmd1HR6LZFUYuK3fPHLXC%2Fuploads%2FJG7g9WEEzQdxuSAHEG4l%2FShare%20with%20group.png?alt=media&amp;token=ebc7b1b1-9db4-4d71-b2c9-03e12d916988" alt=""><figcaption><p>In the field labeled 'Share with every,' select the permission set you wish to share/assign the list to. This will make the list available to anyone with that permission set.</p></figcaption></figure>

Be sure to click the Save button :smile:
{% endtab %}
{% endtabs %}

{% hint style="warning" %}

#### **Using the "Assigned" Permission**

In some cases, you may want to restrict your users so **they can only see Contacts that have been assigned to them**. This is done using NationBuilder's Permissions Sets. [Learn more about restricting access](/team-setup/restricting-access).

**If you are using the Assigned feature, you will also need to Batch Update the list to assign that person to the list.** [**Learn how here**](/team-setup/restricting-access#assign-people-on-your-list-a-point-person)**.**
{% endhint %}

## Accountless Users

For Accountless users (user with a FieldEdge account but not a NationBuilder account), lists are assigned in the FieldEdge HQ Dashboard.

By default, when an Accountless user is added, they will not have any lists assigned to them. You have the option to assign specific lists or all list from your nation. It is recommended to assign specific lists.

To assign a list, go to [Team Management > Accountless Users](https://hq.fieldedgeapp.com/team?type=mobile_only) (click this link to open it in HQ).

Pay attention to the **List Access** column. To assign a list or change list assignment, click on the button for the user you wish to edit. Select Specific and then assign the lists.

<figure><img src="https://3317596624-files.gitbook.io/~/files/v0/b/gitbook-x-prod.appspot.com/o/spaces%2Fmd1HR6LZFUYuK3fPHLXC%2Fuploads%2FZGPUWu7RuIrgnLZN8rEQ%2FCleanShot%202024-01-09%20at%2010.30.31%402x.png?alt=media&amp;token=953cf596-e8e3-493f-8fa1-115d44a2f874" alt=""><figcaption></figcaption></figure>

<figure><img src="https://3317596624-files.gitbook.io/~/files/v0/b/gitbook-x-prod.appspot.com/o/spaces%2Fmd1HR6LZFUYuK3fPHLXC%2Fuploads%2FrQjO59z31TOY7QJxsASq%2Fteam%20management%20-%20accountless%20users%20select%20list.png?alt=media&amp;token=ab942fdb-ff63-41b2-b14e-e1f34a4bc930" alt=""><figcaption></figcaption></figure>

Your user will now be able to see the lists you have assigned. They may need to fully close the app and reopen it to see the lists assigned to them.

### Syncing your lists to the FieldEdge mobile app <a href="#h_2ac883bd95" id="h_2ac883bd95"></a>

Once you create your lists in NationBuilder and assign them to a person or permission set, they will automatically sync to FieldEdge and become available as a list to canvass.

<br>


# Adding a survey

Create a survey in your nation for users to access in the field

{% hint style="success" %}
**NEW!** [**Advanced Survey Features**](#advanced-surveys-features)
{% endhint %}

## Create a survey for use in FieldEdge <a href="#summary" id="summary"></a>

* FieldEdge accesses the surveys from your NationBuilder account and makes them available within the app
* New surveys are setup via your NationBuilder Control Panel
* Surveys must be attached to a Page on your website that has a “Published” or “Unlisted” status
* Results are sent back to your nation in real time as if the person had completed the surveys via your nation’s website

In this video you will learn how to:

* Setup a new Survey in NationBuilder
* Connect a Survey to an *unlisted* Survey Page
* Check survey results

{% embed url="<https://www.loom.com/share/2d86b011bbad46bfa43337e23cace5f3>" %}

{% hint style="warning" %}
**Having trouble seeing your survey?** If some or all of your users are not seeing the survey you setup, see our article [Surveys not showing up in FieldEdge](/everything-else/other-guides/surveys-not-showing-up-in-fieldedge)
{% endhint %}

**Also see:**

* [**NationBuilder's article**](https://support.nationbuilder.com/en/articles/2306373-create-a-survey) **on how to create a survey and attach it to a page**
* **Our article on** [**Viewing survey results**](/guide-to-canvassing-and-calls/reporting/viewing-survey-results)<br>

***

## Advanced Surveys Features

FieldEdge enhances NationBuilder’s survey capabilities with features designed specifically for canvassing and phone outreach. These advanced tools help teams collect more structured, complete, and actionable data in the field.

Our advanced survey features add the following features:

* **Extended Field Types** – Support for multi-select answers, formatted contact fields, and scripted text makes it easier to gather detailed, high-quality responses.
* **Required Fields** – Make questions required, helping ensure key information is captured consistently.
* **Native Contact Fields** – Sync survey questions directly to NationBuilder contact fields like name, phone, and email, keeping profiles up to date automatically.

{% hint style="info" %}
**Warning, this gets a little techie:** It's important to know that these powerful features are enabled by workarounds to NationBuilder's default survey behaviour and so some advanced setup is required. All of these advanced features are enabled by adding special "codes" inside the "question slug" and "full question" of the relevant survey question in NationBuilder.
{% endhint %}

<div><figure><img src="https://3317596624-files.gitbook.io/~/files/v0/b/gitbook-x-prod.appspot.com/o/spaces%2Fmd1HR6LZFUYuK3fPHLXC%2Fuploads%2FHvPvkKonN3dXd2mMnIGX%2F5.PNG?alt=media&amp;token=0dff7d24-b335-4ec5-8b54-6345a1964c1e" alt=""><figcaption></figcaption></figure> <figure><img src="https://3317596624-files.gitbook.io/~/files/v0/b/gitbook-x-prod.appspot.com/o/spaces%2Fmd1HR6LZFUYuK3fPHLXC%2Fuploads%2FsIG3h6hI67Cy94WpebiE%2F4.PNG?alt=media&amp;token=ce89ecf4-a777-4603-9a57-047b2e3b847d" alt=""><figcaption></figcaption></figure> <figure><img src="https://3317596624-files.gitbook.io/~/files/v0/b/gitbook-x-prod.appspot.com/o/spaces%2Fmd1HR6LZFUYuK3fPHLXC%2Fuploads%2F5Y0xR4Q5QwXNL5jKMSrF%2F1.jpeg?alt=media&amp;token=cdb00e2d-c56c-4761-9567-40e508100900" alt=""><figcaption></figcaption></figure> <figure><img src="https://3317596624-files.gitbook.io/~/files/v0/b/gitbook-x-prod.appspot.com/o/spaces%2Fmd1HR6LZFUYuK3fPHLXC%2Fuploads%2FYbuJhDomkmJf52I0XNsj%2F6.PNG?alt=media&amp;token=9413286b-3e74-44e1-984d-6feb3775738e" alt=""><figcaption></figcaption></figure> <figure><img src="https://3317596624-files.gitbook.io/~/files/v0/b/gitbook-x-prod.appspot.com/o/spaces%2Fmd1HR6LZFUYuK3fPHLXC%2Fuploads%2FboS00pKvfh4jRji4gROm%2F3.PNG?alt=media&amp;token=d2af3ee6-041f-4ffb-90ca-48fea1d12ad1" alt=""><figcaption></figcaption></figure> <figure><img src="https://3317596624-files.gitbook.io/~/files/v0/b/gitbook-x-prod.appspot.com/o/spaces%2Fmd1HR6LZFUYuK3fPHLXC%2Fuploads%2FAFz0kxoaxinMpzgJ5WTC%2F2.PNG?alt=media&amp;token=d8a345f1-e0db-40d3-b3df-638d3014c75f" alt=""><figcaption></figcaption></figure></div>

<figure><img src="https://3317596624-files.gitbook.io/~/files/v0/b/gitbook-x-prod.appspot.com/o/spaces%2Fmd1HR6LZFUYuK3fPHLXC%2Fuploads%2FZi6I5Wg5f1YImEvo8q42%2FCleanShot%202024-10-11%20at%2016.07.37%402x.png?alt=media&amp;token=0052a5e2-f924-4d36-8b77-498e6ee368c0" alt=""><figcaption><p>Example of how to add a prefix to the question slug. Be sure to include the underscore.</p></figcaption></figure>

### **New Advanced Field Types**

The table below outlines the new field types enabled by FieldEdge's Advanced Surveys. By adding a "prefix" to the slug of the question in NB, you can enable features like multi-select and script.

{% hint style="info" %}
**NB Question Format** = the format that the question in NationBuilder should be set to

**Question Slug Prefix** = the special text that needs to be included in at the start of the question slug
{% endhint %}

<table data-card-size="large" data-view="cards"><thead><tr><th>Name</th><th>NB Question Format</th><th>Question Slug Prefix</th><th>Description</th></tr></thead><tbody><tr><td><strong>Multiselect</strong><br></td><td>multiple_choice<br></td><td><code>multiselect_</code><br></td><td><p>Displays as a list of single select choices and allows a user to select more than one answer.</p><p><mark style="background-color:red;"><strong>🚨 Important Limitation:</strong></mark> when exporting the survey results through NationBuilder, only a single answer will be exported.<br><br><strong>How it looks in FieldEdge:</strong><br><br><img src="https://3317596624-files.gitbook.io/~/files/v0/b/gitbook-x-prod.appspot.com/o/spaces%2Fmd1HR6LZFUYuK3fPHLXC%2Fuploads%2FCjUolc32nepgZ3shpkTy%2Fimage.png?alt=media&amp;token=0c015af9-d435-438e-b6ff-ad3341428c0c" alt="" data-size="original"></p></td></tr><tr><td><strong>Script</strong><br></td><td>text<br></td><td><code>script_</code><br></td><td><p>Add a paragraph of text. Useful for creating talking points or explaining different sections of the survey, providing instructions.</p><p><strong>How it looks in FieldEdge:</strong><br><br><img src="https://3317596624-files.gitbook.io/~/files/v0/b/gitbook-x-prod.appspot.com/o/spaces%2Fmd1HR6LZFUYuK3fPHLXC%2Fuploads%2FywnGXKQGRi7V86mnsyjJ%2Fimage.png?alt=media&amp;token=781e259e-80dc-4591-8efd-4c8b3856467e" alt=""></p></td></tr><tr><td><strong>Email Address</strong><br></td><td>text<br></td><td><code>email_</code><br></td><td>Formats as an email address validated text field.<br><br>Note: If you want this data to sync to the field in the person's profile, use the Native Field feature (more detail below).<br><br><strong>How it looks in FieldEdge:</strong><br><br><img src="https://3317596624-files.gitbook.io/~/files/v0/b/gitbook-x-prod.appspot.com/o/spaces%2Fmd1HR6LZFUYuK3fPHLXC%2Fuploads%2FC6TPIc8uyEJkuv4MkFXK%2Fimage.png?alt=media&amp;token=51656dcb-35db-4a5f-a1b6-8168cd7288b7" alt=""></td></tr><tr><td><strong>Phone</strong><br></td><td>text<br></td><td><code>phone_</code><br></td><td>Formats as a validated phone field. People shouldn’t have to type in the country code.<br><br>Note: If you want this data to sync to the field in the person's profile, use the Native Field feature (more detail below).<br><br><strong>How it looks in FieldEdge:</strong><br><br><img src="https://3317596624-files.gitbook.io/~/files/v0/b/gitbook-x-prod.appspot.com/o/spaces%2Fmd1HR6LZFUYuK3fPHLXC%2Fuploads%2F03ewoOfLt0F2VIAyD0dN%2Fimage.png?alt=media&amp;token=751626f4-ff16-46a0-ada3-45b6142ca1ca" alt=""></td></tr></tbody></table>

### **Make a Field Required**

By default, all questions are optional. If you would like to make a question required, add `_r` to the end of the question slug eg. `multiselect_q1_r`

<figure><img src="https://3317596624-files.gitbook.io/~/files/v0/b/gitbook-x-prod.appspot.com/o/spaces%2Fmd1HR6LZFUYuK3fPHLXC%2Fuploads%2F7LjC2X6jTMjAoHDOxOOD%2FCleanShot%202024-10-11%20at%2016.04.04%402x.png?alt=media&amp;token=c2a1b60f-7ddf-40c1-bca5-b3721df11d10" alt=""><figcaption></figcaption></figure>

### **Native Contact Fields**

#### **Case Case 1: Add a native contact field as a survey question**

In some cases, you may want to collect information during a survey that builds a person's profile in NationBuilder. With FieldEdge, you can add a "NationBuilder native" profile field to your survey. For example, you could collect someones email and have it be automatically added to their profile.

To do so, add a survey question with the type “text” and the prefix `native_` prefix (ie. at the beginning of the slug), followed the slug of the field you want to add.

#### **Case Case 2: Dynamically inject native contact fields in a survey question**

You may want to dynamically inject details about a contact into a survey question. For example: "Is your name Abram Phelps"? You can do so by adding the

**We support the following NationBuilder contact fields:**

<table><thead><tr><th width="175">NB Field</th><th width="268">As a survey question</th><th>Inject into survey question</th></tr></thead><tbody><tr><td><em><strong>Description</strong></em></td><td><em><strong>Add to start of question 'Slug'</strong></em></td><td><em><strong>Add anywhere in 'Full question'</strong></em></td></tr><tr><td>Email address</td><td><code>native_email_</code></td><td><code>native_email</code></td></tr><tr><td>Mobile number</td><td><code>native_mobile_</code></td><td><code>native_mobile</code></td></tr><tr><td>Opt-in to text</td><td><code>native_mobile_opt_in_</code></td><td><code>n/a</code></td></tr><tr><td>Home phone no.</td><td><code>native_phone_</code></td><td><code>native_phone</code></td></tr><tr><td>Work phone no.</td><td><code>native_work_phone_</code></td><td><code>native_work_phone_number</code></td></tr><tr><td>Employer</td><td><code>native_employer_</code></td><td><code>native_employer_</code></td></tr><tr><td>Volunteer</td><td><code>native_is_volunteer_</code></td><td><code>n/a</code></td></tr><tr><td>First Name</td><td><code>native_first_name_</code></td><td><code>native_first_name</code></td></tr><tr><td>First Name</td><td><code>native_last_name_</code></td><td><code>native_last_name</code></td></tr></tbody></table>

{% hint style="danger" %}
**Important Notes:**

* Native field in *answers* are disabled when canvassing more than one person at a time (via Canvass Household option) and the user will need to skip them, while in the *questions* field, it will show the details from the first person selected.
* When creating a native fields question, ensure you include a trailing underscore, eg. `native_last_name_`
* Fields will not be automatically updated in FieldEdge until after you reload. For example, if update a person's name via a survey while on a walk, it will show their old name on the profile until you restart the walk, open up their full profile, start a new call time session, etc.
  {% endhint %}

{% hint style="warning" %}
**Having trouble with advanced fields display correctly?**\
If you find your field is not displaying correctly, ensure you have an underscore after the prefix, for example:\
\
native\_email will not work, it should be **native\_email\_**&#x78;xxx

script will not work, it should be **script\_**&#x78;xxxx
{% endhint %}

## Automated Actions

NationBuilder survey's offer an incredibly sophisticated and power feature that enables specific actions to be triggered via a survey response. Most actions can be set at the survey level, the question level and the specific answer level. These can be setup via **Survey's page Survey setting -> Basic tab**.

### Auto-tagging

One of the most useful survey actions is auto-tagging. When integrated with FieldEdge, it allows for granular segmentation based on survey responses. For instance, during canvassing activities, you can use tags to categorize voters based on their interests, their likelihood to support a campaign, or other criteria relevant to your strategy.

### Add to Path

Set a Path, the Step and other path options. Ensure the person is guided on their journey to become a voter, member, donor, volunteer or any other desired path.

### Enroll in Automation

Add them to an existing email automation workflow. Great for following-up post canvass.

### Assign Point Person

Assign a point person (if not already assigned). Ensure each and every person is taken care of by the correct person in your campaign or organization.

### Assign Membership

Assign a membership along with an expiry date. Get creative by assigning Memberships as a way to group people.

{% hint style="info" %}
A default survey can be set per user type in [App Customization](/product-tour-or-hq/app-customization) → Default Survey, with an option to hide all other surveys from field users.
{% endhint %}


# Extended Workflows

Advanced canvassing and calling workflows for FieldEdge

FieldEdge Canvassing is built to work with all different types of campaigns – Sentiment, Awareness, Voter ID, Persuasive, Recruiting, GOTV, and more.

FieldEdge is designed to simplify core campaign workflows while retaining the flexibility necessary to accommodate various types of complex and agile campaigns.

This set of guides focuses on extended workflows not built into the core of NationBuilder or FieldEdge but can be easily achieved.

{% hint style="info" %}
**To understand the basics of canvassing and call time workflows, review the** [Setup & Core Workflows](/guide-to-canvassing-and-calls/setup-and-core-workflows) **guide.**
{% endhint %}

To see all extended workflows, use the menu or search Some common advanced workflows include:

{% content-ref url="/pages/wb2kDtEi4ApjBboI5N4q" %}
[Yard Sign](/guide-to-canvassing-and-calls/extended-workflows/yard-sign)
{% endcontent-ref %}

{% content-ref url="/pages/b7IqJVw08zuYz2WqP8HZ" %}
[Capturing Voter ID/Sentiment/Support Level](/guide-to-canvassing-and-calls/extended-workflows/capturing-voter-id-sentiment-support-level)
{% endcontent-ref %}

{% content-ref url="/pages/epm0YjsaGtuQwYGSRpsG" %}
[Capture campaign involvement / volunteer interest](/guide-to-canvassing-and-calls/extended-workflows/capture-campaign-involvement-volunteer-interest)
{% endcontent-ref %}

{% content-ref url="/pages/JJ5Sq1bHd8uwLfF7qK0A" %}
[Re-canvass & re-calling voters](/guide-to-canvassing-and-calls/extended-workflows/re-canvass-and-re-calling-voters)
{% endcontent-ref %}

{% content-ref url="/pages/QXtIQE9vXmuXWJNh4o6T" %}
[Collecting extra profile data (eg. email address)](/guide-to-canvassing-and-calls/extended-workflows/collecting-extra-profile-data-eg.-email-address)
{% endcontent-ref %}


# Yard Sign

Yard signs are a common campaign workflow that works best when it’s set up with **clear, consistent tagging**. This guide walks through **two supported methods** for tracking yard signs in NationBuilder + FieldEdge:

1. **Auto-tagging via survey responses (recommended)**
2. **Manually tagging while canvassing**

It also explains **recommended tag naming conventions**, how to build delivery lists, and how to manage the full yard sign lifecycle.

***

### Recommended Tagging Format

Before setting anything up, decide on a consistent tagging format. We strongly recommend:

* `Yard Sign – Requested`
* `Yard Sign – Delivered`
* *(Optional)* `Yard Sign – Declined`
* *(Optional)* `Yard Sign – Needs Pickup`

**Best practices:**

* Use **plain-English tags with spaces** (underscores are not required).
* Be consistent with capitalization and spelling.
* Avoid creating multiple versions of the same tag (for example: `yard_sign`, `Yard sign`, `Yard Sign Requested`).

> Consistent tag names make filtering, reporting, and list creation much easier later.

***

### Method 1: Auto-Tagging via Survey Responses (Recommended)

This method is ideal if you are collecting yard sign requests through a survey (online form, canvassing survey, phone bank, etc.).

#### Step 1: Create or Edit Your Yard Sign Survey Question

Create a survey question such as:

> “Would you like a yard sign?”

If you need help creating or editing surveys, see: [Adding a survey](https://guides.fieldedgeapp.com/guide-to-canvassing-and-calls/setup-and-core-workflows/adding-a-survey)<br>

***

#### Step 2: Configure Auto-Tagging per Response

For each response option:

1. Open the survey question in NationBuilder
2. Go to **Possible Responses**
3. Edit the response (for example, “Yes”)
4. Under **Tag people who choose this response**, add:\
   \&#xNAN;**`Yard Sign – Requested`**
5. Save the response

Repeat for other responses if needed (for example, tagging “No” with `Yard Sign – Declined`).

> This ensures tags are applied **automatically** whenever someone answers the question.

***

#### Step 3: Build a Delivery Filter

Once people are tagged, you can create a filter to find everyone who needs a yard sign delivered:

* Has tag **Yard Sign – Requested**
* Does **not** have tag **Yard Sign – Delivered**

To learn more about filtering and creating walk lists, see: [Creating walk lists](https://guides.fieldedgeapp.com/guide-to-canvassing-and-calls/setup-and-core-workflows/creating-walk-lists)<br>

Save this filter so it can be reused.

***

#### Step 4: Create a Yard Sign Delivery List

From the filtered people view:

1. Add them to a new list (for example:\
   \&#xNAN;*“Yard Sign Deliveries – Week of Oct 10”*)
2. Assign the list to canvassers in FieldEdge
3. Deliver yard signs using the FieldEdge app

When a sign is delivered, update the person with the tag:\
\&#xNAN;**`Yard Sign – Delivered`**

***

### Method 2: Manually Tagging While Canvassing

This method works well if yard sign requests come up **organically at the door** and are not part of a survey question.

#### How It Works

While canvassing in FieldEdge or reviewing a person in NationBuilder:

1. Open the person’s profile
2. Add the tag **`Yard Sign – Requested`**
3. Save the person

Later, when the sign is delivered, add:\
\&#xNAN;**`Yard Sign – Delivered`**

***

#### Building Lists with Manual Tags

Even when tags are applied manually, the workflow is the same:

* Filter for people with **Yard Sign – Requested**
* Exclude those with **Yard Sign – Delivered**
* Save the filter
* Create a delivery list

This approach gives you flexibility when surveys were not set up in advance.

***

### Managing the Full Yard Sign Lifecycle

Many campaigns use multiple tags to track progress:

| Stage        | Tag                      |
| ------------ | ------------------------ |
| Requested    | Yard Sign – Requested    |
| Delivered    | Yard Sign – Delivered    |
| Declined     | Yard Sign – Declined     |
| Needs Pickup | Yard Sign – Needs Pickup |

You can decide whether to:

* Keep all tags for historical tracking, or
* Remove `Yard Sign – Requested` once `Yard Sign – Delivered` is applied

Both approaches work—choose what best fits your reporting needs.

***

### Re-Delivering or Re-Canvassing Yard Sign Lists

If you need to re-canvass the same list (for example, a second delivery pass), you may need to reset canvassing completion status.

See: [**Re-canvass & re-calling voters**](https://guides.fieldedgeapp.com/guide-to-canvassing-and-calls/extended-workflows/re-canvass-and-re-calling-voters)<br>

> Resetting a list only resets canvassing completion—it does **not** delete people or tags.

***

### Summary

* **Auto-tagging survey responses** is the most scalable and reliable method
* **Manual tagging** works well for ad-hoc conversations at the door
* Consistent tag naming is critical
* Filters + saved lists turn tags into actionable delivery workflows

Once set up correctly, this workflow eliminates spreadsheets and makes yard sign delivery easy to manage directly in FieldEdge and NationBuilder.


# Track who a voter plans to vote for

Track who each voter says they plan to support so you can follow up, segment lists, and plan your outreach effectively.

Campaign teams often need to record voter intention — *who a person says they plan to vote for* — during canvassing or outreach. The most scalable and reliable way to capture this in FieldEdge + NationBuilder is by **using a survey with auto-tagging.**

This guide will walk you step-by-step through designing the survey, setting up auto-tagging, and then using those tags to segment and act on voter intentions.

### 1. Design Your Voter Intention Survey

Start by creating the survey in **NationBuilder**:

1. Go to **People → Surveys** in your NationBuilder dashboard.
2. Create a new survey titled something like **“Voter Intention — Election 20XX.”**
3. Add a question such as:
   * “Who do you plan to vote for in the upcoming election?”
   * Provide the answer options (e.g., Candidate A, Candidate B, Undecided, Other).

Alternative, integrate the question into an existing survey.

{% hint style="info" %}
Learn more about [surveys in FieldEdge](/guide-to-canvassing-and-calls/setup-and-core-workflows/adding-a-survey)
{% endhint %}

***

### 2. Add Auto-Tagging to Survey Responses

Auto-tagging applies tags to people based on how they answer. This is the key to capturing voter intent in a way that FieldEdge can leverage.

For each answer option:

1. In the NationBuilder survey editor, open the **Possible Responses** for the question.
2. For each response (e.g., “Candidate A”), enter a tag under **Tag the responder with** such as:
   * `Will Vote – Candidate A`
   * `Will Vote – Candidate B`
   * `Will Vote – Undecided`
3. Save the response.

These tags will be automatically applied when the survey is completed in FieldEdge or elsewhere.

***

### 3. Conduct the Survey in the Field

When canvassers are out knocking doors or making calls:

1. Open the FieldEdge app on a mobile device.
2. Navigate to the contact and select **Survey**.
3. Run the “Voter Intention” survey you created.

FieldEdge will automatically sync the response back to NationBuilder and apply the configured tags on the person’s profile.

***

### 4. Use Tags to Segment and Act

If auto-tagging is in place, you can now build a lists of voters per candidate:

**In NationBuilder:**

* Go to **People → Filters**.
* Filter by tag (e.g., “Will Vote – Candidate A”).
* Save filter (e.g., “Candidate A Supporters”).

#### Create Canvass Lists or Call Lists

Use saved filters to create targeted lists that focus outreach on specific voter intention segments.

#### Report on Results

You can easily see how many voters said they plan to vote for each option using via the surveys results or using by filtering by the tags in NationBuilder.


# Capturing Voter ID/Sentiment/Support Level

When canvassing, it’s essential to gauge and record the level of support from each voter you interact with. NationBuilder introduced the concept of 'Support Level' to gauge voter support, and FieldEdge has adopted this feature, providing a consistent and integrated experience across platforms.

## Capturing Support Levels

By default, on the Canvass Profile screen in FieldEdge, you'll find the 'Support Level' section prominently displayed. This intuitive interface allows you to quickly capture the voter's sentiment by simply tapping the corresponding number that reflects the individual’s support.
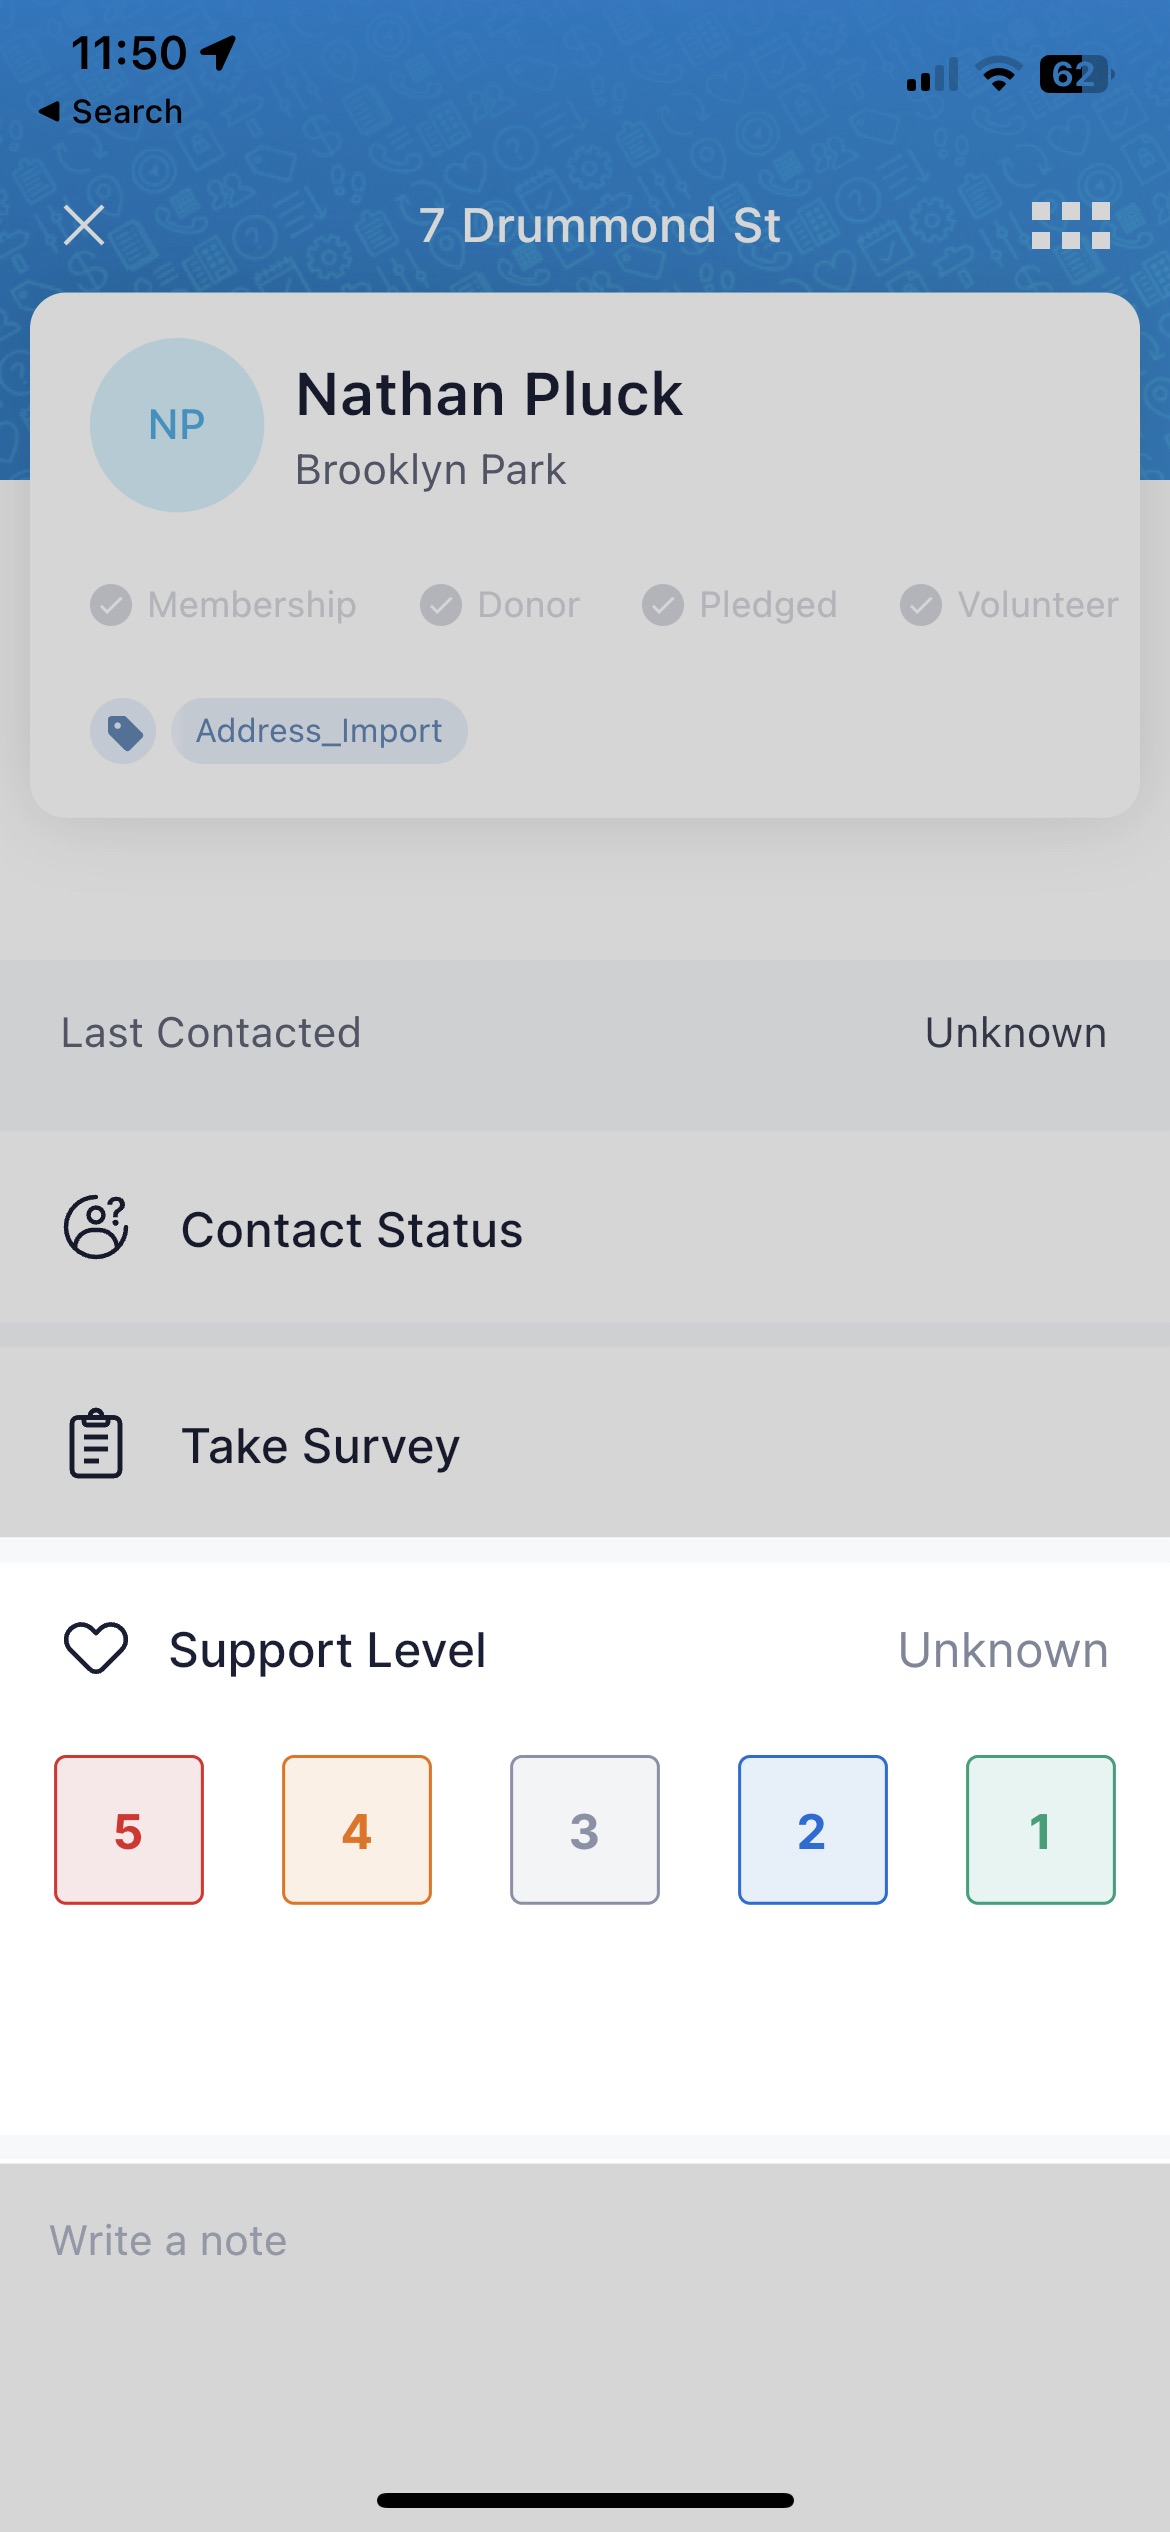
<figure><img src="https://3317596624-files.gitbook.io/~/files/v0/b/gitbook-x-prod.appspot.com/o/spaces%2Fmd1HR6LZFUYuK3fPHLXC%2Fuploads%2FnYLJFp3LmoDQNBHuRHlq%2Fsupport-level.jpeg?alt=media&amp;token=545060fd-0afb-4052-be68-5474bf9fa94f" alt="" width="188"><figcaption><p>Tap to Zoom</p></figcaption></figure>

**Support Levels range from 1 to 5, each representing the voter's inclination towards your campaign:**

<details>

<summary>🟩 <strong>1 – Strong Support (Green)</strong></summary>

The person is a strong supporter, likely to advocate for your cause / vote for your candidate.

</details>

<details>

<summary>🟦 <strong>2 – Weak Support (Blue)</strong></summary>

The person supports you but is not as vocal or active as those at level 1. Will most likely vote for your cause / candidate.

</details>

<details>

<summary><strong>⬜️ 3 – Undecided (Grey)</strong></summary>

The person is neutral, undecided, or their stance is unknown and may or may not vote for your cause/candidate

</details>

<details>

<summary>🟧 <strong>4 – Weak Oppose (Orange)</strong></summary>

The person is opposed to your campaign but not actively working against it and will likely not vote for your cause/candidate

</details>

<details>

<summary>🟥 <strong>5 – Strong Oppose (Red)</strong></summary>

The person is a strong opponent, possibly actively working to support your competition and it is highley likely they will not vote for you.

</details>

## Best Practices

* **Consistency**: Use the same criteria for each voter to maintain consistency in how support levels are assigned.
* **Training**: Ensure all canvassers are trained on what each level signifies to avoid discrepancies in data capture.
* **Verification**: Double-check that the support level is correctly inputted to avoid future confusion or inaccurate reporting.

By following these steps, you'll be able to quickly and effectively capture each voter's support level, creating a valuable dataset for your campaign's strategic decision-making.

If you are going with a "Yes, will vote for candidate" or a "No, will not vote for candidate", you may wish to stick with 1 (Green) & 5 (Red).

## Reporting

When you record a Support Level in FieldEdge, this information is sent to the FieldEdge HQ Dashboard for real-time campaign insights and also synced to NationBuilder as a Logged Contact on the person's profile.

Learn more about reporting here.

For a detailed guide on using the Canvass Profile screen, please refer to our Canvass Tour Guide.

## Alternatives

You can also capture voter ID, sentiment and other key info using [surveys + automated actions](/guide-to-canvassing-and-calls/setup-and-core-workflows/adding-a-survey) using Tags, Paths, Memberships and more.

{% hint style="info" %}
Capturing Support Level is an [App Customizations](/product-tour-or-hq/app-customization) option and can be turned off for any of your [user types](/product-tour-or-hq/team-management) if you do not wish to capture it.
{% endhint %}


# Capture campaign involvement / volunteer interest

In any campaign, identifying and engaging with individuals who express an interest in volunteering is crucial. FieldEdge, integrated with NationBuilder, provides effective tools to record and categorize this interest and allowing for efficient follow-ups.\
\
Two primary methods can be used for this process:

1. **Marking the Person as a Volunteer**
   * In FieldEdge, this can be done directly from a person's profile. Access the [Action menu](/product-tour-or-mobile-app/actions) located in the top right-hand corner and toggle the volunteer status to `Yes`. This action automatically updates their NationBuilder profile, adding a "wants to volunteer" note and applying a volunteer flag.<br>
2. **Using Tags for Specific Interests**
   * Tags can be used to mark preferences for activities like displaying a yard signs, hosting events, or participating in phone banking and canvassing. Tags like `interest - yard sign` or `interest - host a party` can be created for this purpose.

{% hint style="info" %}
**Tags can be applied in two ways:**

1. Via the Tags action, accessible from the Action menu in any profile.
2. By [setting up a survey](/guide-to-canvassing-and-calls/setup-and-core-workflows/adding-a-survey) with auto-tagging capabilities, which automatically assigns tags based on survey responses.
   {% endhint %}

This system ensures that volunteer interests are accurately captured and organized within FieldEdge and NationBuilder, streamlining campaign efforts and volunteer management.


# Sharing lists while canvassing

Generally speaking, we recommend create seperate and unique lists for each canvasser. However, you may find some cases that you want canvassers to share a list (for example if they are walking odds & evens) or their lists may contain the same households.

To help you avoid unintentionally knocking the same door twice, it's recommended canvassers:

**a. Coordinate with each other**\
This way they can be aware of the houses and streets the other people plan to knock

**b. Use the "Sync Household Statuses" feature**\
Every few households, press sync to get any updates (completed houses) from other canvasses.

{% hint style="info" %}
You do not need to use this to sync your data, only to get other peoples data
{% endhint %}

<figure><img src="https://3317596624-files.gitbook.io/~/files/v0/b/gitbook-x-prod.appspot.com/o/spaces%2Fmd1HR6LZFUYuK3fPHLXC%2Fuploads%2FI4MmV6GiguiI8t8eS8mh%2FIMG_3763.PNG?alt=media&amp;token=2dcb4ed0-42c5-44ae-8cc0-9eebfe143fa4" alt=""><figcaption></figcaption></figure>


# Re-canvass & re-calling voters

Discover how to reset a person's completion status so they can be recontacted

Often during a campaign, you'll want to connect with potential voters, volunteers, etc., more than once or maybe you were unable to speak with them the first time because they weren't available.

For example, you may run an initial door knocking exercise to *build awareness* for a candidate and to collect data about key topics. Later in the campaign you may want to run a *persuasive canvass* and then lastly a final *GOTV effort* – for a total of 3 contacts *at the door*. This guides explains how you can reset the status of a contact before hitting them again.

### The role of tagging in FieldEdge

To keep track of what people in your nation have been contacted during while canvassing or phone banking, FieldEdge "special FE tags" to reflect the interaction. The tag includes if it was a walk or call and if they were completed (any status) or skipped.

In order to re-canvass or re-call a person, their completion status will need to be reset by removing the special FieldEdge tags. You can do this either using [FieldEdge HQ' List Reset tool](/product-tour-or-hq/tools/list-reset) or batch update to a list in NationBuilder.

{% hint style="info" %}
Want to know more detail about FieldEdge special tags? Read [our guide here](/everything-else/other-guides/fieldedge-special-tags)
{% endhint %}

### 🎯 Targeting Your Resets

Say you want to only reset people who were not home during when you knocked.

To do so, create a filter in NationBuilder, add these people to the list and then reset the list using one of the methods below.

### Two Methods of Resetting a List

{% tabs %}
{% tab title="List Reset Tool via FieldEdge HQ" %}
The FieldEdge HQ Reset Tool streamlines the process of re-canvassing or re-calling by providing an easy-to-use interface for resetting contact statuses in one place – with several options.\
\
**Open the** [**List Reset tool in FieldEdge HQ**](https://hq.fieldedgeapp.com/tools?type=list_reset) **or take our** [**List Reset Tool tour**](/product-tour-or-hq/tools/list-reset)**.**
{% endtab %}

{% tab title="Batch Update via NationBuilder" %}
If you prefer to do all of your list management in NationBuilder, you can use NationBuilder's Batch Update List feature to remove the applicable tags:\
\
`fe:walk Completed`\
`fe:walk Skipped`\
`fe:call Completed`\
`fe:call Skipped`\
\
You'll need to batch update the list to remove the applicable tags

\
**See our guide to** [**Batch update a list in NationBuilder**](/everything-else/other-guides/batch-update-a-list-in-nationbuilder).
{% endtab %}
{% endtabs %}

{% hint style="warning" %}
If you have OLD FieldEdge special tags applied prior to late April 2024, you may need use our Legacy List Reset tool to remove the older tags from your list.
{% endhint %}


# Turf cut by district, ward or pecinct

Create walk lists by filtering on districts, wards, precincts and electorates

Would you like to create walk lists based on people in a specific district, ward or precinct? Let us show you how.

{% embed url="<https://www.youtube.com/watch?feature=emb_title&v=B-hqbEX3pds>" %}

1\. Head to the map view in your nation

![](https://downloads.intercomcdn.com/i/o/45479432/6ac85757700a2de20927d89c/Screen+Shot+2018-01-16+at+3.51.53+pm.png)

2\. Click on the filter button

![](https://downloads.intercomcdn.com/i/o/45479406/911a8e9a55904c2d0afb78aa/Screen+Shot+2018-01-16+at+3.51.07+pm.png)

3\. Add a criteria and search for "district", "ward" or "precinct" to filter on that field

![](https://downloads.intercomcdn.com/i/o/45479493/eb215ee2b11c5f7dc8e2c9ea/Screen+Shot+2018-01-16+at+3.53.25+pm.png)

4\. Enter the name of the district, ward or precinct and hit the Filter button

![](https://downloads.intercomcdn.com/i/o/45479538/d0c169ce2b6699715178b5c1/Screen+Shot+2018-01-16+at+3.54.33+pm.png)

5\. The map should now only display households from the district, ward or precinct which you can [turf cut as normal](http://nationbuilder.com/how_to_use_map_view_and_turf_cut)

![](https://downloads.intercomcdn.com/i/o/45479812/2c03c357796a95177a9a40e3/Screen+Shot+2018-01-16+at+4.01.15+pm.png)

**If you have any questions about turf cutting, please shoot us a note and we will be happy to help!**

<br>


# Include all people in households

If you have created a list, not just by geocoding, but by targeting people that match a specific criteria, you may end up with a list by where there are additional people in the households you are targeting but not on the list – meaning they won't show up in FieldEdge.

If you would like to also include people who live in the same household you can do so in NationBuilder. You can then choose to canvass or skip these individuals as well.

### Update the list with other household members

Open the list in NationBuilder and tap on the "Households" tab.

You will see the total number of people on the current list and the number of people who are members of households but not on the list.

To add the "missing" people, tap the "Add X in households to list" button.
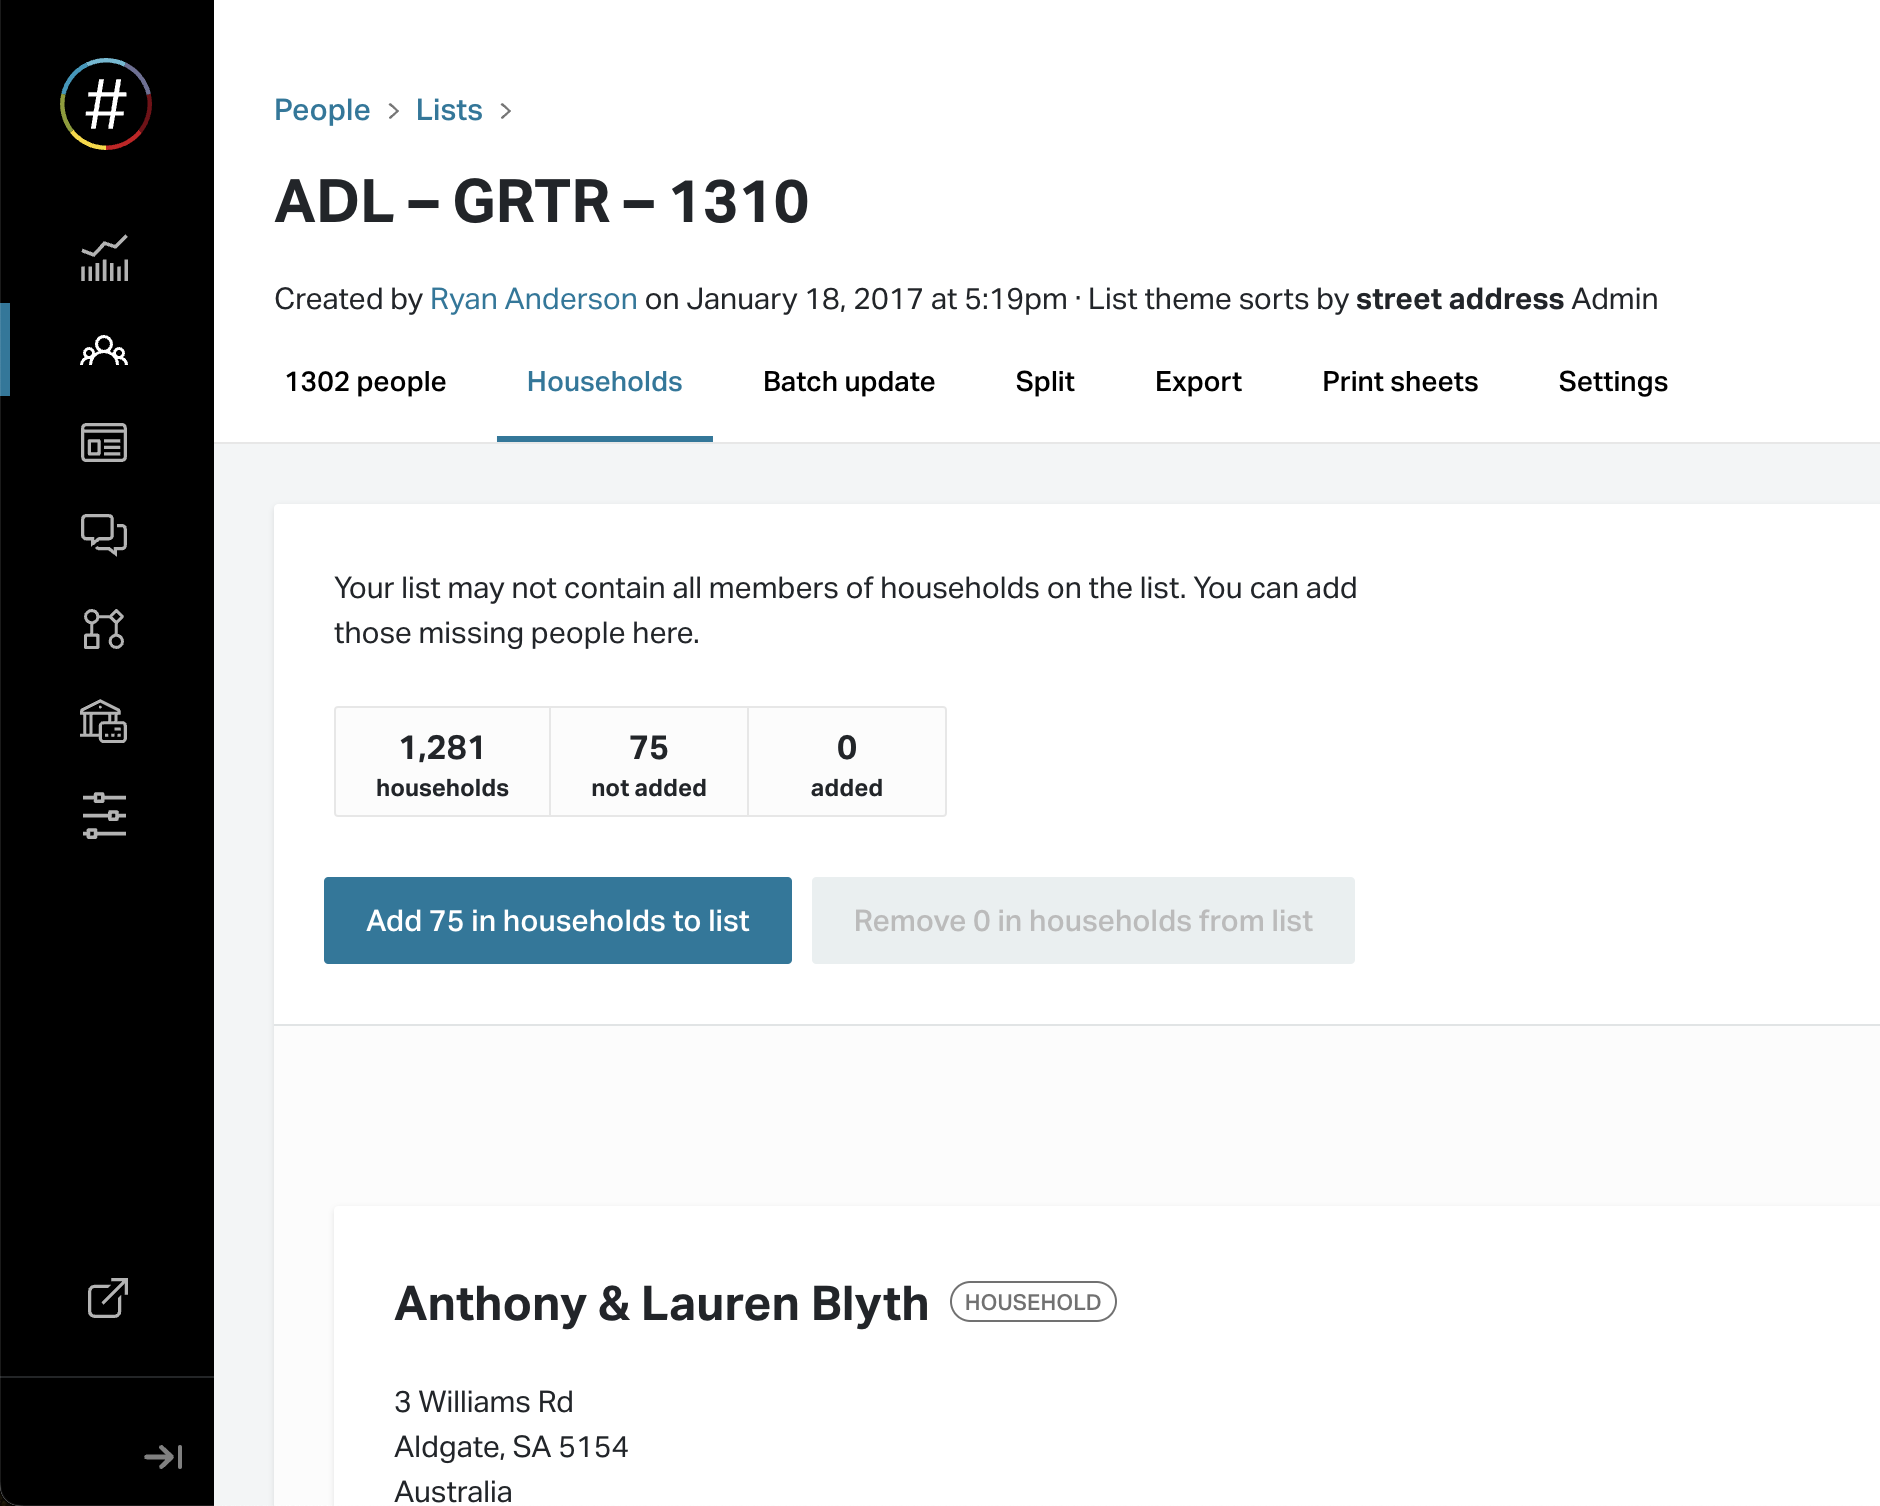
<figure><img src="https://3317596624-files.gitbook.io/~/files/v0/b/gitbook-x-prod.appspot.com/o/spaces%2Fmd1HR6LZFUYuK3fPHLXC%2Fuploads%2FRsN7CHHxhWiBEqTeOS89%2FCleanShot%202024-05-01%20at%2017.47.30%402x.png?alt=media&amp;token=66d53778-76d9-438b-adfb-0f3db8180c15" alt=""><figcaption></figcaption></figure>

### Identifying the primary contact(s) in the field

If you would like to know who is the primary contact and who isn't, while looking at the household in FieldEdge, you can do so with our tag highlighting feature.

1. Start by tagging everyone on the list before adding additional household members. You may already have an appropriate tag or you may want to add something like "Targeted Voter"
2. Add the additional household members
3. Go to FieldEdge HQ -> App Customization -> Tags and add the tag (eg. "Targeted Voter") to the list of highlighted tags
4. You may want to turn on displaying tags at a household level (as shown below) if not already turned on – contact us for assistance.
5. You will not see the Target Voter highlighted on the Household screen
6. You can choose to canvass the others in the household or skip them

   <figure><img src="https://3317596624-files.gitbook.io/~/files/v0/b/gitbook-x-prod.appspot.com/o/spaces%2Fmd1HR6LZFUYuK3fPHLXC%2Fuploads%2FpDnTDRN60O8L6Q6TapqG%2FIMG_05885EFCC324-1.jpeg?alt=media&amp;token=a38d423f-79f7-4b54-8ff7-428b57f52947" alt="" width="188"><figcaption></figcaption></figure>


# Collecting extra profile data (eg. email address)

Collecting profile data such as email addresses and phone numbers during canvassing or calls is crucial for maintaining up-to-date supporter records. FieldEdge makes this easy by allowing you to add these questions to a survey and then syncing the data to the person's NationBuilder profile.

### How It Works

1. Decide which contact fields you'd like to capture based on the table of [supported fields here](https://guides.fieldedgeapp.com/guide-to-canvassing-and-calls/setup/adding-a-survey#native-contact-fields) (under "Native Contact Fields").
2. Create a survey in NationBuilder [following our guide](/guide-to-canvassing-and-calls/setup-and-core-workflows/adding-a-survey) or edit an existing one.
3. For each contact field, create a new text question in your survey, ensuring the slug contains the value from [the supported fields table](https://guides.fieldedgeapp.com/guide-to-canvassing-and-calls/setup/adding-a-survey#native-contact-fields).

**For step-by-step instructions on setting up native fields with our advanced survey features, visit our** [**Adding a Survey**](https://guides.fieldedgeapp.com/guide-to-canvassing-and-calls/setup/adding-a-survey#native-contact-fields) **guide.**

By configuring these fields, collected data is automatically mapped to the appropriate profile fields, reducing manual entry and improving accuracy.

<figure><img src="https://3317596624-files.gitbook.io/~/files/v0/b/gitbook-x-prod.appspot.com/o/spaces%2Fmd1HR6LZFUYuK3fPHLXC%2Fuploads%2F03ewoOfLt0F2VIAyD0dN%2Fimage.png?alt=media&amp;token=751626f4-ff16-46a0-ada3-45b6142ca1ca" alt=""><figcaption></figcaption></figure>


# Using Advanced Surveys as Scripts

Learn how to integrate outreach scripts and talking points

FieldEdge allows you to create scripts or talking points that staff and volunteers can follow during outreach conversations.

Instead of using a separate document, the script can be built directly in FieldEdge so users can follow prompts and record responses in the same place. This helps keep conversations consistent while capturing useful information from each interaction.

Scripts text can integrated into a survey, using the Advanced Survey feature.

As users move through the survey, they can follow the talking points and record answers. Responses are saved directly to the contact’s record in NationBuilder.

<figure><img src="https://3317596624-files.gitbook.io/~/files/v0/b/gitbook-x-prod.appspot.com/o/spaces%2Fmd1HR6LZFUYuK3fPHLXC%2Fuploads%2FntFZIIcOt24oWJ5vizc2%2Fimage.png?alt=media&amp;token=abe6df93-db3c-4255-be1a-4bf6a15f42ca" alt=""><figcaption></figcaption></figure>

### Creating a Script

To create a script, simply build an NationBuilder Survey and include talking points by using the special "Script" field type from FieldEdge's Advanced Survey language.

For instructions, see:

{% content-ref url="/pages/3A1nmxuIrRh7aumLxCz8" %}
[Using Advanced Surveys as Scripts](/guide-to-canvassing-and-calls/extended-workflows/using-advanced-surveys-as-scripts)
{% endcontent-ref %}

This guide explains how to create a survey, add questions and script text.


# Reporting

Track and report on your team's canvassing and phone banking activity

**Collecting, managing, and using data smartly is key to running a successful campaign.**

As you and your team use FieldEdge, NationBuilder will be collecting data about the people you interact with. This data can be extremely useful for analyzing your performance and future communication.

Want to understand the performance of your canvassing activity? **Need answers to questions like?:**

* How many people were canvassed last week?
* Who canvassed the most households today?
* What was the reception/outcome at the door in a certain area?
* What notes were entered at each door?
* How many doors are we hitting per hour?
* What canvassers are performing the best/worst?

#### There are two approaches to reporting activity in FieldEdge:

{% tabs %}
{% tab title="HQ Dashboard" %}
FieldEdge's HQ Dashboard delivers overarching reporting of campaign performance, broken down by different criteria and delivered in chart format.

It also allows you to track your canvassers' real location on a map as they complete households (not available on all plans) for greater oversight and accountability.
{% endtab %}

{% tab title="NationBuilder" %}
For detailed information on who was canvassed and any notes taken, segmented by the canvasser, when and the outcome, you can use NationBuilder's filters to find the data you need.
{% endtab %}
{% endtabs %}

#### Further reading

{% content-ref url="/pages/yWsc3ScsruGXFOTYo3jr" %}
[Tracking performance in the HQ Dashboard](/guide-to-canvassing-and-calls/reporting/tracking-performance-in-hq)
{% endcontent-ref %}

{% content-ref url="/pages/Sf0BrPOsYcKoMxKrFd8k" %}
[User location tracking](/guide-to-canvassing-and-calls/reporting/user-location-tracking)
{% endcontent-ref %}

{% content-ref url="/pages/0dlMVObDuqRd3J6ksr6p" %}
[Activity in NationBuilder](/guide-to-canvassing-and-calls/reporting/filtering-activity-in-nb)
{% endcontent-ref %}

{% content-ref url="/pages/lMq662Odh6QZx1I3Il0h" %}
[Viewing survey results](/guide-to-canvassing-and-calls/reporting/viewing-survey-results)
{% endcontent-ref %}

{% content-ref url="/pages/6j6d7O0jfWzzNdkOn9ND" %}
[Exporting activity and notes](/guide-to-canvassing-and-calls/reporting/exporting-activity-and-notes)
{% endcontent-ref %}

<br>


# Tracking performance in the HQ Dashboard

Monitor real-time field activity and review aggregated campaign metrics using the HQ Dashboard

The Performance section of the FieldEdge HQ Dashboard is your main tool for understanding what's happening in the field. It has three views, each suited to a different question.

{% hint style="info" %}
You need Campaign Manager access to use the Performance page. Open the HQ Dashboard at [hq.fieldedgeapp.com](https://hq.fieldedgeapp.com) and select **Performance** from the sidebar.
{% endhint %}

## Reports

Reports shows aggregated metrics and charts for a selected time period. Use it after (or during) a campaign push to answer questions like "how many contacts did we make this week?", "what was our door answer rate?", or "which contact statuses are most common?". You can filter by activity type and date range, and drill down by canvasser.

## Stream

The Stream is a live feed of every contact your team logs, updating in real time. Use it while a canvass or phone banking session is actively underway — you can watch activity come in as it's completed, filter by team member or outcome, and spot location anomalies as they happen.

## Team

The Team screen breaks down performance by individual team member. Use it to see who's making the most contacts, who's having quality conversations, and how output varies day by day across your roster.

{% hint style="info" %}
The Team screen is a new feature in [HQ Dashboard V2](/product-tour-or-hq/early-access), currently in early preview.
{% endhint %}

For a full breakdown of every metric, filter, and widget across all three views, see the [Performance reference in the Product Tour](/product-tour-or-hq/performance).

## What to check if data seems off

**A house is Completed but has no contact status**: A volunteer can press **Complete** without selecting **Available/Unavailable**. The activity is recorded in FieldEdge and NationBuilder, but its contact status is missing. See the [questions about surveys and completion](/product-tour-or-mobile-app/canvass/canvass-profile#frequently-and-infrequently-asked-questions).

**Activity isn't appearing in the Stream**: The Stream only captures contacts logged through the **Canvass** or **Call Time** features in the mobile app. If a team member logs contact via NationBuilder's native Log Contact action — even with Door Knock or Phone selected as the method — it won't appear in the Stream or any field activity metrics.

**Support level stats look low**: Support level is optional in FieldEdge. Avg. Support Level and Confirmed Support Level only reflect contacts where it was recorded.

**A contact status is missing from the Outcome chart**: Only contact statuses enabled in [App Customization](/product-tour-or-hq/app-customization) are available to field users, so disabled statuses won't appear here.

## Further reading

{% content-ref url="/pages/81skv3NJj2yndoj1ERkb" %}
[Performance](/product-tour-or-hq/performance)
{% endcontent-ref %}

{% content-ref url="/pages/Sf0BrPOsYcKoMxKrFd8k" %}
[User location tracking](/guide-to-canvassing-and-calls/reporting/user-location-tracking)
{% endcontent-ref %}

{% content-ref url="/pages/0dlMVObDuqRd3J6ksr6p" %}
[Activity in NationBuilder](/guide-to-canvassing-and-calls/reporting/filtering-activity-in-nb)
{% endcontent-ref %}


# Activity in NationBuilder

Use NationBuilder to find notes, create new lists based on outcomes and more

## **Segmenting Results** <a href="#h_04d1bc0f34" id="h_04d1bc0f34"></a>

When someone is canvased in FieldEdge, the app will "Log Contact" in NationBuilder, recording the date, outcome, and any notes taken during the interaction.

To find people who have been canvassed, you can use a filter that targets this Logged Contact (with the method of "Door Knock"). By using filter combinations, you find an activity that matches specific criteria, such as:

* the date they were canvassed
* who they were canvassed by
* the outcome of the canvass.

Running a filter will give you a total number of people that match the criteria, as well as the list of people, so you can dive in one by one and review the details such as any notes.

Here are a few useful filters to find canvass activity that matches specific criteria...

{% embed url="<https://www.youtube.com/watch?v=1hQzeAxLXpU>" %}

**Show people who were contacted but did not answer in a certain time period:**

![](https://downloads.intercomcdn.com/i/o/50298352/d8fa8b85eaf6436d5fbf7449/Filter_contacted-no-answer-between-date.png)

**Show people who were contacted by a specific person on a specific date:**

![](https://downloads.intercomcdn.com/i/o/50298399/184712f2db2d155b0f13eaa0/Filter_contacted-by-and-date.png)

**Show people who were last contacted via a doorknock and requested information:**

![](https://downloads.intercomcdn.com/i/o/50298421/cfb577582c71add26f82058a/Filter_doorknock-send-info.png)

From there you may want to export a list of those people, add them to a list or batch update them. **Looking to export the details of each contact including notes?** [See our article on exporting notes](/guide-to-canvassing-and-calls/reporting/exporting-activity-and-notes).

As you can see, using NationBuilder’s built-in reports, plus the use of filters can deliver great analytical data and segmentation based on your team’s activity with FieldEdge.

**Some examples of things you might do with this data:**

* Create a new list to canvass in the future
* Create a list to send an email blast or thank you note
* Analyze the performance of a particular canvasser

**Important notes:**

* FieldEdge uses the Log Contact feature built into NationBuilder to record canvass interactions
* Segmenting data is primarily based on the logged contact (contact history)
* Run a filter to create your segment of people (eg. use the filters "Contacted on" and Contacted by")

***

## **View Individual Results & Notes** <a href="#h_679c3b488f" id="h_679c3b488f"></a>

To view the details of the individual interaction, open the person and scroll down to their Activity feed. You'll see the outcome of the interaction and any notes added.

![](https://downloads.intercomcdn.com/i/o/481642181/ba77ac2d4c9295f9f40f17b0/Screen+Shot+2022-03-17+at+12.44.16+pm.png)

**Want to export the details of each contact including notes?** [See our article on exporting notes](/guide-to-canvassing-and-calls/reporting/exporting-activity-and-notes).

**Summarised Results**

Using NationBuilder’s built-in tools, we can view a summary of our canvassing efforts for analysis right on our Dashboard. With FieldEdge version 2, each time you "complete" a person, the contact is logged to your nation and a special FieldEdge tag is added to the person.

For each interaction, you will now have a quantitative measure of the interaction by nominating the Contact Status flag – options include “No answer” “Inaccessible” “Meaningful interaction” “Send information” and more. Optionally you can collect qualitative feedback using the Note field.

**To view our summary, navigate to Dashboard > Contact:**

![](https://downloads.intercomcdn.com/i/o/346657615/663218de601e05536e65a3c0/Screen+Shot+2021-06-07+at+1.31.17+pm.png)

There are two ways you might want to view this data:

* a break down of day-to-day volume (Monthly view)
* a break down per canvasser during a given period (Point Person contacts view).

#### Point Person contacts view <a href="#h_cabd60bfe1" id="h_cabd60bfe1"></a>

![](https://downloads.intercomcdn.com/i/o/50298129/c5805b7a10900afb16d2ab3b/Contact-point-person-stats.png)

**In this view you can filter by Path or Contact Type (legacy), Contact Method and timeframe:**

![](https://downloads.intercomcdn.com/i/o/50298179/c269e4f038800e2e804c7f33/Contact-point-person-filters.png)

**You will be given some key stats:**

![](https://downloads.intercomcdn.com/i/o/50298199/3702eeb9b8f41acec9b36410/Contact-point-person-stats-slim.png)

*\*Note that at this time, the support status logged through FieldEdge will not show up in these stats.*

**Next, you’ll see a visual representation of your canvasser’s efforts:**

![](https://downloads.intercomcdn.com/i/o/50298226/2e1611c14ee3ba32daf90d88/Contact-point-person-graphs.png)

**And finally, a detailed breakdown:**

![](https://downloads.intercomcdn.com/i/o/50298257/bcb19a7335bc8576dc76a498/Contact-point-person-table.png)

#### Monthly view <a href="#h_3af2ac535e" id="h_3af2ac535e"></a>

**You can also use the Monthly to see a day-by-day snapshot of your canvassing efforts.** You can use the filter at the top to view only stats for a particular Path or Contact Type:

![](https://downloads.intercomcdn.com/i/o/50298287/303dc3ed2502f10da6071239/Contact-monthly.png)<br>

#### Questions? <a href="#questions" id="questions"></a>

If you have any questions about tracking and reporting canvass activity in FieldEdge, please don't hesitate to reach out. We're fully certified NationBuilder Experts!


# Viewing survey results

View the consolidated summary of survey results or an individual's responses

Once people have responded to the survey, you can see all summaries of the results for that survey or an individual's responses from the person's profile.

## Survey Results Summary <a href="#h_b66e1c8d29" id="h_b66e1c8d29"></a>

To understand the response to a survey, navigate to the survey you wish to review and find the "Results" tab of the survey.

{% hint style="info" %}
Surveys can be found **`People`** (main menu) **`> Surveys`** (horizontal menu)
{% endhint %}

A summary of responses to each question will be shown like so:

![](https://downloads.intercomcdn.com/i/o/45480414/7c9810871ad80ab994f07a6d/image.png)

## Individual Responses <a href="#h_59692c0bb3" id="h_59692c0bb3"></a>

To understand how an individual responded to a survey, open the Contact and scroll down to their Activity feed. From here you should be able to find the answers to each survey question like so:

![](https://downloads.intercomcdn.com/i/o/481643115/6a8af8f416619b244cf0ddb1/Screen+Shot+2022-03-17+at+12.46.15+pm.png)

#### Questions?

If you have any questions about tracking and reporting canvass activity in FieldEdge, please don't hesitate to reach out. We're fully certified NationBuilder Experts!

<br>


# Viewing Notes

View notes captured during canvassing and call time inside NationBuilder

Notes captured during canvassing and call time sync back to NationBuilder as part of the logged contact. This means each contact record includes who was canvassed, the outcome of the interaction, and any notes that were captured by the canvasser or caller.

## Finding Notes on a Profile

To view notes for a specific person, open their profile in NationBuilder and scroll down to the tab row (Dashboard, Edit, Location, Finances, etc.). Continue scrolling past the tab row and you'll reach the **Activity Feed**.

In the activity feed, look for entries like:

> *Ryan Anderson contacted Josh Howard via Door knock Answered*

These entries represent logged contacts synced from FieldEdge. Click **Show More** on any entry to expand it and see the full notes captured during that interaction.

## Viewing Notes in FieldEdge

You can also view notes directly in FieldEdge. Open the contact's profile in the app and tap the **Activity** tab to see their logged contacts, including any notes that were captured.

## Filtering by Note Content

There's no way to filter for everyone who has a note as part of their logged contact, but you can filter for notes that **contain a specific string of text**. This is useful if you're looking for contacts where something specific was mentioned.

To do this, open the People filter in NationBuilder and add a **Logged contact note** criteria set to **contains**, then enter the text you're looking for.

{% hint style="info" %}
This filter is particularly useful for finding contacts where a canvasser flagged something important — for example, filtering for "major donor" or "volunteer" to follow up with specific people.
{% endhint %}

## Coming Soon: Notes Export Tool

We're currently working on a tool that makes it easy to pull all notes into a single place for bulk review and export. If you'd like early access, please reach out to us — we'd love to hear from you.

#### Questions?

If you have any questions about viewing notes or reporting canvass activity in FieldEdge, please don't hesitate to reach out. We're fully certified NationBuilder Experts!

<br>


# User location tracking

Monitor where your canvassers are logging activity relative to household locations

{% hint style="info" %}
Not available on all plans
{% endhint %}

FieldEdge tracks the GPS location where your canvassers log activity and compares it to the household's known location. This helps Campaign Managers spot anomalous behavior — especially useful when managing paid canvassers.

Location tracking is built into the **Stream** on the [Performance](/product-tour-or-hq/performance) page. There is no separate map view — location data appears as distance warnings on each activity card in the Stream.

## How It Works

When a canvasser completes a household during a walk, FieldEdge records two GPS coordinates:

* **Household location** — the address coordinates from NationBuilder
* **Activity location** — where the canvasser's device was when they logged the activity

The distance between these two points is calculated automatically and displayed on the activity card in the Stream.

## Distance Warnings

Activity cards in the Stream display a distance badge when location data is available. The badge is color-coded by severity:

| Distance  | Severity   | What It Means                                                |
| --------- | ---------- | ------------------------------------------------------------ |
| 0–30 m    | No warning | Canvasser was at or very near the household                  |
| 30–100 m  | Low        | Canvasser was nearby — typically normal                      |
| 100–500 m | Medium     | Canvasser was some distance away — worth reviewing           |
| 500+ m    | High       | Canvasser was far from the household — may indicate an issue |

{% hint style="info" %}
Use the **Warnings only** toggle in the Stream filters to show only activities with distance warnings. This is the fastest way to review location anomalies.
{% endhint %}

## Viewing Location Details

Tap an activity card in the Stream to open the detail sheet, which shows:

* **Household address** — clickable link to Google Maps
* **Household coordinates** — GPS lat/lng with a Google Maps link
* **Activity coordinates** — where the canvasser actually was, with a Google Maps link
* **Distance** — the calculated distance between the two points, with a "Get directions" link

{% hint style="info" %}
If a canvasser's device did not capture GPS coordinates, the activity card will show a "Not captured" badge instead of a distance.
{% endhint %}

{% content-ref url="/pages/81skv3NJj2yndoj1ERkb" %}
[Performance](/product-tour-or-hq/performance)
{% endcontent-ref %}


# Exporting activity and notes

Create an automation that automatically syncs new logged contacts as they happen to Google Sheets, Airtable, Excel, etc.

{% hint style="success" %}
This tutorial assumes you have some familiarity with Zapier. If you need help, feel free to reach out to our support team.
{% endhint %}

FieldEdge uses NationBuilder's Log Contact feature to store the outcome and notes of canvass activity. Unfortunately, at this point in time, NationBuilder does not have a way to export Log Contact data.

Using [Zapier](https://zapier.com/app/dashboard), we've created an automation to sync that data in real-time to an online spreadsheet tool of your choice – such as Google Sheets, [Airtable](https://go.ryand.co/airtable) or Excel.

Watch the tutorial below to see how you can set the automation up for yourself.

{% embed url="<https://www.youtube.com/watch?v=gmwR3nT_EHo>" %}

{% hint style="danger" %}
This method can use a lot of Zapier tasks and can become expensive. We are working on other solutions so please reach out if this is something you are interested in.
{% endhint %}


# Overview

A tour of the FieldEdge mobile app and its key features

FieldEdge is a mobile CRM that connects users to the NationBuilder database from a phone or tablet. The app lets users search and access voter data, create walk lists, canvass door-to-door, make phone calls from call lists, collect survey responses, and track every interaction in real time.

## Bottom navigation

The FieldEdge mobile app has four main tabs at the bottom of every screen:

### People

Search and browse contacts from your NationBuilder database, view full profiles, edit details, and manage tags and lists.

{% content-ref url="/pages/nlACcbe1PJoY0UI0QvKp" %}
[People](/product-tour-or-mobile-app/people)
{% endcontent-ref %}

### Canvass

The door-to-door canvassing interface. Work through a walk list on the map or as a list, log outcomes household by household, take surveys, and add tags — even when offline.

{% content-ref url="/pages/P0RGdR5wf1r1k4EOh9SA" %}
[Canvass](/product-tour-or-mobile-app/canvass)
{% endcontent-ref %}

### Call Time

Make calls to contacts from your call lists, log outcomes, take surveys, and track progress through a phone banking session.

{% content-ref url="/pages/YcDuSkWWWc1x1jvpX8v6" %}
[Call Time](/product-tour-or-mobile-app/call-time)
{% endcontent-ref %}

### Account

Manage your account, app settings, language, location permissions, and access support.

{% content-ref url="/pages/7MeS8PIyAEDUuVPz6X2S" %}
[Account](/product-tour-or-mobile-app/account)
{% endcontent-ref %}

{% hint style="info" %}
Which tabs (People, Canvass, Call Time) appear on the bottom nav is configured per user type in [App Customization](/product-tour-or-hq/app-customization).
{% endhint %}

## Across the app

A few key features show up in multiple places:

{% content-ref url="/pages/JwbkE6rhnd5zG4pmDXqB" %}
[Actions](/product-tour-or-mobile-app/actions)
{% endcontent-ref %}

{% content-ref url="/pages/P5vfNyisBXDDJhjIPqac" %}
[Tags](/product-tour-or-mobile-app/tags)
{% endcontent-ref %}

{% content-ref url="/pages/OL0U6jDM2pjOgYAYqcaG" %}
[Offline Capabilities](/product-tour-or-mobile-app/offline-capabilities)
{% endcontent-ref %}


# People

Access and manage NationBuilder contacts from the FieldEdge mobile app

The People tab is where you access your NationBuilder contacts on the go — searching your database, browsing contacts by tag or list, viewing and editing full profiles, and taking actions like logging contact or managing tags.

## Tabs

The People screen has three tabs across the top:

{% content-ref url="/pages/KABPGFEYpKqjCV7PYVFf" %}
[Contacts Tab](/product-tour-or-mobile-app/people/contacts)
{% endcontent-ref %}

{% content-ref url="/pages/hrG8b7aJx7ke4CJYSvEs" %}
[Tags Tab](/product-tour-or-mobile-app/people/tags-tab)
{% endcontent-ref %}

{% content-ref url="/pages/YP8x1Vyaex5tQdjx9kKO" %}
[Lists Tab](/product-tour-or-mobile-app/people/lists)
{% endcontent-ref %}

## Finding people

A search bar at the top lets you find contacts by name, phone, or email across your whole database.

{% content-ref url="/pages/uxJIJCb2WnSyxjtynb4q" %}
[Search](/product-tour-or-mobile-app/people/search)
{% endcontent-ref %}

## Contact Profile

Tap any contact to open their full profile screen.

{% content-ref url="/pages/mNbeVNiu4CLJtjCmdTt1" %}
[Contact Profile](/product-tour-or-mobile-app/people/profile)
{% endcontent-ref %}

## Adding contacts

{% content-ref url="/pages/oIH55xjKX3iIbX0BTHuV" %}
[Add a Contact](/product-tour-or-mobile-app/people/add-a-contact)
{% endcontent-ref %}

## Data Access

### NationBuilder users

When using the [Log in with NationBuilder](/team-setup) option, the data displayed in FieldEdge follows the permission sets of the logged-in user. If a user cannot see a person in NationBuilder, they will not be able to see that person in FieldEdge.

### Accountless users

Accountless users inherit permissions from the Admin account connected to your nation. The People menu is hidden and inaccessible by default, to prevent full access to your database. Accountless users can only access contacts via a Canvass walk or Call Time session, through lists assigned to them in FieldEdge HQ. See [Team Setup](/team-setup) for more detail.

## Hiding the People Menu

The People section can be turned off for user types via the [App Customization](/product-tour-or-hq/app-customization) section in FieldEdge HQ.


# Contacts Tab

Browse the full list of contacts in the People tab

The Contacts tab is the default view of the People section. It shows every contact in your NationBuilder database that you have permission to see, as a scrollable list.

## What's shown

At the top, a counter shows "X of Y people" — how many contacts are currently visible after any active filters, out of the total.

Each row in the list shows the contact's name and key identifying info (such as address). Tap a row to open the full [Contact Profile](/product-tour-or-mobile-app/people/profile).

## Sorting and filtering

Use the sort and filter controls at the top of the screen to refine which contacts are shown. The same filter and sort options used in Canvass apply here.

{% content-ref url="/pages/QPZy04sFVa9CGxtwK0FO" %}
[Filter & Sort](/product-tour-or-mobile-app/canvass/filter-and-sort)
{% endcontent-ref %}

## Adding a contact

Tap the **+** button to create a new contact.

{% content-ref url="/pages/oIH55xjKX3iIbX0BTHuV" %}
[Add a Contact](/product-tour-or-mobile-app/people/add-a-contact)
{% endcontent-ref %}


# Tags Tab

Browse contacts by tag in the People section

The Tags tab in the People section lets you browse all tags in your NationBuilder database and see which contacts have each tag.

## What's shown

A scrollable, searchable list of every tag in your nation. Tap a tag name to view a list of contacts who have that tag.

Tap any contact in the resulting list to open their [Contact Profile](/product-tour-or-mobile-app/people/profile).

## Adding and removing tags

To add or remove tags on an individual contact, use the [Actions menu](/product-tour-or-mobile-app/actions) from their profile.

{% content-ref url="/pages/P5vfNyisBXDDJhjIPqac" %}
[Tags](/product-tour-or-mobile-app/tags)
{% endcontent-ref %}

{% hint style="info" %}
Optionally, you can choose to highlight specific tags at the top of profiles, or hide tags from view entirely. Both are configured in [App Customization](/product-tour-or-hq/app-customization) → Tags.
{% endhint %}


# Lists Tab

Browse NationBuilder lists from the People section

The Lists tab in the People section shows every NationBuilder list you have permission to access.

## What's shown

Each row shows the list name and number of people on the list. Tap a list to view its contents — the contacts on the list appear as a scrollable list, the same as the [Contacts tab](/product-tour-or-mobile-app/people/contacts).

{% hint style="info" %}
The lists shown here are the same lists used for [Canvass](/product-tour-or-mobile-app/canvass) walks and [Call Time](/product-tour-or-mobile-app/call-time) sessions. To start canvassing or calling a list, use those sections rather than starting from People.
{% endhint %}


# Search

Find contacts in your NationBuilder database from the FieldEdge mobile app

A search bar sits at the top of the People tab, letting you quickly find contacts across your NationBuilder database.

## How to search

Tap the search bar and type to search by:

* **Name** — first name, last name, or both
* **Phone number** — full or partial
* **Email address** — full or partial

Results appear as you type. Tap any result to open the contact's full [Profile](/product-tour-or-mobile-app/people/profile).

{% hint style="info" %}
Search queries your NationBuilder database and requires an active data connection. Search is not available offline.
{% endhint %}


# Contact Profile

The full contact profile screen in the FieldEdge mobile app

The Contact Profile screen displays everything FieldEdge knows about a contact from NationBuilder, organized into three tabs.

## Opening a profile

You can reach the Contact Profile in two ways:

* **From the People tab** — tap any contact in the [Contacts tab](/product-tour-or-mobile-app/people/contacts), or from a list or tag.
* **From a Canvass walk or Call Time session** — if your user type has the "Allow users to access full profiles via canvass/call list" option enabled in [App Customization](/product-tour-or-hq/app-customization), you can tap into the full profile from the in-walk [Canvass Profile](/product-tour-or-mobile-app/canvass/canvass-profile). If this is disabled for your user type, you'll only see the canvass-context profile during a walk or call.

## Header

At the top of the profile you'll see:

* Avatar and name
* Tags (with highlighted tags surfaced — see [App Customization → Tags](/product-tour-or-hq/app-customization))
* Last contact info (date, type, outcome)

## Personal Tab

The Personal tab shows the contact's identifying and contact information:

* Name, prefix, demographics (age, gender)
* Phone numbers, email addresses
* Home address
* Custom fields (see [Custom Fields](/product-tour-or-mobile-app/people/custom-fields))

Tap a phone number or email to call or message directly. Tap the edit icon to update any field — changes sync to NationBuilder in real time.

{% hint style="info" %}
Which fields are editable on a contact (such as Religion, Name Prefix, Middle Name) is configured in [App Customization](/product-tour-or-hq/app-customization) → Edit Fields.
{% endhint %}

## Support Tab

The Support tab shows political and engagement data:

* Support level (1 = strong support … 5 = strong oppose)
* Priority level
* Party affiliation
* Capital and political capital scores (where available)

{% hint style="info" %}
Which profile fields appear (such as Donations) is configured in [App Customization](/product-tour-or-hq/app-customization) → Profile Fields.
{% endhint %}

### Ballots (Voting History)

Ballots are imported as a historical record of when elections occurred and how an individual voted in that election. If ballots have been imported into your nation and available for the profile, you will see a "Ballots" section under the Support tab. Opening this section will show a list of ballots.

<div><figure><img src="https://3317596624-files.gitbook.io/~/files/v0/b/gitbook-x-prod.appspot.com/o/spaces%2Fmd1HR6LZFUYuK3fPHLXC%2Fuploads%2Fy4FVOlnjQKf6tOzE8mEL%2FFE%20access%20ballots%20profile.PNG?alt=media&amp;token=a91fd413-137c-4a47-ba0c-376c822c09c6" alt=""><figcaption></figcaption></figure> <figure><img src="https://3317596624-files.gitbook.io/~/files/v0/b/gitbook-x-prod.appspot.com/o/spaces%2Fmd1HR6LZFUYuK3fPHLXC%2Fuploads%2FMkczrojpjY5grqLLMICX%2FFE%20ballots%20screen.PNG?alt=media&amp;token=d4b5a96d-121b-43f4-afff-769bd7a98725" alt=""><figcaption></figcaption></figure></div>

{% hint style="info" %}
Note: The vote history stat boxes on the NationBuilder Control Panel will show all the elections the nation has set up that the person is eligible to have voted in based on their registered address. FieldEdge only shows the ballots where the person voted.
{% endhint %}

For further detail on Ballots and vote history, see NationBuilder's [Import vote history](https://support.nationbuilder.com/en/articles/2471330-import-vote-history) documentation.

## Activity Tab

The Activity tab is a chronological log of every interaction recorded against this contact:

* Logged contacts (with date, method, outcome, and who logged them)
* Private notes
* Survey responses
* Tag changes

Use this tab to review past engagement before reaching out again.

## Taking Actions

A floating action button opens the Actions menu — log a contact, add a note, manage tags, take a survey, set priority or support level, and more.

{% content-ref url="/pages/JwbkE6rhnd5zG4pmDXqB" %}
[Actions](/product-tour-or-mobile-app/actions)
{% endcontent-ref %}


# Add a Contact

Create new contacts from the FieldEdge mobile app

FieldEdge lets you create new contacts directly from the mobile app. New contacts are added to your NationBuilder database in real time, making it easy to grow your voter file while in the field.

## How to Add a Contact

1. Go to the **People** section
2. Tap the **Add** button (+ icon)
3. Fill in the contact's details
4. Tap **Save** to create the contact

## Contact Details

When adding a new contact, you can enter:

* **Name** — first name and last name (required)
* **Phone number** — mobile or home phone
* **Email address** — personal or work email
* **Address** — start typing and select from Google Places autocomplete suggestions for accurate address data
* **Support level** — initial support level (1–5)
* **Demographics** — age, gender, party affiliation, and other demographic fields

{% hint style="info" %}
Only the contact's name is required. All other fields are optional and can be filled in later.
{% endhint %}

## Address Autocomplete

When entering an address, FieldEdge uses Google Places autocomplete to suggest matching addresses as you type. Selecting a suggestion ensures the address is formatted correctly and geocoded for map display.

## Duplicate Detection

FieldEdge checks for potential duplicate contacts when you save. If a contact with a similar name or matching phone number/email already exists in your NationBuilder database, you'll be notified and given the option to:

* **View the existing contact** — open the potential duplicate's profile to verify
* **Create anyway** — proceed with creating the new contact if it's not a duplicate

{% hint style="warning" %}
Duplicate contacts can cause data inconsistencies. Always review potential matches before creating a new contact.
{% endhint %}

## Adding Contacts During a Canvass

You can also add new contacts while canvassing — for example, when you meet someone at a door who isn't in your database. New contacts created during a canvass are automatically added to NationBuilder.

{% content-ref url="/pages/mNbeVNiu4CLJtjCmdTt1" %}
[Contact Profile](/product-tour-or-mobile-app/people/profile)
{% endcontent-ref %}


# Custom Fields

View and edit custom NationBuilder fields on contact profiles

FieldEdge displays custom fields from your NationBuilder database on contact profiles. This lets your field team access and update campaign-specific data directly from the mobile app.

## Viewing Custom Fields

Custom fields appear on the **Personal** tab of a contact's [profile](/product-tour-or-mobile-app/people/profile). They are displayed below the standard contact information fields.

## Editing Custom Fields

To edit a custom field:

1. Open the contact's profile
2. Tap the **Edit** icon
3. Scroll to the custom fields section
4. Update the field value
5. Save your changes

Changes to custom fields sync back to NationBuilder in real time.

{% hint style="info" %}
Custom fields are defined in NationBuilder. FieldEdge displays and allows editing of custom fields that have been configured for your nation. To add or modify custom field definitions, use the NationBuilder control panel.
{% endhint %}

## Field Types

FieldEdge supports the following NationBuilder custom field types:

* **Text** — free-form text input
* **Number** — numeric values
* **Checkbox** — true/false toggle
* **Dropdown** — select from predefined options
* **Date** — date picker

{% content-ref url="/pages/mNbeVNiu4CLJtjCmdTt1" %}
[Contact Profile](/product-tour-or-mobile-app/people/profile)
{% endcontent-ref %}

{% hint style="info" %}
Which edit and profile fields are visible to users is configured in [App Customization](/product-tour-or-hq/app-customization).
{% endhint %}


# Canvass

Door-to-door canvassing in the FieldEdge mobile app

The Canvass tab is FieldEdge's door-to-door canvassing interface. Work through a list of contacts, log outcomes, take surveys, and add tags — all from your phone or tablet, online or offline.

{% hint style="info" %}
The Canvass menu can be turned on or off per user type in [App Customization](/product-tour-or-hq/app-customization).
{% endhint %}

When you tap **Canvass** from the bottom navigation bar, you see a list of your active walks. If you haven't created any walks yet, the screen shows an empty state with a button to create your first walk.

{% content-ref url="/pages/GIPFkteHzcBeWdOMVdyv" %}
[Starting a Walk](/product-tour-or-mobile-app/canvass/starting-a-walk)
{% endcontent-ref %}

## During a walk

Once you've started a walk, you can flip between two ways to view your list:

{% content-ref url="/pages/7bigUMVoTZ3ykS2pT8m5" %}
[Map View](/product-tour-or-mobile-app/canvass/map-view)
{% endcontent-ref %}

{% content-ref url="/pages/ZocJWMwdS0xT84v5ZA80" %}
[List View](/product-tour-or-mobile-app/canvass/list-view)
{% endcontent-ref %}

Tap a household to open the household view, then a person to open their canvass profile.

{% content-ref url="/pages/WDISPqn2CRH5oz4hqstD" %}
[Household View](/product-tour-or-mobile-app/canvass/household-view)
{% endcontent-ref %}

{% content-ref url="/pages/iEqP2pZ6upn4f1L8fjA8" %}
[Canvass Profile](/product-tour-or-mobile-app/canvass/canvass-profile)
{% endcontent-ref %}

## Coordinating multiple canvassers

Generally speaking, we recommend creating separate and unique lists for each canvasser. However, you may find some cases where you want canvassers to share a list (for example if they are walking odds & evens) or their lists may contain the same households.

To help you avoid unintentionally knocking the same door twice, it's recommended canvassers:

**a. Coordinate with each other**\
This way they can be aware of the houses and streets the other people plan to knock

**b. Use the "Sync Household Statuses" feature**\
Every few households, press sync to get any updates (completed houses) from other canvassers.

{% hint style="info" %}
You do not need to use this to sync your data, only to get other peoples data
{% endhint %}

<figure><img src="https://3317596624-files.gitbook.io/~/files/v0/b/gitbook-x-prod.appspot.com/o/spaces%2Fmd1HR6LZFUYuK3fPHLXC%2Fuploads%2FI4MmV6GiguiI8t8eS8mh%2FIMG_3763.PNG?alt=media&amp;token=2dcb4ed0-42c5-44ae-8cc0-9eebfe143fa4" alt=""><figcaption></figcaption></figure>


# Starting a Walk

Create a new walk in the FieldEdge mobile app

The Canvass tab opens to a list of your active walks. Tap any walk to resume it, or create a new one.

If you haven't created any walks yet, you'll see a **Create a Walk** button in the middle of the screen instead of a list — tap it to get started.

## Creating a new walk

Tap the **+** button in the corner to open a menu with three options:

* **Traditional Walk** — select an existing list of contacts from NationBuilder
* **Proximity Walk** — build a walk on the fly from contacts near your current location
* **Cold Walk** — start with no list and add households as you knock doors

After selecting an option and a list (for Traditional), you'll see the [Walk Preview](/product-tour-or-mobile-app/canvass/walk-preview) before starting.

{% content-ref url="/pages/VEDyYxrfPnuagsRxPrRt" %}
[Walk Preview](/product-tour-or-mobile-app/canvass/walk-preview)
{% endcontent-ref %}

{% content-ref url="/pages/DiQhEjwzOXYu6z2NYbaP" %}
[Proximity Walk](/product-tour-or-mobile-app/canvass/proximity-walk)
{% endcontent-ref %}

## Deleting a walk

Swipe left on any walk in the list to delete it. Deleting a walk doesn't remove the underlying list — you can start a new walk on the same list at any time.

{% hint style="info" %}
The three walk types (Traditional, Proximity, Cold) can be enabled or disabled per user type in [App Customization](/product-tour-or-hq/app-customization).
{% endhint %}


# Walk Preview

Preview your walk list before starting in the FieldEdge mobile app

After you've selected a list (or built one via Proximity/Cold Walk), the Walk Preview screen appears. It's your chance to review the list, apply filters, and decide whether to start now or save for later.

{% content-ref url="/pages/QPZy04sFVa9CGxtwK0FO" %}
[Filter & Sort](/product-tour-or-mobile-app/canvass/filter-and-sort)
{% endcontent-ref %}

## Save for Later

If you don't want to start the walk immediately, tap **Save for Later**. This downloads the list to your device so you can begin canvassing later — even when offline.

{% hint style="info" %}
Saving a walk for later is required to canvass offline. See [Offline Capabilities](/product-tour-or-mobile-app/offline-capabilities) for the full breakdown of what works without a data connection.
{% endhint %}

## Starting the walk

Tap **Start Walk** to begin. The walk opens in [Map View](/product-tour-or-mobile-app/canvass/map-view) by default. You can flip to [List View](/product-tour-or-mobile-app/canvass/list-view) at any time.


# Map View

Navigate your walk on a map in the FieldEdge mobile app

Map View shows your walk on a map — every household on your list as a pin you can tap to canvass. Use it to see what's around you and find your next stop. It's the view you land in when you start a walk.

## Reading the pins

A pin's appearance tells you two things at a glance: what kind of property it is, and whether you've canvassed it.

### Before canvassing

Until you've canvassed it, a pin shows whether the property is a single home or a multi-unit building:

| Pin | Status                        | What it means                                           |
| --- | ----------------------------- | ------------------------------------------------------- |
|     | Not Yet Canvassed (house)     | A single household — one address, one or more residents |
|     | Not Yet Canvassed (apartment) | A multi-unit building — apartments, condos, townhouses  |
|     | Next Stop (house)             | The next household on your route                        |
|     | Next Stop (apartment)         | The next apartment building on your route               |

### After canvassing

Once you've completed a household, its pin changes to reflect what happened:

| Pin | Status       | What it means                                                                       |
| --- | ------------ | ----------------------------------------------------------------------------------- |
|     | Completed    | All residents have been completed or skipped, and no other household status applies |
|     | Left Message | At least one person was marked Left Message                                         |
|     | No Answer    | All residents were marked No Answer or skipped                                      |
|     | Blocked      | All residents were marked Bad Info, Inaccessible, Refused, Not Interested, or Other |
|     | Skipped      | All residents were skipped                                                          |

{% hint style="info" %}
The post-canvass status pins look the same for single households and apartments. Only the Not Yet Canvassed and Next Stop pins differ by property type — so you can still spot apartments at a glance before you've visited them.
{% endhint %}

Tap any pin to open the household and canvass its residents. For what each status means, see [Statuses](/product-tour-or-mobile-app/canvass/statuses).

{% content-ref url="/pages/LK53rG1IdBXCAbrkgaQd" %}
[Statuses](/product-tour-or-mobile-app/canvass/statuses)
{% endcontent-ref %}

## Your next stop

The next stop on your walk is whichever household is currently closest to you — measured **as the crow flies** (straight-line distance, not driving or walking distance). As you move, the next stop updates automatically.

The bottom panel always shows your current next stop. Drag the panel up to expand it into the full list of households on your walk, or leave it collapsed to keep the map in focus.

## Adding a household from the map

Tap an empty spot on the map to add a new household at that location.

{% content-ref url="/pages/9RQPG77mmS6OjAtOIYXh" %}
[Adding People & Households](/product-tour-or-mobile-app/canvass/adding-people-and-households)
{% endcontent-ref %}

## Switching to List View

Use the toggle in the screen header to flip to [List View](/product-tour-or-mobile-app/canvass/list-view). Your filters and sort order carry over.

{% hint style="info" %}
Map View requires a data connection to start. If you start a walk while offline, the app opens in List View by default and Map View won't be available until you reconnect. See [Offline Capabilities](/product-tour-or-mobile-app/offline-capabilities).
{% endhint %}


# List View

Work through your walk as a scrollable list in the FieldEdge mobile app

List View shows the households on your walk as a scrollable list, organized by address. Use it when you don't need geographic context — or when you're working offline.

## What's shown

Each row in the list represents one household. You'll see:

* The address (and unit number for apartments)
* The number of residents at that household
* A status indicator showing the household's current canvass status

Tap a row to open the [Household View](/product-tour-or-mobile-app/canvass/household-view) and canvass its residents.

## Status indicators

Each row shows the household's current status (Not Yet Canvassed, Completed, Left Message, No Answer, Blocked, or Skipped). For what each status means, see [Statuses](/product-tour-or-mobile-app/canvass/statuses).

{% content-ref url="/pages/LK53rG1IdBXCAbrkgaQd" %}
[Statuses](/product-tour-or-mobile-app/canvass/statuses)
{% endcontent-ref %}

## Switching to Map View

Use the toggle in the screen header to flip to [Map View](/product-tour-or-mobile-app/canvass/map-view). Your filters and sort order carry over.

{% hint style="info" %}
List View works offline. If you've saved a walk for later via [Walk Preview](/product-tour-or-mobile-app/canvass/walk-preview), you can canvass through it in List View without a data connection.
{% endhint %}


# Statuses

How households track their canvass status during a walk

As you canvass, every household tracks its own status — what's been done and what happened. Statuses appear in both [Map View](/product-tour-or-mobile-app/canvass/map-view) and [List View](/product-tour-or-mobile-app/canvass/list-view) so you can see at a glance where you are in your walk.

## The statuses

| Status            | What it means                                                                       |
| ----------------- | ----------------------------------------------------------------------------------- |
| Not Yet Canvassed | You haven't visited the household yet                                               |
| Completed         | All residents have been completed or skipped, and no other household status applies |
| Left Message      | At least one person was marked Left Message                                         |
| No Answer         | All residents were marked No Answer or skipped                                      |
| Blocked           | All residents were marked Bad Info, Inaccessible, Refused, Not Interested, or Other |
| Skipped           | All residents were skipped                                                          |

The status reflects the *household* as a whole. It combines each resident's completion or skip with any contact outcome recorded, so a household won't move out of Not Yet Canvassed until you've completed (or skipped) every resident inside.

Completing a person does not require a contact status. See the [questions about surveys and completion](/product-tour-or-mobile-app/canvass/canvass-profile#frequently-and-infrequently-asked-questions).

{% hint style="info" %}
The contact statuses available to canvassers (which roll up into household statuses) are configured in [App Customization](/product-tour-or-hq/app-customization) → Contact Statuses.
{% endhint %}

## How statuses appear

### In Map View

Each household is a pin on the map. The pin's icon and color reflect the status — single houses and apartments have their own Not Yet Canvassed icons so you can spot apartments before visiting, while post-canvass status pins look the same regardless of property type.

{% content-ref url="/pages/7bigUMVoTZ3ykS2pT8m5" %}
[Map View](/product-tour-or-mobile-app/canvass/map-view)
{% endcontent-ref %}

### In List View

Each row in the list shows a status indicator next to the address.

{% content-ref url="/pages/ZocJWMwdS0xT84v5ZA80" %}
[List View](/product-tour-or-mobile-app/canvass/list-view)
{% endcontent-ref %}

## Changing a status

You don't set the household status directly. It updates automatically based on whether each resident is completed or skipped and any contact statuses recorded. To change a household's status, open it from Map View or List View and update the relevant residents from the [Canvass Profile](/product-tour-or-mobile-app/canvass/canvass-profile).


# Household View

Canvass the residents of a household in the FieldEdge mobile app

Household View shows the residents at a single address. It's the screen you land on when you tap a pin in Map View or a row in List View.

## What's shown

* The address at the top
* "X people" — the number of residents at this household
* A scrollable list of every resident with their name, avatar, and current contact status

## Canvassing a resident

Tap any resident to open their [Canvass Profile](/product-tour-or-mobile-app/canvass/canvass-profile), where you can log a contact, take a survey, and more.

## Completing a household

When you've finished canvassing the residents, tap **Complete Household** (or **Complete Apartment Unit** for an apartment). The app warns you if there are residents you haven't logged an outcome for.

## Adding to a household

Add a new person to this household using the user icon in the top-right of the screen.

{% content-ref url="/pages/9RQPG77mmS6OjAtOIYXh" %}
[Adding People & Households](/product-tour-or-mobile-app/canvass/adding-people-and-households)
{% endcontent-ref %}

## Apartments

If this household is part of an apartment building, you'll also see the building's other units accessible from this screen.

{% content-ref url="/pages/ylWml0sQEDhAIRa45W7s" %}
[Apartments & Multi-Unit Buildings](/product-tour-or-mobile-app/canvass/apartments-and-households)
{% endcontent-ref %}


# Canvass Profile

The in-walk contact profile in the FieldEdge mobile app

The Canvass Profile is the streamlined version of a contact's profile shown during a walk. It's designed for quick interactions in the field — log a contact, take a survey, update support level, and move on.

## Header

At the top of the screen, above the tabs:

* **Avatar and name**
* **Address**
* **Tags** — applied tags shown as badges; [highlighted tags](/product-tour-or-mobile-app/tags) appear at the top. If you want certain tags to stand out at the top of profiles, or to hide some tags from view entirely, this can be configured in [App Customization](/product-tour-or-hq/app-customization) → Tags.
* **Flags / alerts** — any indicators set on the contact (e.g., Do Not Contact, Deceased)
* **Last contact** — date and outcome of the most recent interaction with this person

## Tabs

Below the header, the canvass profile splits into two tabs: **Current** and **History**.

### Current tab

The Current tab is where you record what happens during this interaction:

* **Contact status** — large button to set the outcome (Answered, No Answer, Refused, Not Interested, etc.). Available statuses are configured in [App Customization](/product-tour-or-hq/app-customization).
* **Support level** — set or update the contact's support level (1–5)
* **Survey** — if a survey is attached to this walk, the questions appear inline. Answer them directly on the profile.
* **Logged contact** — once you set a status, the contact is logged. The card shows the method (in person, phone, etc.) and any captured details.
* **Notes** — add notes about this specific interaction

### History tab

The History tab shows previous interactions with this contact:

* Date and time
* Who logged the contact
* Method and outcome
* Any notes

Use the history to see context before you engage — was the last canvasser told to come back later? Did this person already say they're not interested?

## Additional Actions

A floating Actions button opens a full menu of actions you can take on the contact — manage tags, set priority, RSVP to an event, add a private note, and more.

{% content-ref url="/pages/JwbkE6rhnd5zG4pmDXqB" %}
[Actions](/product-tour-or-mobile-app/actions)
{% endcontent-ref %}

## Opening the Full Profile

If your user type has the **Allow users to access full profiles via canvass/call list** option enabled in [App Customization](/product-tour-or-hq/app-customization), you can tap into the contact's full profile from here — the same screen accessible from the [People tab](/product-tour-or-mobile-app/people/profile), with Personal, Support, and Activity tabs.

When this option is disabled, the canvass profile is all you'll see during a walk — the full profile isn't accessible.

{% content-ref url="/pages/mNbeVNiu4CLJtjCmdTt1" %}
[Contact Profile](/product-tour-or-mobile-app/people/profile)
{% endcontent-ref %}

## Completing and moving on

At the bottom of the screen, a fixed button moves you forward:

* **Complete** — finalize this person and move to the next resident in the household
* **Next Person** — advance without completing (the contact remains incomplete)

You can also go back to the [Household View](/product-tour-or-mobile-app/canvass/household-view) to pick a different resident.

## Frequently (and infrequently) asked questions

<details>

<summary>Will a house count as completed without selecting Available/Unavailable?</summary>

Yes, if you take the survey and press **Complete**. Leaving **Available/Unavailable** unset does not prevent completion: the house is shown as **Completed** in the app and under **Performance → Lists** once the household is finished.

The activity is recorded in both FieldEdge and NationBuilder, but the logs have no contact status (such as **Answered** or **No Answer**). Select **Available/Unavailable** before completing to include that outcome. Survey results still sync to NationBuilder.

For households with multiple residents, each resident must be completed or skipped before the household is finished. See [household statuses](/product-tour-or-mobile-app/canvass/statuses).

</details>

<details>

<summary>What happens if I take a survey, then go back or skip the person?</summary>

Survey results still sync to NationBuilder in both cases. What changes is how the canvass is recorded:

* **Go back without completing:** the person is not recorded as **Completed**.
* **Skip the person:** the person is recorded as **Skipped**.

Taking the survey alone does not mark the canvass as completed. Press **Complete** when you have finished canvassing the person.

</details>


# Adding People & Households

Add new people and households to your walk in the FieldEdge mobile app

While canvassing you can add new households and new residents on the fly — useful when you encounter a property or person that isn't yet in your NationBuilder database, or when you're running a [Cold Walk](/product-tour-or-mobile-app/canvass/cold-walk) and building your list from scratch.

Two distinct flows live on this page:

* [Adding a person to an existing household](#adding-a-person-to-an-existing-household) — add a resident to a household that's already in your walk
* [Adding a household](#adding-a-household) — create a brand new household at a new address

## Adding a person to an existing household

When the door is answered by someone who isn't yet in your NationBuilder database for that address, add them to the household.

### How to start

From the [Household View](/product-tour-or-mobile-app/canvass/household-view), tap the **user icon** in the top-right of the app bar.

### Filling in the details

* **First Name** (required)
* **Last Name** (required)
* Everything else is optional: phone, email, demographics (gender, age, language, ethnicity, religion), date of birth, support level, point person, recruited by
* Call-status flags: Do Not Call, Do Not Contact, Deceased

The **Home Address field is not shown** — the new person inherits the household's address (and apartment unit number, if it's an apartment).

Tap **Save** to create the person. They appear in the household view immediately and are added to NationBuilder right away.

## Adding a household

There are two ways to start.

### From the button

Tap the house icon in the **top-right** of the app bar. This works in both [Map View](/product-tour-or-mobile-app/canvass/map-view) and [List View](/product-tour-or-mobile-app/canvass/list-view).

### By tapping the map

In Map View, tap an empty spot on the map where you want to add a household. The app:

1. Reverse-geocodes the tapped location to find the street address
2. Drops a temporary marker at that spot
3. Opens a sheet at the bottom of the screen with a **Create New Household** button

Tap **Create New Household** to continue.

### Filling in the details

Both entry points open the Add Contact screen. Fill in:

* **First Name** (required)
* **Last Name** (required)
* **Home Address** (required if you started from the button — for the tap-on-map flow, the address is filled in from the map tap)
* Phone, email, demographics, support level — optional

Tap **Save** to create the household. The new household appears on the map immediately and is created in NationBuilder right away.

### Address entry

Tap the **Home Address** field to open the address screen. As you type, FieldEdge uses Google Places autocomplete to suggest addresses. Pick a match and the street number, name, unit, zip, city, state, and lat/lng all fill in automatically.

### No street address? Use coordinates.

When the address you're standing in front of isn't recognized — rural areas, new developments, informal addresses — you can save the household using GPS coordinates instead.

In the Home Address search box, tap the **pin icon**. A map picker opens:

1. Your current GPS location is shown as a marker
2. Tap anywhere on the map to drop a marker at that spot — or just confirm your current location
3. Tap **Save**

The latitude and longitude fields fill in. The street, city, zip, and state fields are cleared. A toast confirms "Coordinates Saved".

You can manually fill in street and city afterwards if you want — or save the household as coordinates-only.

{% hint style="info" %}
The pin / coordinates feature is for the new-household flow only. It's not available when [adding a person](#adding-a-person-to-an-existing-household) to an existing household — that person inherits the household's address automatically.
{% endhint %}

## Internet connection required

{% hint style="warning" %}
Both flows require an active internet connection. If you're offline, the app will show an offline dialog when you try to save. See [Offline Capabilities](/product-tour-or-mobile-app/offline-capabilities) for what works without a connection.
{% endhint %}


# Apartments & Multi-Unit Buildings

How FieldEdge handles multi-unit buildings during a canvass

FieldEdge groups contacts at the same address into a single building when there are unit numbers — letting you canvass apartments, condos, and townhouse complexes one unit/apartment at a time.

## What makes a building an apartment

A group of contacts at the same address becomes an **apartment** when:

* At least one contact has a **unit number** in their address, AND
* They share the same lat/lng coordinates

If contacts share an address with **no unit numbers**, they remain a single household with multiple residents (not an apartment).

{% hint style="info" %}
Grouping happens in the app when your walk list loads — not in NationBuilder. If two contacts at the same address aren't being grouped the way you expect, check that they have matching addresses and unit numbers in NationBuilder.
{% endhint %}

## How the canvass flow differs

* **Single household:** tapping the pin or list row opens directly into the [Household View](/product-tour-or-mobile-app/canvass/household-view) showing the residents.
* **Apartment:** tapping the pin or row first shows the building, with each unit/apartment listed inside it. Tap a unit/apartment to see its residents.

## Apartment pins on the map

Apartments use a building/apartment icon to distinguish them from single-household house icons. After canvassing, status pins (Completed, Left Message, No Answer, Blocked, Skipped) are the same icons used for single households — see [Map View → Pins](/product-tour-or-mobile-app/canvass/map-view#pins) for the full breakdown.

## Adding a new unit/apartment

When [adding a new household](/product-tour-or-mobile-app/canvass/adding-people-and-households#adding-a-household) in an apartment, there's an important constraint: the **unit number field only becomes editable once you've selected the building address** via Google Places autocomplete. You can't type a unit number first and pick the building later.

The flow:

1. Tap to add a new household (button or tap-on-map)
2. Search for and select the building's address
3. The unit number field becomes editable — fill it in
4. Complete the rest of the form and save

When you then [add a person](/product-tour-or-mobile-app/canvass/adding-people-and-households#adding-a-person-to-an-existing-household) to that unit/apartment, the unit number is locked — they inherit it from the household.

## Tracking completion

Each unit/apartment tracks its own canvass status independently. You can complete some units/apartments of a building and skip others. The apartment pin on the map reflects the overall outcome across all its units/apartments.


# Proximity Walk

Create walk lists on the fly based on your current location

Proximity Walk lets canvassers create walk lists on the fly based on their current GPS location and your NationBuilder database. Instead of relying on a pre-built list, you can discover nearby contacts and start canvassing immediately.

{% hint style="info" %}
Proximity Walk must be enabled for your user type in [App Customization](/product-tour-or-hq/app-customization). It is enabled by default for Campaign Managers and Default Users.
{% endhint %}

## Starting a Proximity Walk

1. Go to the **Canvass** section
2. Tap **New Walk** and select **Proximity Walk**
3. Set your desired radius to define how far from your location to search
4. Optionally apply filters to narrow results
5. Tap **Start** to begin canvassing the discovered contacts

## Setting the Radius

The radius control lets you define how far from your current location FieldEdge should search for contacts. A larger radius will find more people but may include contacts that are further away.

## Filtering Results

You can filter Proximity Walk results by:

* **Distance** — sort contacts by how close they are to you
* **Tags** — only show contacts with specific tags
* **Support level** — filter by support level (1–5)
* **Priority level** — filter by priority
* **Assigned to me** — only show contacts assigned to your account

Results are shown in a list view or on a map, sorted by distance from your current location. You can then start a walk directly from these results.

{% hint style="info" %}
Proximity Walk requires an active data connection and GPS access. See [Ensuring FieldEdge Access to GPS Location](/everything-else/other-guides/ensuring-fieldedge-access-to-gps-location-on-your-device) if you're having trouble with location services.
{% endhint %}

{% content-ref url="/pages/MenW6sqJfa4Lxa0ZdyQM" %}
[Create walk lists on the fly](/guide-to-canvassing-and-calls/setup-and-core-workflows/create-walk-lists-on-the-fly)
{% endcontent-ref %}


# Cold Walk

Build a walk list from scratch as you knock doors

Cold Walk lets you start canvassing without an existing list — useful when you don't have voter file data yet, or you're targeting an area that's not represented in your NationBuilder database.

{% hint style="info" %}
Cold Walk must be enabled for your user type in [App Customization](/product-tour-or-hq/app-customization).
{% endhint %}

## Starting a Cold Walk

1. From the Canvass tab, tap the **+** button
2. Select **Cold Walk** (also called Listless)
3. A new NationBuilder list is created automatically to hold the contacts you add

## Building your list as you go

Once started, the map opens in [Map View](/product-tour-or-mobile-app/canvass/map-view) with no pins. Add households as you reach them:

* Tap the house icon in the top-right to add a household by address
* Tap an empty spot on the map to add a household at that location

Either way, the new household is added to your Cold Walk list and appears on the map.

{% content-ref url="/pages/9RQPG77mmS6OjAtOIYXh" %}
[Adding People & Households](/product-tour-or-mobile-app/canvass/adding-people-and-households)
{% endcontent-ref %}

## Canvassing the households you add

Once added, households work like any other walk — open them, log contacts, take surveys, and complete each one.

## After your walk

Because Cold Walk creates a real NationBuilder list, the contacts you added are saved to your nation as soon as they're created and can be reused in future walks, calls, or NationBuilder lists.


# Support Levels

Understand and set support levels during canvassing

Support levels are a key metric for campaigns to gauge voter sentiment. FieldEdge uses NationBuilder's support level scale, letting you record a contact's level of support during canvass walks and call time sessions.

## The Support Level Scale

| Level | Meaning        |
| ----- | -------------- |
| **1** | Strong support |
| **2** | Lean support   |
| **3** | Undecided      |
| **4** | Lean oppose    |
| **5** | Strong oppose  |

## Setting a Support Level During Canvass

When completing a contact during a canvass walk or call time session:

1. After selecting the contact status (e.g., Answered), you'll be prompted to set a support level
2. Tap the appropriate level (1–5)
3. The support level is saved and synced to NationBuilder

{% hint style="info" %}
Support level is not a required field. If you don't have enough information to gauge support, you can skip it and move on.
{% endhint %}

## Viewing Support Levels

Support levels are visible on a contact's profile under the **Support** tab. They also appear in the [Performance](/product-tour-or-hq/performance) reports, where you can see average support levels and breakdowns by canvasser.

{% content-ref url="/pages/b7IqJVw08zuYz2WqP8HZ" %}
[Capturing Voter ID/Sentiment/Support Level](/guide-to-canvassing-and-calls/extended-workflows/capturing-voter-id-sentiment-support-level)
{% endcontent-ref %}

{% content-ref url="/pages/81skv3NJj2yndoj1ERkb" %}
[Performance](/product-tour-or-hq/performance)
{% endcontent-ref %}


# Filter & Sort

Filter and sort contacts in your canvass, call time, and people lists

FieldEdge provides filtering and sorting options to help you focus on the right contacts during canvass walks, call time sessions, and in the People section.

## Accessing Filters

Tap the **Filter** icon at the top of any contact list to open the filter panel. Available filters may vary depending on whether you're in Canvass, Call Time, or People.

## Available Filters

| Filter                  | Description                                                                             |
| ----------------------- | --------------------------------------------------------------------------------------- |
| **Support Level**       | Show contacts with one or more selected support levels (1–5, or Unknown)                |
| **Tags**                | Show contacts (or households) that have at least one of the selected tags               |
| **Party / Affiliation** | Show contacts belonging to one or more selected parties                                 |
| **Odd/Even**            | Show only odd or even street numbers — useful for splitting a street between canvassers |

## How Filters Combine

Filters are **inclusive** — they show contacts that match your criteria.

**Between different filter types:** filters combine with **AND** logic. A contact must pass every active filter to appear. For example, if you filter by Support Level 1 **and** Party "Democrat", only contacts who are *both* strong supporters *and* registered Democrats will show.

**Within a single filter type:** selections combine with **OR** logic. For example, if you select tags "VIP" and "Priority", contacts with *either* tag will appear. Similarly, selecting Support Levels 1 and 2 shows contacts with *either* level.

{% hint style="info" %}
Tag filters work at the **household** level. If no one in a household matches the selected tags, the entire household is hidden from the list.
{% endhint %}

## Sorting Options

Sorting changes the order contacts are displayed without hiding anyone:

* **Distance** — nearest contacts first, based on straight-line distance from your current GPS location
* **Name** — alphabetical by last name
* **Address** — grouped by street address

{% hint style="info" %}
Distance is a sort, not a filter — it reorders your list by proximity but doesn't remove contacts that are far away. For location-based list building, see [Proximity Walk](/product-tour-or-mobile-app/canvass/proximity-walk).
{% endhint %}

## Clearing Filters

Tap **Clear Filters** to remove all active filters and return to the full list.

{% hint style="info" %}
Filters are applied for the current session only and reset when you start a new walk or call session.
{% endhint %}


# Call Time

Make calls to contacts directly from the FieldEdge mobile app

Call Time lets you work through a list of contacts, make phone calls, log outcomes, and take surveys — all from within the FieldEdge app.

{% hint style="info" %}
Before you can start calling, you'll need a call list set up in NationBuilder and assigned to your account. See the [Call Time Overview](/guide-to-canvassing-and-calls/call-time-overview) for setup instructions.
{% endhint %}

{% hint style="info" %}
The Call Time menu can be turned on or off per user type in [App Customization](/product-tour-or-hq/app-customization).
{% endhint %}

## Starting a call session

When you tap **Call Time** from the bottom navigation bar, you see a list of your active call sessions. If you haven't started any, the screen shows an empty state with a button to start your first session.

Tap the **+** button to start a new call session. You'll be prompted to pick from the call lists assigned to you.

## Call list preview

After selecting a list, the preview screen appears. It shows the total number of contacts on the list and a list view of everyone on it, with search and filter controls.

* Search and filter the list to focus on a subset
* Tap **Start Calling** to begin the session

## Calling interface

The calling interface walks you through one contact at a time. For each person, you see:

* **Name and address**
* **Phone numbers** — tap to dial directly using your device's phone app
* **Tags and flags** — including Do Not Call indicators
* **Survey questions** — if a survey is attached to the call session, the questions appear inline
* **Notes** — record notes about the call
* **Last contact** — the most recent recorded interaction with this contact

### Logging an outcome

After the call, choose a **contact status** to log the outcome — Answered, No Answer, Refused, Not Interested, Left Message, and so on. Available statuses are configured in [App Customization](/product-tour-or-hq/app-customization).

Optionally set a [support level](/product-tour-or-mobile-app/canvass/support-levels) before completing.

### Completing and skipping

* **Complete** — log the outcome and move to the next contact
* **Skip** — move past the contact without logging an outcome (you can revisit them later in the session)

## Additional Actions

A floating Actions button opens the full Actions menu — add notes, manage tags, take surveys, set priority, and more.

{% content-ref url="/pages/JwbkE6rhnd5zG4pmDXqB" %}
[Actions](/product-tour-or-mobile-app/actions)
{% endcontent-ref %}

## Opening the full profile

If your user type has **Allow users to access full profiles via canvass/call list** enabled in [App Customization](/product-tour-or-hq/app-customization), you can tap into the full [Contact Profile](/product-tour-or-mobile-app/people/profile) from the calling interface.

{% content-ref url="/pages/obiIaMaqepJgSbNC9JUV" %}
[Call Time Overview](/guide-to-canvassing-and-calls/call-time-overview)
{% endcontent-ref %}


# Actions

Take actions on contact profiles including notes, tags, surveys, and more

FieldEdge's Actions menu is a key feature for taking additional actions on a person's profile. From editing tags to changing priority level to RSVPing to an event – the Action menu is the place to do it.

<div align="left"><figure><img src="https://3317596624-files.gitbook.io/~/files/v0/b/gitbook-x-prod.appspot.com/o/spaces%2Fmd1HR6LZFUYuK3fPHLXC%2Fuploads%2FGaOdRCtLDks91l20sCxJ%2FIMG_6632.PNG?alt=media&amp;token=c17ad82a-ea85-41c3-a142-070efc7859ff" alt="" width="188"><figcaption></figcaption></figure></div>

### Accessing the Actions menu

Easily accessible from a person's full profile, during Canvass sessions, or while in Call Time, this menu is identifiable by a grid icon featuring six squares is either located in two different locations:

### On Full Profiles

<div align="left"><figure><img src="https://3317596624-files.gitbook.io/~/files/v0/b/gitbook-x-prod.appspot.com/o/spaces%2Fmd1HR6LZFUYuK3fPHLXC%2Fuploads%2FlhmGqPifZnkMB9q1UzwT%2FIMG_6631.PNG?alt=media&amp;token=f9fd4b16-d20e-4d46-be54-8f6118fc520c" alt="" width="188"><figcaption></figcaption></figure></div>

### On Canvass/Call Time Profiles

<div align="left"><figure><img src="https://3317596624-files.gitbook.io/~/files/v0/b/gitbook-x-prod.appspot.com/o/spaces%2Fmd1HR6LZFUYuK3fPHLXC%2Fuploads%2F3FopZshYpxc8pcTVnufP%2FIMG_3155.PNG?alt=media&amp;token=56cb7930-d6c1-4d6f-be0f-b50a13f332cf" alt="" width="375"><figcaption></figcaption></figure></div>

**The Actions menu includes:**

<details>

<summary><strong>Note</strong></summary>

Add private notes to a person's profile for internal reference and follow-up.

</details>

<details>

<summary><strong>Log Contact</strong></summary>

Record any direct or attempted interactions with a person, maintaining an organized contact history.\
\
\&#xNAN;*Note: this is already integrated into the Canvass and Call Time flows.*

</details>

## Contact Methods

When logging a contact via the Actions menu — or as part of a [Canvass walk](/product-tour-or-mobile-app/canvass) or [Call Time](/product-tour-or-mobile-app/call-time) session — you'll record both how you reached the person (the **contact method**) and what happened (the **contact status**).

### Methods

| Method        | When it's used                                   |
| ------------- | ------------------------------------------------ |
| **In Person** | Door-to-door canvassing or face-to-face meetings |
| **Phone**     | Phone calls made during Call Time or manually    |
| **Email**     | Email outreach                                   |
| **Mail**      | Physical mail or literature drops                |

The contact method is set automatically in context — **In Person** during canvass walks, **Phone** during call time sessions. When logging a contact from the Actions menu on a profile, you choose the method manually.

### Statuses

After picking a method, choose a status describing what happened (Answered, No Answer, Refused, and so on). Available statuses are configured per user type in [App Customization](/product-tour-or-hq/app-customization) — see the Contact Statuses table there for the full list.

All logged contacts sync to NationBuilder in real time and appear in the contact's [Activity tab](/product-tour-or-mobile-app/people/profile#activity-tab).

<details>

<summary><strong>Tags</strong></summary>

Manage tags associated with a person, including viewing, adding, or removing them for better categorization.

</details>

<details>

<summary><strong>Priority Level</strong></summary>

Assign a priority level to a person, aiding in the allocation of resources and attention where needed.

</details>

<details>

<summary><strong>Support Status</strong></summary>

Update a person's level of support, crucial for campaign and community management.\
\
\&#xNAN;*Note: this is already integrated into the Canvass and Call Time flows.*

</details>

<details>

<summary><strong>Open in NB</strong></summary>

Directly access a person's NationBuilder profile for more in-depth information not available in FieldEdge.

</details>

<details>

<summary><strong>Surveys</strong></summary>

Complete surveys on behalf of a person in NationBuilder, gathering essential feedback or data.

</details>

<details>

<summary><strong>Lists</strong></summary>

Include a person in specific NationBuilder lists, facilitating targeted communication and organization.

</details>

<details>

<summary><strong>RSVP</strong></summary>

Log a person's RSVP to events in NationBuilder, crucial for event planning and attendance tracking.

</details>

<details>

<summary><strong>Volunteer</strong></summary>

Indicate a person's interest or involvement in volunteering, essential for mobilizing and managing volunteer resources.

</details>

<details>

<summary><strong>Point Person</strong></summary>

Assign a point person to a contact — the team member responsible for maintaining the relationship with this person. This is useful for tracking who "owns" a relationship with key contacts or volunteers.

</details>

<details>

<summary><strong>Recruited By</strong></summary>

Record who recruited or referred this contact to your campaign. Select a team member or another contact as the recruiter. This helps track the effectiveness of your volunteer recruitment efforts.

</details>

This menu in FieldEdge enhances the efficiency of handling individual profiles, providing a straightforward and centralized way to perform essential actions, both in FieldEdge and NationBuilder.


# Tags

View, add, and remove tags on contacts in the FieldEdge mobile app

Tags are a key concept in NationBuilder and FieldEdge for categorizing contacts. Tags are virtual sticky notes added to profiles to describe a characteristic that can help you target people with what they care about most.

While contact status, support level, survey responses, and walk activity are all logged using dedicated tools in FieldEdge, sometimes you need to capture **extra context** — the kind of information that's unique to your campaign or field team. That's where tags come in.

### Examples of useful tags

* `Yard Sign - Requested`
* `VIP`
* `Needs ASL Interpreter`
* `Has Dogs`
* `Contact Again in Evening`
* `Elderly - Bring Info`
* `Gated Community`
* `Volunteer - Special Skills`

## View and Edit Contact Tags

### Tags on a Contact in NationBuilder

<div align="left"><figure><img src="https://3317596624-files.gitbook.io/~/files/v0/b/gitbook-x-prod.appspot.com/o/spaces%2Fmd1HR6LZFUYuK3fPHLXC%2Fuploads%2Fax4gh2Yfm6GCJJRJqdOr%2FCleanShot%202025-04-15%20at%2007.50.34%402x.png?alt=media&amp;token=30753802-fd3e-4ffa-b160-c739736caca4" alt="" width="375"><figcaption></figcaption></figure></div>

### Tags on a Contact in FieldEdge

<div align="left"><figure><img src="https://3317596624-files.gitbook.io/~/files/v0/b/gitbook-x-prod.appspot.com/o/spaces%2Fmd1HR6LZFUYuK3fPHLXC%2Fuploads%2FQwDRL7cz20wGvRHN6u1D%2FIMG_6633.PNG?alt=media&amp;token=b5a6b0f5-1416-45f8-9441-fbec32eb22f1" alt="" width="375"><figcaption></figcaption></figure></div>

To edit tags from a contact in FieldEdge, tap the Tag action button to the left of the tags or via the [Actions](/product-tour-or-mobile-app/actions) menu (grid icon).

<figure><img src="https://3317596624-files.gitbook.io/~/files/v0/b/gitbook-x-prod.appspot.com/o/spaces%2Fmd1HR6LZFUYuK3fPHLXC%2Fuploads%2F8i4p1fNtXYzGMWjE9Y2J%2FIMG_6633.PNG?alt=media&amp;token=715ee2ba-9d1c-4329-b726-ca45d723ba38" alt=""><figcaption></figcaption></figure>

## Adding a Tag

You can add tags from any contact's profile — including during a [canvass walk](/product-tour-or-mobile-app/canvass) or [call time](/product-tour-or-mobile-app/call-time) session.

1. Open the contact's profile (or canvass profile during a walk)
2. Tap the Tags icon at the top, or find it in the [Actions](/product-tour-or-mobile-app/actions) menu (grid in the top right)
3. Start typing to find an existing tag, or type a new one
4. Tap **Save** — it's instantly synced to NationBuilder

<div align="left"><figure><img src="https://3317596624-files.gitbook.io/~/files/v0/b/gitbook-x-prod.appspot.com/o/spaces%2Fmd1HR6LZFUYuK3fPHLXC%2Fuploads%2Fpi8ccg4rQ8YLFCLn0gLD%2FIMG_E02E6EFDD8EE-1.png?alt=media&amp;token=c4dc4adf-b002-4cac-9b66-bf1244de111a" alt="" width="375"><figcaption></figcaption></figure></div>

{% embed url="<https://youtube.com/shorts/MXLv6Zsmevg?feature=share>" %}

## Removing a Tag

If a tag is no longer relevant — say you've delivered someone's yard sign — you can remove it just as easily:

1. Tap the Tags icon, or access Tags via the [Actions](/product-tour-or-mobile-app/actions) menu
2. Tap the X on the tag you want to remove
3. Save your changes

## Real-Time Sync with NationBuilder

All tags added or removed in FieldEdge sync directly with NationBuilder in real time.

## Find People by Tag

To view a list of people tagged with a specific tag, head to People and tap the **Tags** tab at the top. You can now scroll or search to find the specific tag. Tap on the tag name to view a list of people.

<div align="left"><figure><img src="https://3317596624-files.gitbook.io/~/files/v0/b/gitbook-x-prod.appspot.com/o/spaces%2Fmd1HR6LZFUYuK3fPHLXC%2Fuploads%2FNEZh3tOXzkvaH6ftqIyM%2FIMG_BC209204499E-1.jpeg?alt=media&amp;token=053fd167-3ecf-4090-ad2b-3698fcdf39d3" alt="" width="188"><figcaption></figcaption></figure></div>

## Other Useful Tag-Related Features

### Highlight and Hide Tags

If you use certain tags to indicate important information about contacts, you can nominate them to be highlighted at the top of profiles in FieldEdge — ensuring they're always seen. You can also choose to hide specific tags from users, keeping profiles clean, focused, and privacy-focused.

To customize tag visibility and highlights, go to the **Tags** tab under **App Customization** in your HQ Dashboard, and select which tags to highlight or hide.

### Auto-apply a tag during a survey

One of the most useful survey actions is auto-tagging. When integrated with FieldEdge, it allows for granular segmentation based on survey responses. For instance, during canvassing activities, you can use tags to categorize voters based on their interests, their likelihood to support a campaign, or other criteria relevant to your strategy.

To auto-apply tags, when setting up your survey in NationBuilder, look for the "Tag the responder with" field at the survey, question, and possible-response level.


# Account

Manage your account and app settings in FieldEdge

The Account tab lets you manage your FieldEdge account, adjust app preferences, and access support.

To open the Account tab, tap **Account** in the bottom navigation bar.

## Account Information

View your account details including:

* **Name** — your display name in FieldEdge
* **Email** — the email address associated with your account
* **User type** — whether you're a Campaign Manager, Default User, or Accountless User
* **App version** — the currently installed version of FieldEdge

## Language

FieldEdge supports multiple languages. To change the app language:

1. Open **Settings**
2. Tap **Language**
3. Select your preferred language
4. The app will update to the selected language

## Location Settings

FieldEdge uses your device's location services for canvassing features like map view and Proximity Walk. Tap **Location Settings** to be taken to your device's location permissions for FieldEdge.

{% hint style="info" %}
For help with location settings, see [Ensuring FieldEdge Access to GPS Location on Your Device](/everything-else/other-guides/ensuring-fieldedge-access-to-gps-location-on-your-device).
{% endhint %}

## Grant Access (Accountless Users)

If you're an Accountless User, the Settings screen includes a **Grant Access** option. This allows a Campaign Manager to log in on your device to reconnect or authorize access if needed.

## Support

Tap **Get Help** to open the in-app support chat (powered by Intercom). You can ask questions, report issues, or request assistance from the FieldEdge support team.

## Logging Out

To log out of FieldEdge:

1. Open **Settings**
2. Scroll to the bottom
3. Tap **Log Out**

{% hint style="warning" %}
Logging out will remove any locally saved data, including saved walks that haven't been synced. Ensure you have a data connection and your data has synced before logging out.
{% endhint %}


# Offline Capabilities

As of FieldEdge 3.0, the mobile app can be used offline. Changes made while offline are synced back to your nation whenever the data connection becomes available again. Syncing happens automatically and in the background. [Not all features are available offline](#first-tab) and for now, we have focused on making canvassing possible without a data connection.

### Preparing for an offline canvass

To start a walk while you are offline, you will need to download the list beforehand. To do this: create a new Walk, select a list and then tap **`Save for Later`**.

![](https://3317596624-files.gitbook.io/~/files/v0/b/gitbook-x-prod.appspot.com/o/spaces%2Fmd1HR6LZFUYuK3fPHLXC%2Fuploads%2FUck3fpOkDRwmSVDDrOge%2FFieldEdge%20-%20Walk%20Preview%20-%20Wide.png?alt=media\&token=7f87c652-ab12-4a68-9bd9-299bedf6c73f)

### Start a walk offline

To start a saved Walk while offline, go to **`Canvass`** menu, find your Walk and tap it to start. You will be taken directly to the *list view*. The *map view* will not be available when starting your walk offline.

### What features work while offline?

{% tabs %}
{% tab title="✅ Available Offline" %}
**Canvass**

* Start a walk using *List View* (if create prior)
* Complete or Skip person/household/building
* Conduct Surveys
* All Profile Actions
* Add new person or household

\
**People**

* Add a new contact
  {% endtab %}

{% tab title="☁️ Online Only" %}
**Canvass**

* Create new walk (be sure to create your walk before going offline)
* Map view (available when starting walk while online)
* Sync household status
* Street view
* Viewing full profiles if not downloaded prior
* Saving field activity back to HQ Dashboard (activity will be lost)

\
**People**

* Searching for contacts by name, tag or list
* People Viewing full profiles if not downloaded prior

\
**Call Time**

* Create new Call Time session
  {% endtab %}
  {% endtabs %}

{% hint style="info" %}
**Sync status**\
Currently, FieldEdge syncs all data collected offline in the background so it isn't possible to see the status of the sync. If you would like to see more information about syncing while using the app, please reach out to us and let us know.
{% endhint %}

{% hint style="info" %}
Whether activity is sent to HQ at all is controlled per user type by the "Send Field Activity to HQ" toggle in [App Customization](/product-tour-or-hq/app-customization).
{% endhint %}


# Early Access: HQ Dashboard V2

A faster, more capable HQ Dashboard — now available for early access

We've been working on a new version of the FieldEdge HQ Dashboard, and it's now available for early access.

V2 is faster, has everything the current dashboard does, and is where we'll be rolling out new features going forward. It's the dashboard you know, with more to come.

## What's new

**Real-time Stream.** See your team's field activity come in live during an active canvass or phone banking session — who's completed contacts, what outcomes they're logging, and any location flags worth reviewing.

**Team screen.** A breakdown of individual team member performance — contacts made, conversations had, average support levels, and a day-by-day activity grid. Useful for keeping tabs on a large team or reviewing performance after a push.

## Try it now

Head to [hq2.fieldedgeapp.com](https://hq2.fieldedgeapp.com) — your existing login works, no new account needed.

If you run into anything or have feedback, reach out at <support@fieldedgeapp.com>.


# Dashboard Overview

Your central hub for managing your FieldEdge campaign

The FieldEdge HQ Dashboard is your central command center for managing your campaign's field operations. Access it at [hq.fieldedgeapp.com](https://hq.fieldedgeapp.com).

## Getting Started

After logging in, you'll see the main dashboard with a sidebar menu on the left. The sidebar provides access to all of FieldEdge HQ's features.

{% hint style="info" %}
Only Campaign Managers can access the HQ Dashboard. See [Team Setup](/team-setup) for details on user types.
{% endhint %}

## Dashboard Sections

### App Customization

Customize the mobile app experience for each user type — control which menus, contact statuses, and features are available.

{% content-ref url="/pages/VO92lxFx8iDDkV9HeNTj" %}
[App Customization](/product-tour-or-hq/app-customization)
{% endcontent-ref %}

### Team Management

Invite Campaign Managers, manage Default Users, and add Accountless Users to your team.

{% content-ref url="/pages/YMzXjtMp7BQ4dt1OBjp5" %}
[Team Management](/product-tour-or-hq/team-management)
{% endcontent-ref %}

### Performance

View real-time canvassing and phone banking metrics, track team productivity, and analyze voter engagement.

{% content-ref url="/pages/81skv3NJj2yndoj1ERkb" %}
[Performance](/product-tour-or-hq/performance)
{% endcontent-ref %}

### Tools

Access campaign management utilities like List Reset and Export Users.

{% content-ref url="/pages/kWYvzcHxbt2qvyaMdk4d" %}
[Tools](/product-tour-or-hq/tools)
{% endcontent-ref %}

### Multiple Nations

Manage multiple NationBuilder nations under one login, switch between campaigns, and handle organization-level settings.

{% content-ref url="/pages/BiT0JgQEpCij00dNw6UK" %}
[Multiple Nations](/product-tour-or-hq/multiple-nations)
{% endcontent-ref %}


# App Customization

Customize the FieldEdge mobile app experience for each user type

Every field campaign is different. Different goals, different team members, and different workflows. Optimizing your field tools to match your campaign can be a huge boost in productivity, enabling higher-quality conversations at scale.

To this end, our App Customization features allows for a campaign to customize the app experience for all FieldEdge users of their nation. A different set of Customizations can be applied to [each different user type](/product-tour-or-hq/team-management).

{% hint style="success" %}
App Customizations can be found in the main menu of the [FieldEdge HQ Dashboard](https://hq.fieldedgeapp.com/customization). Some items require reaching out to support for change.
{% endhint %}

## Switching Between User Types

App Customization settings can be configured independently for each user type. Use the navigation at the top of the App Customization page to switch between:

* **All** — view settings across all user types at once
* **Default Users** — settings for NationBuilder login users
* **Campaign Managers** — settings for HQ Dashboard users
* **Accountless** — settings for users without a NationBuilder account

Select a user type to view and edit its specific configuration. The tables below show default values for each user type side by side.

## Menus

Enable or disable the main menus in FieldEdge. For Accountless users, we recommend the People menu remains turned off to prevent full access to your nation. *If you would like to enable the People menu for Accountless users, please reach out.*

{% hint style="info" %}
A tick indicates turned the option is turned on by default
{% endhint %}

<table><thead><tr><th width="420">Customization</th><th width="80" data-type="checkbox">CM*</th><th width="100" data-type="checkbox">Default</th><th width="132" data-type="checkbox">Accountless</th></tr></thead><tbody><tr><td><strong>People</strong><br>Access to NationBuilder contacts</td><td>true</td><td>true</td><td>false</td></tr><tr><td><strong>Canvass</strong><br>Powerful door knocking interface</td><td>true</td><td>true</td><td>true</td></tr><tr><td><strong>Call Time</strong><br>Quickly make calls to stakeholders</td><td>true</td><td>true</td><td>true</td></tr></tbody></table>

*\*CM = Campaign Manager*

{% hint style="info" %}
When the **People** menu is disabled for a user type, an additional toggle appears: **Allow users to access full profiles via canvass/call list**. Enabling this lets users tap into a contact's full profile from within a canvass walk or call time session, even though the People menu itself is hidden.
{% endhint %}

## Contact Statuses

To streamline outreach entry, Contact Statuses can be enabled/disabled.

{% hint style="warning" %}
NationBuilder provides a static list of Contact Statuses so they cannot be renamed.
{% endhint %}

{% hint style="info" %}
A tick indicates turned the option is turned on by default
{% endhint %}

<table><thead><tr><th width="405">Contact Status Title</th><th width="100" data-type="checkbox">CM*</th><th width="100" data-type="checkbox">Default</th><th width="132" data-type="checkbox">Accountless</th></tr></thead><tbody><tr><td>Answered</td><td>true</td><td>true</td><td>true</td></tr><tr><td>Meaningful Interaction</td><td>true</td><td>true</td><td>true</td></tr><tr><td>Lit Drop/Left Message**</td><td>true</td><td>true</td><td>true</td></tr><tr><td>No Answer</td><td>false</td><td>false</td><td>false</td></tr><tr><td>Bad Info</td><td>false</td><td>false</td><td>false</td></tr><tr><td>Inaccessible</td><td>true</td><td>true</td><td>true</td></tr><tr><td>Not Interested</td><td>true</td><td>true</td><td>true</td></tr><tr><td>Refused</td><td>false</td><td>false</td><td>false</td></tr><tr><td>Other</td><td>false</td><td>false</td><td>false</td></tr><tr><td>Send Information</td><td>false</td><td>false</td><td>false</td></tr></tbody></table>

*\*CM = Campaign Manager*

\*\*Changes based on what section of the app you are in. Always shows in NationBuilder as "Left Message"

## Edit Fields

FieldEdge enables the toggling on/off of certain fields when editing a contact.

{% hint style="info" %}
A tick indicates turned the option is turned on by default
{% endhint %}

<table><thead><tr><th width="405">Edit Fields</th><th width="100" data-type="checkbox">CM*</th><th width="100" data-type="checkbox">Default</th><th width="132" data-type="checkbox">Accountless</th></tr></thead><tbody><tr><td>Religion</td><td>true</td><td>true</td><td>true</td></tr><tr><td>Name Prefix</td><td>true</td><td>true</td><td>true</td></tr><tr><td>Middle Name</td><td>false</td><td>false</td><td>false</td></tr></tbody></table>

*\*CM = Campaign Manager*

{% hint style="info" %}
Changes to Edit Fields are managed by the FieldEdge support team. To request changes, contact <support@fieldedgeapp.com>.
{% endhint %}

## Profile Fields

FieldEdge enables the toggling on/off of certain fields on a contact's profile.

{% hint style="info" %}
A tick indicates turned the option is turned on by default
{% endhint %}

<table><thead><tr><th width="405">Edit Fields</th><th width="100" data-type="checkbox">CM*</th><th width="100" data-type="checkbox">Default</th><th width="132" data-type="checkbox">Accountless</th></tr></thead><tbody><tr><td>Donations</td><td>true</td><td>true</td><td>false</td></tr></tbody></table>

*\*CM = Campaign Manager*

{% hint style="info" %}
Changes to Profile Fields are managed by the FieldEdge support team. To request changes, contact <support@fieldedgeapp.com>.
{% endhint %}

## Tags

Customize which tags are highlighted or hidden for each user type. This helps keep profiles clean and draws attention to the most important tags.

* **Highlight Tags** — select up to 5 tags to highlight at the top of contact profiles. Highlighted tags are always visible, making important information easy to spot.
* **Hide Tags** — select up to 10 tags to hide from the user interface entirely. Hidden tags still exist on the contact in NationBuilder but won't be visible in FieldEdge.

To configure tag visibility, go to the **Tags** tab in App Customization and select the user type you want to configure.

## Default Survey

Set the survey that's opened when the user selects "Take Survey" during a canvass. Note the user still has the option to go back and select a different survey.

{% hint style="info" %}
When a default survey is selected, a **Hide all other surveys** toggle becomes available. Enabling this prevents users from seeing or selecting any survey other than the designated default during canvass or call time sessions.
{% endhint %}

## Other

{% hint style="info" %}
A tick indicates turned the option is turned on by default
{% endhint %}

<table><thead><tr><th width="405">Customization</th><th width="100" data-type="checkbox">CM*</th><th width="100" data-type="checkbox">Default</th><th width="132" data-type="checkbox">Accountless</th></tr></thead><tbody><tr><td>Send Field Activity to HQ</td><td>true</td><td>true</td><td>true</td></tr><tr><td>Enable Proximity Walk</td><td>true</td><td>true</td><td>false</td></tr><tr><td>Field Activity</td><td>true</td><td>true</td><td>true</td></tr></tbody></table>

*\*CM = Campaign Manager*

{% hint style="info" %}
Some settings in this section — including Edit Fields, Profile Fields, Field Activity, and Proximity Walk configuration beyond the toggle — are managed by the FieldEdge support team. To request changes, contact <support@fieldedgeapp.com>.
{% endhint %}

## Copy Settings

To save time when configuring multiple user types, you can copy customization settings from one user type to another.

* **Copy a single section** — copy just one section's settings (e.g., Contact Statuses) from one user type to another
* **Copy all settings** — copy the entire customization configuration from one user type to another

This is useful when you want most user types to share the same configuration with only minor differences.


# Team Management

Manage Campaign Managers, Default Users, and Accountless Users in FieldEdge HQ

{% hint style="info" %}
Anyone with **Control Panel** access to your nation is considered a **Default User** and can log in to the FieldEdge Mobile App without being added to FieldEdge explicitly (and permission set that [**meets our minimum requirements**](/team-setup/permission-sets)).
{% endhint %}

To facilitate our unique integration with NationBuilder, and enable different use cases, there are 3 types of users in FieldEdge.

You can think of these types of users as buckets that dictate what a user can do (as it applies to the mobile and the HQ Dashboard) and allow you to customize the Mobile App experience for each.

**We recommend reviewing the 3 user types below to understand which best fits your needs:**

<details>

<summary>Default</summary>

**For users with a NationBuilder login who don’t need access to the FieldEdge HQ Dashboard**

* Anyone with a login to your Nation (and permission set that [**meets our minimum requirements**](/team-setup/permission-sets)) can log in to FieldEdge and will be considered a Default User.
* Their access to Contacts will be influenced by their NationBuilder permission set.
* Does not need to be added or invited outside of NationBuilder.
* Lists are assigned in NationBuilder – restricting access can be nuanced and cumbersome.
* The same list cannot be assigned to multiple users simultaneously.

</details>

<details>

<summary>Accountless</summary>

**For users without a NationBuilder account**

* Users will sign in with their mobile numbers.
* Needs to be added by a Campaign Manager in FieldEdge HQ Dashboard.
* Best for volunteers who should have a heavily filtered experience.
* Lists are assigned via NB Dashboard.
* The same list can be assigned to multiple users simultaneously.
* Cannot access the People section (Mobile CRM).
* Not available on all plans.

</details>

<details>

<summary>Campaign Manager</summary>

**For users who need access to the FieldEdge HQ Dashboard and optionally the mobile app**

* To login to the mobile app: requires a NationBuilder login with a permission set that [**meets our minimum requirements**](/team-setup/permission-sets) (the Admin permission set meets these requirements by default) to log in to the mobile app.
* Needs to be invited by another Campaign Manager.
* Best for regular, trusted staff with the Admin permission set in NationBuilder/

</details>

### Managing Your Team

{% content-ref url="/pages/Ha2sSSaWjUzKpUaxAiGp" %}
[Default Users](/product-tour-or-hq/team-management/default-users)
{% endcontent-ref %}

{% content-ref url="/pages/dfKlmGgaHSRmWFthbzyv" %}
[Campaign Managers](/product-tour-or-hq/team-management/campaign-managers)
{% endcontent-ref %}

{% content-ref url="/pages/WYMHyLGX91OLmVyMRZgZ" %}
[Accountless Users](/product-tour-or-hq/team-management/accountless-users)
{% endcontent-ref %}


# Default Users

For users with a NationBuilder login who do not need access to the FieldEdge HQ Dashboard.

## Send A Download Link

{% hint style="info" %}
Get to understand the differences and requirements of [different user types here](/product-tour-or-hq/team-management)
{% endhint %}

To send an SMS with a download link and login instructions to a Default User:

1. Go to the `Team Management menu.`
2. Look for `Default users` area.
3. Click the `Send Download Link` button.
4. Enter the user's phone number and click the `Send Download Link` button.

{% embed url="<https://youtu.be/Xvj8y2W60G0>" %}

##

## View Access Login

FieldEdge keeps track of default users accessing the mobile app. The access log shows the user's primary email address (from NationBuidler), the date they first accessed the app and the last date they accessed the app.

* Go to the `Team Management menu.`
* Look for `Default users` area.
* Click the `View Access Log` button.

{% embed url="<https://youtu.be/sb6sn9w1YOw>" %}

{% hint style="info" %}
Keep in mind the Last Seen At date is an approximate date based on when the app last contacted the FieldEdge server. This generally happens when they first launch the app or when the app is closed and reopened.
{% endhint %}


# Accountless Users

For users without a NationBuilder account, best for volunteers who should have a heavily filtered experience.

{% hint style="info" %}
Get to understand the differences and requirements of [different user types here](/product-tour-or-hq/team-management)
{% endhint %}

## Add a user

{% embed url="<https://youtu.be/_6bCQ5y17cw>" %}

To add an Accountless user and send them a download link and login instructions:

1. Go to the `Team Management menu.`
2. Open the `Accountless users` area.
3. Enter the user's name and phone number
4. Optionally, select `Send invite by SMS` to send a download link and login instructions.
5. Click `Create Accountless User`

(Now, don't forget to assign a list)

## Add Users in Bulk (CSV Upload)

For campaigns that need to onboard many Accountless users at once, you can upload a CSV file to add them in bulk.

### CSV Format

Your CSV file should include the following columns:

| Column    | Required | Description                          |
| --------- | -------- | ------------------------------------ |
| **Name**  | Yes      | The user's full name                 |
| **Phone** | Yes      | Mobile phone number (used for login) |

### Uploading

1. Go to the `Accountless users` area in Team Management
2. Click the `Bulk Upload` button
3. Select your CSV file
4. Review the preview to confirm the data looks correct
5. Click `Upload` to create all users

### Validation and Errors

During upload, FieldEdge validates each row:

* **Duplicate phone numbers** — if a phone number already exists as an Accountless user, that row will be skipped
* **Invalid phone numbers** — rows with invalid phone formats will be flagged
* **Missing required fields** — rows without a name or phone number will be skipped

After the upload, you'll see a summary showing how many users were successfully created and any rows that were skipped with reasons.

{% hint style="info" %}
After bulk upload, don't forget to [assign lists](#assign-a-list) to your new users so they can access contacts in the app.
{% endhint %}

## Assign a List

By default, an Accountless user won't have access to any lists in NationBuilder. A few quick things to know about assigning lists:

* You can assign *one or more* lists to a user
  * Alternatively, you can give the user to *all lists* – current a future – in your nation (use with caution)
* Any individual list can be assigned to multiple users.

{% embed url="<https://www.youtube.com/watch?v=Rl7UZ_OOkvo>" %}

To assign one or more lists to a user:

1. Go to the `Accountless users` area.
2. Click the `Edit` button (next to the user's name).
3. Select `Specific` to assign individual lists (or `All` to provide access to all lists in your nation).
4. Select the specific lists to assign to the user.
5. Click `Save List Assignment`

{% hint style="info" %}
Lists assigned to anyone else will show \*Assigned\*
{% endhint %}

## View user's last login

You can see the last time a user logged in on the far righthand side of the Accountless users area.

<figure><img src="https://3317596624-files.gitbook.io/~/files/v0/b/gitbook-x-prod.appspot.com/o/spaces%2Fmd1HR6LZFUYuK3fPHLXC%2Fuploads%2FIctsVVDXyoRRjerscKaD%2FTeam%20%E2%80%93%20FieldEdge%20HQ%202023-05-16%20at%2010.10.09%20am.png?alt=media&amp;token=db996cf2-86f8-4bea-9c1d-37d8f283a2c7" alt=""><figcaption></figcaption></figure>

## Remove a user

{% embed url="<https://youtu.be/ApXw5oMKE1s>" %}

To remove an Accountless user:

1. Go to the `Accountless users` area.
2. Select the user you want to remove.
3. Press the delete (trash can) icon.


# Campaign Managers

For users who need access to the FieldEdge HQ Dashboard and optionally the mobile app with their NationBuilder login.

Campaign Managers are users who can access the FieldEdge HQ Dashboard to manage your campaign. They can customize the app, manage team members, view performance reports, and access campaign tools.

{% hint style="info" %}
Get to understand the differences and requirements of [different user types here](/product-tour-or-hq/team-management)
{% endhint %}

## Invite a Campaign Manager

To invite a new Campaign Manager:

1. Go to the `Team Management` menu
2. Look for the `Campaign Managers` area
3. Click the `Invite Campaign Manager` button
4. Enter the user's email address
5. Optionally, toggle **Organization Admin** to give them access to all nations in your organization
6. Click `Send Invite`

{% hint style="warning" %}
Enabling **Organization Admin** gives the user access to all nations attached to your organization, including billing. Only enable this for trusted team members who need cross-nation access.
{% endhint %}

{% hint style="success" %}
Campaign Managers can be invited and log in to the FieldEdge HQ Dashboard using only their email address — a NationBuilder account is not required. This is useful for giving finance teams access to download invoices, for example.
{% endhint %}

## Accepting an Invite

When you invite someone, they'll receive an email with a link to accept.

**If they already have a FieldEdge account:** They'll be prompted to log in, and the new nation will be added to their account. They can switch between nations using the [Switch Nation](/product-tour-or-hq/multiple-nations) menu.

**If they're new to FieldEdge:** They'll be guided through creating an account and setting a password before gaining access to the HQ Dashboard.

## Using the Mobile App

Campaign Managers can also use the FieldEdge mobile app. To log in to the mobile app, the Campaign Manager must have a NationBuilder login with a permission set that [meets the minimum requirements](/team-setup/permission-sets). The NationBuilder Admin permission set meets these requirements by default.

## Managing Campaign Managers

The Campaign Managers area in Team Management shows all current Campaign Managers for your nation, including their email address and role.

## Remove a Campaign Manager

To remove a Campaign Manager:

1. Go to the `Team Management` menu
2. Find the Campaign Manager in the list
3. Click the delete (trash can) icon
4. Confirm the removal

{% hint style="info" %}
Removing a Campaign Manager revokes their access to the HQ Dashboard for this nation only. If they have access to other nations, those remain unaffected.
{% endhint %}


# Performance

Real-time canvassing and phone banking metrics for your campaign

The Campaign Performance page provides a real-time overview of canvassing activity and voter engagement metrics across your campaign. It helps HQ teams monitor effectiveness, identify trends, and assess team member productivity in the field.

{% hint style="info" %}
This page covers the Performance section of [HQ Dashboard V2](/product-tour-or-hq/early-access) (Early Access). If you're on the current dashboard, you'll find a single **Campaign Performance** page with the same metrics as the Reports section below.
{% endhint %}

## Stream

{% hint style="info" %}
The Stream is a new feature in [HQ Dashboard V2](/product-tour-or-hq/early-access).
{% endhint %}

The Stream provides a real-time feed of individual field activity as it happens. Use it to monitor your team's progress during active canvassing or phone banking sessions.

### What Appears in the Stream

Each activity card in the Stream shows:

* **Contact method**: door knock, phone, or message icon
* **Household address**: the address that was contacted
* **Performed by**: which team member logged the activity
* **Contact status**: the outcome of the interaction (e.g., Answered, No Answer)
* **Support level**: if captured during the interaction
* **Time**: when the activity occurred (relative, with full timestamp on hover)
* **Location distance**: a color-coded badge showing the distance between where the canvasser was and the household location. See [User Location Tracking](/guide-to-canvassing-and-calls/reporting/user-location-tracking) for details on distance warnings.

Click any activity card to open a detail sheet with the full household address, GPS coordinates (linked to Google Maps), and distance breakdown.

### Filtering the Stream

Use the filters at the top of the Stream to narrow results:

* **Activity type**: All Activity, Canvass, or Call Time
* **Field user**: show activity from a specific team member
* **Contact status**: filter by outcome (e.g., only show Answered contacts)
* **List**: filter by a specific walk or call list
* **Date range**: select a time period (defaults to last 30 days)
* **Warnings only**: toggle to show only activities with location distance warnings

{% hint style="info" %}
The Stream is useful for real-time oversight during active field operations. For aggregated reporting and charts, use the Reports view below.
{% endhint %}

{% hint style="info" %}
The Stream only captures activity logged through the **Canvass** or **Call Time** features in the mobile app. Contacts logged via NationBuilder's native Log Contact action won't appear here, even if the door knock or phone method is selected.
{% endhint %}

## Reports

The Reports view provides aggregated metrics and charts to analyze your campaign's field performance over time.

### Filter by Activity Type or Date Range

Use the dropdowns and date selector to refine the performance view:

* **Activity Type Filter**: Choose between *All Activity, Canvass,* or *Call Time*.
* **Date Range Selector**: Adjust the time period you wish to analyze.

<figure><img src="https://3317596624-files.gitbook.io/~/files/v0/b/gitbook-x-prod.appspot.com/o/spaces%2Fmd1HR6LZFUYuK3fPHLXC%2Fuploads%2FiJYBtiitpso51LZxVnrd%2FCleanShot%202025-10-27%20at%2022.59.11%402x.png?alt=media&amp;token=e8db47d0-0258-46dd-ba24-990d4e9a21f5" alt=""><figcaption></figcaption></figure>

### Overview Metrics

At the top of the page, you’ll find high-level stats for the selected campaign period:

<figure><img src="https://3317596624-files.gitbook.io/~/files/v0/b/gitbook-x-prod.appspot.com/o/spaces%2Fmd1HR6LZFUYuK3fPHLXC%2Fuploads%2FLNe6a1OkNx9d0hqPcT5t%2FCleanShot%202025-10-27%20at%2022.43.45%402x.png?alt=media&amp;token=0c75d45b-5eb2-44ed-9acd-cb0e1a4fe5bf" alt=""><figcaption></figcaption></figure>

#### What do these stats mean?

| Tile                          | Description                                                                                                                                           |
| ----------------------------- | ----------------------------------------------------------------------------------------------------------------------------------------------------- |
| **Team Members in the Field** | Number of distinct canvassers who logged any contact in the selected period. Includes all user types including Accountless.                           |
| **Contacts Made**             | Total number of contacts Completed during the period. If your field users Complete multiple people per household, each will be included in this stat. |
| **Avg. Support Level**        | The mean support level (1 = strong support … 5 = strong oppose) from contacts where the support level was captured.                                   |
| **Confirmed Support Level**   | Count of contacts that recorded a support level (1‑5) — useful to measure quality of engagement. Support Level is not a required field.               |
|                               |                                                                                                                                                       |

### Contacts Made By Support Level

This section breaks down contact data by support level, which helps you understand voter sentiment.

<figure><img src="https://3317596624-files.gitbook.io/~/files/v0/b/gitbook-x-prod.appspot.com/o/spaces%2Fmd1HR6LZFUYuK3fPHLXC%2Fuploads%2F3fvA5dVNp0y2iXuRDm7d%2FCleanShot%202025-10-27%20at%2022.53.32%402x.png?alt=media&amp;token=bb66096f-c2ff-4792-b518-14e91fa27b95" alt=""><figcaption></figcaption></figure>

### Contacts Made by Outcome

This section categorizes each contact by result (what happened during the interaction):

| Contact Status          | Description                                          |
| ----------------------- | ---------------------------------------------------- |
| Answered                | The voter answered and was spoken to                 |
| Meaningful Interaction  | A quality conversation was recorded                  |
| Lit Drop / Left Message | Left campaign materials or voicemail                 |
| No Answer               | Attempted contact but no response                    |
| Inaccessible            | Could not access the address (e.g. gate, building)   |
| Bad Info                | Wrong address or incorrect data                      |
| Refused                 | Contact declined to talk                             |
| Not Interested          | Expressed disinterest in the campaign                |
| Send Information        | Voter requested campaign information be sent to them |
| Other                   | Unspecified outcome                                  |
| Not Captured            | No outcome recorded                                  |

The dropdown in the top right of this section allows you calculate the stats by People or unique Households.

{% hint style="info" %}
Which contact statuses are available to field users (and therefore which appear here) is configured in [App Customization](/product-tour-or-hq/app-customization).
{% endhint %}

### Contacts Made by Day

This time-series graph visualizes the number of contacts made each day, helping you identify peak outreach times or gaps in field activity.

<figure><img src="https://3317596624-files.gitbook.io/~/files/v0/b/gitbook-x-prod.appspot.com/o/spaces%2Fmd1HR6LZFUYuK3fPHLXC%2Fuploads%2FrR8UgIN0dcw5fOXJOWpp%2FCleanShot%202025-10-27%20at%2023.04.25%402x.png?alt=media&amp;token=79c7a0ed-5697-4adb-afc3-dbb6cecc9f48" alt=""><figcaption></figcaption></figure>

### Canvasser Performance

#### Contacts Made by Canvasser

Displays the number of contacts each canvasser has logged during the selected period. Use the dropdown to toggle between top performers or bottom performers.

#### Average Support Level by Canvasser

Calculates each canvasser’s average support level across their contacts — useful for understanding impact and quality of engagement.

### Need a different report?

Request a new report by emailing us at: <support@fieldedgeapp.com>.

## Team

The **Team** screen gives you a consolidated view of individual team member performance and day-by-day activity. Select **Performance** then **Team** from the sidebar to open it.

{% hint style="info" %}
The Team screen is a new feature in [HQ Dashboard V2](/product-tour-or-hq/early-access), currently in early preview.
{% endhint %}

### Filters

Two filters sit at the top of the page:

* **Activity type**: Canvass (default), Call Time, or All Activity
* **Date range**: defaults to the last 30 days. The Daily Breakdown widget requires a range of 31 days or less.

Once you've set your filters, a **Copy Report URL** button appears so you can share a pre-filtered view directly with a teammate.

To reorder or hide widgets, click the **Customize Layout** gear icon. Layout changes are saved in your browser.

### Summary cards

Three headline numbers give a quick read on team output for the selected period:

| Card                      | What it shows                                                                         |
| ------------------------- | ------------------------------------------------------------------------------------- |
| **Team Members in Field** | Distinct team members who logged at least one contact                                 |
| **Contacts per Person**   | Average contacts across active team members                                           |
| **Door Answer Rate**      | Percentage of contacts that resulted in an Answered or Meaningful Interaction outcome |

### Team Roster

A sortable table showing each team member's activity for the period:

| Column            | Description                                                       |
| ----------------- | ----------------------------------------------------------------- |
| **Name**          | Team member's name                                                |
| **Contacts**      | Total contacts logged                                             |
| **Conversations** | Contacts where the outcome was Answered or Meaningful Interaction |
| **Avg Support**   | Mean support level across their contacts                          |
| **Last Active**   | How recently they logged a contact                                |

Click any column header to sort. Click a row to expand it and see that person's full outcome breakdown. Results are paginated at 10 per page.

### Daily Breakdown

A date × team-member grid showing how many contacts each person logged each day. Defaults to the top 8 performers by contacts made.

Use the **Pick team members** dropdown to choose who appears. Remove someone by hovering their row and clicking ×.

The name column and totals column stay fixed as you scroll horizontally. The bottom row shows daily totals across the whole team.

{% hint style="info" %}
Daily Breakdown is only available for date ranges of 31 days or less.
{% endhint %}

## Further reading

{% content-ref url="/pages/yWsc3ScsruGXFOTYo3jr" %}
[Tracking performance in the HQ Dashboard](/guide-to-canvassing-and-calls/reporting/tracking-performance-in-hq)
{% endcontent-ref %}

{% content-ref url="/pages/Sf0BrPOsYcKoMxKrFd8k" %}
[User location tracking](/guide-to-canvassing-and-calls/reporting/user-location-tracking)
{% endcontent-ref %}

{% content-ref url="/pages/VO92lxFx8iDDkV9HeNTj" %}
[App Customization](/product-tour-or-hq/app-customization)
{% endcontent-ref %}


# Tools

Campaign management utilities in FieldEdge HQ

The Tools section in FieldEdge HQ provides utilities to help you manage your campaign. Access Tools from the sidebar menu in the [HQ Dashboard](https://hq.fieldedgeapp.com/tools).

{% content-ref url="/pages/JtalXFTtwLrnwfLA4JcP" %}
[List Reset](/product-tour-or-hq/tools/list-reset)
{% endcontent-ref %}

{% content-ref url="/pages/jWrGfo5RkIzpWztc0T0P" %}
[Export Users](/product-tour-or-hq/tools/export-users)
{% endcontent-ref %}


# List Reset

Reset canvass and call lists to re-contact voters

Does your campaign strategy call for re-canvassing households? Started with a persuasion phase and you're now moving GOTV? FieldEdge HQ provides a simple way to reset a list so it can be re-canvassed or re-called.

<details>

<summary>🚀 NEW version released: Faster &#x26; more reliable</summary>

We’ve launched a **new, faster, and more reliable version** of the List Reset tool. Key changes include:

* **Improved speed and reliability**, even with larger lists.
* **Simplified tag removal**: Only the following tags are removed:
  * `FE:walk Completed`
  * `FE:walk Skipped`
  * `FE:call Completed`
  * `FE:call Skipped`
* The **“Only reset older completions/skips”** option has been removed for clarity and simplicity.

> 💡 **Need to clear tags that aren't removed by the new version?**\
> Use the **Legacy List Reset** version if you've used the new tool but still see individuals marked as completed or skipped.

</details>

## Background

To keep track of the people in your nation that have been contacted while canvassing or phone banking, FieldEdge adds "special FE tags" to reflect the interaction. The tag includes the interaction was a walk or call and if they were completed (regardless of the outcome) or skipped. This tool provides an easy way to remove all of those tags easily.

{% hint style="info" %}
Alternatively to using this tool, you can use NationBuiler to reset a list in *some* *cases*. We recommended reviewing our [Re-canvass & re-calling voters guide](/guide-to-canvassing-and-calls/extended-workflows/re-canvass-and-re-calling-voters) before using this tool.
{% endhint %}

## Accessing the List Reset Tool

Find the List Reset feature in the 'Tools' section of FieldEdge HQ ([click here to open](https://hq.fieldedgeapp.com/tools?type=list_reset)).

<div align="left"><figure><img src="https://3317596624-files.gitbook.io/~/files/v0/b/gitbook-x-prod.appspot.com/o/spaces%2Fmd1HR6LZFUYuK3fPHLXC%2Fuploads%2FBnpYaQ7eJ9ghxlsY6E3d%2FCleanShot%202024-04-29%20at%2013.38.22%402x.png?alt=media&amp;token=9f09aa47-484c-4465-8dd7-f66972f0d7eb" alt="" width="123"><figcaption></figcaption></figure></div>

## Start a New List Reset

1. Use the "New Reset" button to start the reset process.
2. Select the list of people you would like to reset
3. Next, select which type of tags you would like to remove. For example, if you only want to re-canvass people that were Completed during Canvassing, select "Canvass Completed"
4. Confirm the List Reset
5. The reset will be scheduled and the status will be added to overview screen

Note: Reseting a list is permanent and may take several minutes to complete depending on the size of your list. We recommend keeping the list 500 people.

### Understanding tags and the list reset settings

<table><thead><tr><th width="197">Tag Removal Setting</th><th>Notes</th><th>Example Tag(s)</th></tr></thead><tbody><tr><td>Canvass Completed</td><td>Tags associated with a <em>completing</em> a person (with any status, eg. inaccessible) during a FieldEdge <em>Canvass Walk</em>.</td><td><p><code>FE:walk Completed</code></p><p><em>Using the Legacy Tool only:</em><br><code>FE:walk0 Completed</code><br><code>fe:walk:20210822 canvassed</code></p></td></tr><tr><td>Canvass Skipped</td><td>Tags associated with <em>skipping</em> a person during a FieldEdge <em>Canvass Walk</em> (normally used if you want to canvass a single person in the house).</td><td><p><code>FE:walk Skipped</code></p><p><em>Using the Legacy Tool only:</em><br><code>FE:walk:231 Completed</code><br></p></td></tr><tr><td>Call Completed</td><td>Tags associated with <em>completing</em> person (with any status, eg. Not answered) during a FieldEdge <em>Call Time</em> <em>Session</em>.</td><td><p><code>FE:call Completed</code><br><br><em>Using the Legacy Tool only:</em></p><p><code>FE:call:7243 Completed</code></p></td></tr><tr><td>Call Skipped</td><td>Tags associated with skipping person during a FieldEdge <em>Call Time</em> <em>Session</em>.</td><td><p><code>FE:call Skipped</code></p><p><br><em>Using the Legacy Tool only:</em><br><code>FE:call:323 Completed</code></p></td></tr></tbody></table>

{% hint style="warning" %}
For people canvassing or calling during the April transition period, this List Reset Tool offers a way to *only reset tags* *that were applied* during *past* canvass or call sessions – attempting restore the list to it's previous status. To use this option, select **Only reset older completions/skips**.
{% endhint %}

## FAQS

#### What is the max list size the tool supports?

The latest version of the tool is designed to work all sizes of lists.

The legacy reset tool is designed to be used with lists of up to 500 people.

#### How long should it take?

The latest version of the tool is faster and should take anywhere from 10 - 60 seconds to compelete depending on the size of the list.

## Further Reading

If you haven't already, we recommend reading our guide to re-canvass and re-calling voters.

{% content-ref url="/pages/JJ5Sq1bHd8uwLfF7qK0A" %}
[Re-canvass & re-calling voters](/guide-to-canvassing-and-calls/extended-workflows/re-canvass-and-re-calling-voters)
{% endcontent-ref %}


# Export Users

Export your FieldEdge team members to a CSV file

The Export Users tool lets you download a CSV file of your FieldEdge team members. This is useful for auditing team access, record keeping, or sharing team information.

## Accessing Export Users

Find the Export Users tool in the **Tools** section of FieldEdge HQ.

## Exporting

To export your users:

1. Navigate to **Tools** in the HQ Dashboard sidebar
2. Select **Export Users**
3. Choose which user types to include in the export:
   * **Campaign Managers** — users with HQ Dashboard access
   * **Default Users** — NationBuilder login users
   * **Accountless Users** — users without a NationBuilder account
4. Click **Export** to generate and download the CSV file

## What's Included

The CSV export includes the following fields for each user:

| Field         | Description                                             |
| ------------- | ------------------------------------------------------- |
| **Name**      | The user's full name                                    |
| **Email**     | Email address (for Campaign Managers and Default Users) |
| **Phone**     | Phone number (for Accountless Users)                    |
| **User Type** | Campaign Manager, Default, or Accountless               |
| **Last Seen** | The date the user last accessed FieldEdge               |

{% hint style="info" %}
The export reflects the current state of your team at the time of download. For historical access logs, see the View Access Log feature in [Team Management](/product-tour-or-hq/team-management).
{% endhint %}

{% content-ref url="/pages/YMzXjtMp7BQ4dt1OBjp5" %}
[Team Management](/product-tour-or-hq/team-management)
{% endcontent-ref %}


# Billing & Subscriptions

Manage your FieldEdge subscription, payment methods, and invoices

FieldEdge uses Stripe to manage billing and subscriptions. Campaign Managers can view and manage their subscription directly from the FieldEdge HQ Dashboard.

{% hint style="info" %}
Billing is managed at the **Organization** level. If you have multiple nations attached to the same organization, they share one subscription. See [Multiple Nations](/product-tour-or-hq/multiple-nations) for more on organizations.
{% endhint %}

## Accessing Billing

Navigate to **Billing** in the HQ Dashboard sidebar menu. From here you can view your current plan, manage payment methods, and access invoices.

## Your Plan

The Billing page shows your current plan details including:

* **Plan name** — the subscription tier you're on
* **Status** — active, trialling, canceled, or expired
* **Billing period** — monthly or annual billing cycle
* **Next billing date** — when your next payment is due

### Changing Your Plan

To upgrade or downgrade your plan:

1. Click **Change Plan** on the Billing page
2. Review the available plans and their features
3. Select the plan that fits your needs
4. Confirm the change

{% hint style="info" %}
Plan changes take effect immediately. If you upgrade mid-cycle, you'll be charged a prorated amount for the remainder of the billing period. Downgrades take effect at the next billing date.
{% endhint %}

## Trial

New nations start with a free trial period. During the trial:

* You'll see a notification banner in the HQ Dashboard showing the days remaining
* All features are available during the trial
* You'll be prompted to select a plan and add payment details before the trial expires

{% hint style="warning" %}
If the trial expires without selecting a plan, access to the HQ Dashboard and mobile app will be suspended until a plan is activated.
{% endhint %}

## Payment Methods

Manage your payment methods through the Stripe billing portal:

1. Click **Manage Payment Methods** on the Billing page
2. You'll be redirected to the Stripe customer portal
3. Add, update, or remove credit/debit cards
4. Set a default payment method

## Invoices

View and download past invoices:

1. Click **View Invoices** on the Billing page
2. You'll be redirected to the Stripe customer portal
3. Browse your invoice history
4. Download individual invoices as PDF

## Organization Management

Billing is managed at the organization level. Organization Admins have access to additional management features.

### Rename Your Organization

To rename your organization, go to the organization settings and update the name. This affects the display name across all nations attached to the organization.

### Subscription Status

From the Switch Nation menu, you can view the subscription status of each nation in your organization:

* **Trialling** — the nation is on a free trial
* **Active** — the nation has an active paid subscription
* **Canceled** — the subscription has been canceled but may still be accessible until the end of the billing period
* **Expired** — the trial or subscription has ended

You can filter your nations by subscription status to quickly find nations in a specific state — helpful when managing many nations.

### Export Subscription Data

Organization Admins can export subscription data for all nations in their organization as a CSV file. This includes plan details, billing status, and key dates — useful for financial reporting and auditing.

{% hint style="info" %}
If you need help with billing or have questions about your subscription, contact <support@fieldedgeapp.com>.
{% endhint %}


# Multiple Nations

Manage multiple NationBuilder nations under one FieldEdge login

FIeldEdge HQ offers a lot of flexibility with how you manage and access nations. It is designed to enable Campaign Managers to work across multiple campaigns, for Organization's with many nation or resellers offering FieldEdge to their clients.

{% embed url="<https://youtu.be/fsSQN1U7brQ>" %}

Firstly, Campaign Managers can have access to multiple nations under the one login and can [switch between them](#switch-nation) at anytime.

Each nation can be attached to a single parent organization or each can be attached their own organization, or a combination.

You can invite other Campaign Managers to a single nation or invite them to all nations attached to your Organisation (as an "Organisation Admin"). Note that this also provides them access to the Billing section. Other organisation's can invite the same user to their organisation too.

Each nation is billed to the Organization it is attached to.

If you need assistance in this area, please don't hesitate to reach out as we understand it can be quite complex.

## Add a new Nation

You can add a new nation to your existing Organization or a new Organization by selecting the Switch Nation menu in the top left hand ocrner and selecting "Connect new Nation". From there, select the Organization you'd like to attach it to, type the slug of the Nation and follow the prompts to Authorize. Finally, you will be prompted to start a trial.

{% embed url="<https://youtu.be/0sNKEk_OD-A>" %}

## Switch Nation

If you have access to multiple nations, either individually or via an Organization you're an admin of, you can swtich between the nations by tapping "Swtich Nation" in the top right hand corner and finding the nation you want to switch to.

{% embed url="<https://youtu.be/-ZTtqrKf2yk>" %}


# Other Guides

Troubleshooting guides, tips, NationBuilder resources, and more

A collection of troubleshooting guides, best practices, and reference material to help you get the most out of FieldEdge.

## Troubleshooting

{% content-ref url="/pages/riNloKLjPkZr1CjwNmUi" %}
[Why is my precinct (NBEC) data missing?](/everything-else/other-guides/why-is-my-precinct-nbec-data-missing)
{% endcontent-ref %}

{% content-ref url="/pages/x3mJV106mwMprkgLmPtB" %}
[Missing people or organisations in People section](/everything-else/other-guides/missing-people-or-organisations-in-people-section)
{% endcontent-ref %}

{% content-ref url="/pages/jN4dkvcGEXfLduWOZRe4" %}
[Checkout error: Your card does not support this type of purchase](/everything-else/other-guides/checkout-error-your-card-does-not-support-this-type-of-purchase)
{% endcontent-ref %}

{% content-ref url="/pages/4FO3wx7o6pHTVz6EPFAW" %}
[Search doesn't always find people in my nation](/everything-else/other-guides/search-doesnt-always-find-people-in-my-nation)
{% endcontent-ref %}

{% content-ref url="/pages/MtfPUtJa3nmYqU2qUkLB" %}
[Error message: You do not have permission to use this app](/everything-else/other-guides/error-message-you-do-not-have-permission-to-use-this-app)
{% endcontent-ref %}

{% content-ref url="/pages/H0RNeT837UuyVwZ3jr1m" %}
[Surveys not showing up in FieldEdge](/everything-else/other-guides/surveys-not-showing-up-in-fieldedge)
{% endcontent-ref %}

{% content-ref url="/pages/03j1SSGA3mM0Sd2l4BwP" %}
[Trouble Logging In?](/everything-else/other-guides/trouble-logging-in)
{% endcontent-ref %}

{% content-ref url="/pages/PVDqbTVj2DfOGv3zbQ9z" %}
[People missing from Canvass or Call Time list](/everything-else/other-guides/people-missing-from-canvass-or-call-time-list)
{% endcontent-ref %}

{% content-ref url="/pages/jIuQHsCXk5qUeeFl5upX" %}
[Resetting Your Password in FieldEdge](/everything-else/other-guides/resetting-your-password-in-fieldedge)
{% endcontent-ref %}

{% content-ref url="/pages/fI6sTHwCaOo9yuoMPCYD" %}
[Nation Disconnected](/everything-else/other-guides/nation-disconnected)
{% endcontent-ref %}

## Tips & Best Practices

{% content-ref url="/pages/0wsvqyZpG0i8C6WueccG" %}
[Ensuring FieldEdge Access to GPS Location on Your Device](/everything-else/other-guides/ensuring-fieldedge-access-to-gps-location-on-your-device)
{% endcontent-ref %}

{% content-ref url="/pages/NRwOSElwE1jCDAH32i20" %}
[Battery Usage Tips While Using FieldEdge](/everything-else/other-guides/battery-usage-tips-while-using-fieldedge)
{% endcontent-ref %}

{% content-ref url="/pages/xssu1yJN6wJMmVd4CwaR" %}
[Mobile Data Usage While Using FieldEdge](/everything-else/other-guides/mobile-data-usage-while-using-fieldedge)
{% endcontent-ref %}

{% content-ref url="/pages/wocchvFuCny77yl7oK0X" %}
[Route suggestions while canvassing](/everything-else/other-guides/route-suggestions-while-canvassing)
{% endcontent-ref %}

{% content-ref url="/pages/v6AhUuCQwy88U8PT7Lzg" %}
[How to Adjust Text Size on iOS and Android](/everything-else/other-guides/how-to-adjust-text-size-on-ios-and-android)
{% endcontent-ref %}

{% content-ref url="/pages/152PNvW6P4PMNR6aKm3z" %}
[Compliance best practices for sending SMS messages](/everything-else/other-guides/compliance-best-practices-for-sending-sms-messages)
{% endcontent-ref %}

## NationBuilder

{% content-ref url="/pages/iJzcKdkTa1dqZgLZhKeF" %}
[Add FieldEdge Support to your nation](/everything-else/other-guides/add-fieldedge-support-to-your-nation)
{% endcontent-ref %}

{% content-ref url="/pages/dhgga5CFJ3ziTG65rvNn" %}
[Batch update a list in NationBuilder](/everything-else/other-guides/batch-update-a-list-in-nationbuilder)
{% endcontent-ref %}

{% content-ref url="/pages/2KSbUhMiQnK8JxXuXSLj" %}
[FieldEdge Special Tags](/everything-else/other-guides/fieldedge-special-tags)
{% endcontent-ref %}

## Beta Testing

{% content-ref url="/pages/zbyOxC4pLbI87zANXEcR" %}
[Customer Advisory & Beta Testing](/everything-else/other-guides/customer-advisory-and-beta-testing)
{% endcontent-ref %}

## What's New

{% content-ref url="/pages/zeyPS0OiBl8K5UFRaP5y" %}
[FieldEdge 3.1: Smarter workflows, less admin](/everything-else/other-guides/fieldedge-3.1-smarter-workflows-less-admin)
{% endcontent-ref %}


# Why is my precinct (NBEC) data missing?

How to resolve the no precinct data in FieldEdge

**Do you see precinct data in your nation but not in FieldEdge?**

You may have older precinct data from the NationBuilder Election Center (NBEC).

To confirm this, please contact [NationBuilder support](http://nationbuilder.com/support).

If this is the case, NationBuilder support can assist you to *re-autodistrict* your nation to generate the most up to date precinct information based off of the most recently updated "shapefiles" for that country or state.

If you don't believe you have older NBEC data, please contact us and we'll explore this with you further.


# Missing people or organisations in People section

Can't find the person you are looking for?

{% hint style="warning" %}
If people are missing from a **Call Time** or **Canvass list**, [review this article first](/everything-else/other-guides/people-missing-from-canvass-or-call-time-list).
{% endhint %}

There are a few reasons you might not be able to find the person you are looking for using the People section of the app:

1. You don't have permission to view their profile
2. Searches need to be an exact match
3. Searches for an organisation with three or more words don't work
4. The person is missing from your nation altogether

Read on for further explanation of each scenario.\
​

### 1. You don't have permission to view their profile <a href="#id-1-you-dont-have-permission-to-view-their-profile" id="id-1-you-dont-have-permission-to-view-their-profile"></a>

Check that you have access to this person's profile. If you are not an admin, you may have a permission set that requires you to be the point person to view them. Check with an Admin of your nation what permission set you have and if you are the point person.

### 2. Searches need to be an exact match <a href="#id-2-searches-need-to-be-an-exact-match" id="id-2-searches-need-to-be-an-exact-match"></a>

To find someone using FieldEdge's search, you need to make sure you are search for an exact match, eg. if the person's name is "Franklin", searching for "Frank" will not find them. This is due to a bug in NationBuilder search API.

### 3. Searches for an organisation with three or more words don't work <a href="#id-3-searches-for-an-organisation-with-three-or-more-words-dont-work" id="id-3-searches-for-an-organisation-with-three-or-more-words-dont-work"></a>

If you are searching for an organisation that has more than one word in its name, eg. "McDonalds South Florida", you may not be able to find it using FieldEdge. This is due to the way the NationBuilder search API is designed.

### 4. The person is missing from your nation altogether <a href="#id-4-the-person-is-missing-from-your-nation-altogether" id="id-4-the-person-is-missing-from-your-nation-altogether"></a>

Are you sure the person exists in your nation? Try searching for them on [nationbuilder.com.](http://nationbuilder.com/)

{% hint style="info" %}
NationBuilder is working on a new API that will resolve these issues. Once the API is released widely, FieldEdge will upgrade our search.
{% endhint %}


# Checkout error: Your card does not support this type of purchase

Are you getting this error message in the checkout? Find out why.

Are you getting the error message "Your card does not support this type of purchase." in the FieldEdge checkout?

There are a few different reasons that you might get this response but the most common is that some cards have restrictions on cross-border usage. The company behind FieldEdge is based in Australia, so if you're card was issued in the US or another country, this might be the problem. Please contact your bank to see if you have this restriction and if they can remove it.

Other reasons you may be receiving this error:

* Some debit cards require a PIN to be entered. If you're trying to use one of these cards, you'll need to use another card to make the purchase.
* Some cards (often corporate cards or FSA cards) can only be used for certain business categories, like travel or healthcare. If you think this may be the case for you, please contact your employer to see if it can be removed, or if you can purchase it on a personal credit card and be reimbursed.


# Search doesn't always find people in my nation

Are you having trouble finding a person or organization in your nation using the search feature in FieldEdge?

It could be due to this bug with NationBuilder's API.

As of July 15, 2017, NationBuilder's API only returns results from your nation when the name of the person or organisation exactly matches.

For example: typing "John" will not return results for "Johnathan". Similarly, if I want to find "McDonalds Smithfield", you will need to type "mcdonalds smithfield" – searching for "mcdonalds" would not work.

{% hint style="info" %}
NationBuilder is working on a new API that will resolve these issues. Once the API is released widely, FieldEdge will upgrade our search.
{% endhint %}


# Ensuring FieldEdge Access to GPS Location on Your Device

Directions not working or stuck on waiting for location? Try these setting

If you're experiencing issues with FieldEdge, such as directions not working or the app being stuck on "waiting for location," it's likely that the app does not have the necessary access to your device's GPS location. This guide will help you enable GPS location for FieldEdge on both iPhone and various popular Android versions, ensuring the app functions correctly.

### For iPhone Users

1. **Open Settings**: Tap on the 'Settings' app on your iPhone.
2. **Navigate to Location Services**: Go to `Privacy` > `Location Services`. Here, you manage location settings for your apps.
3. **Find FieldEdge**: Scroll through the list of apps until you find `FieldEdge`.
4. **Adjust Location Access**: Tap on `FieldEdge`, and under “Allow Location Access,” select `While Using the App`. This setting allows FieldEdge to use your location information when you're actively using the app.
5. **Confirm Settings**: With this selection, FieldEdge will have access to your GPS location whenever you use the app, ensuring proper functionality.

### For Android Users

#### Android 10 and Newer:

1. **Open Settings**: Tap on the 'Settings' icon.
2. **Access Location**: Go to `Privacy` > `Permission Manager` > `Location`.
3. **Find FieldEdge**: Scroll through the list of apps and select `FieldEdge`.
4. **Set Location Access**: Choose `Allow all the time` or `Allow only while using the app` based on your preference.

#### Android 9 (Pie):

1. **Open Settings**: Tap on the 'Settings' icon.
2. **Go to Apps & Notifications**: Select `Apps & Notifications`.
3. **Select FieldEdge**: Find and tap on `FieldEdge`.
4. **Manage Permissions**: Tap on `Permissions`, then `Location`.
5. **Enable Location Services**: If Location is off, turn it on.

#### Android 8 (Oreo) and Earlier:

1. **Open Settings**: Tap on the 'Settings' icon.
2. **Go to Apps**: Scroll down and select `Apps` or `Application Manager`.
3. **Select FieldEdge**: Find `FieldEdge` in the list.
4. **Access App Info**: Tap on `FieldEdge`, then go to `Permissions`.
5. **Toggle Location On**: If Location is off, switch it to on.

### Conclusion

By ensuring FieldEdge has access to your device's GPS location, you can resolve issues like directions not working or the app being stuck on waiting for location. If you continue to experience problems after following these steps, please contact FieldEdge Support for further assistance.


# Error message: You do not have permission to use this app

<figure><img src="https://downloads.intercomcdn.com/i/o/156367685/229fc59882a7dabec7c9d1a6/signal-2019-10-16-100615.png" alt="" width="375"><figcaption></figcaption></figure>

### Introduction

Are you encountering the "You do not have permission to use this app" error message in FieldEdge? This common issue typically arises when your account lacks the necessary permissions. Don't worry, though – resolving this is usually straightforward with the help of your NationBuilder account's Admin.

{% embed url="<https://www.loom.com/share/e94ac0d69e3b4f7497b0f2fc11a196af>" %}

### Adjusting Permissions

An Admin of your NationBuilder account will need to follow these steps:

1. **Go to Settings**: Click on `Settings` in the main menu of NationBuilder.
2. **Select Nation Defaults**: Within Settings, find and select `Nation Defaults`.
3. **Edit Permission Sets**: Navigate to `Permission Sets` and edit the relevant set.
4. **Enable Key Permissions**:
   * Ensure the `API` option is checked.
   * Activate the "Sign into apps" permission.
   * Leave other permissions unchanged unless otherwise needed.

By enabling these permissions, your account should be all set to access and use FieldEdge effectively.

### Further Information

For a more comprehensive understanding and additional details, please refer to our [FieldEdge/NB Permissions guide](/team-setup/permission-sets). This resource offers an in-depth look at managing permissions within the FieldEdge and NationBuilder.

If you are receivin


# Add FieldEdge Support to your nation

**To help troubleshoot an issue or help you set something up, our support team may ask you to add them to your nation.**

{% hint style="warning" %}
FieldEdge will only ask for access to your nation while actively supporting you. We will never reach out randomly and ask for access to your nation. Please only provide access if you feel comfortable doing so. We recommend that you remove Admin access from our account after we are done assisting.
{% endhint %}

**The quickest way to do this is:**

1\. Go to the **profile icon in the top right hand corner** of your nation and click **Add control panel user**.

<figure><img src="https://downloads.intercomcdn.com/i/o/176628527/f4366988271db2c37713f463/Screen+Shot+2020-01-13+at+2.39.08+pm.png" alt=""><figcaption></figcaption></figure>

2\. Now enter the email address <support@fieldedgeapp.com>, change **Set permission** dropdown to **Admin** and click Invite.

<figure><img src="https://downloads.intercomcdn.com/i/o/176628470/caa628acc10e236093212168/Screen+Shot+2020-01-13+at+2.40.01+pm.png" alt=""><figcaption></figcaption></figure>

\
We will receive an email notification that will allow us to setup the account.


# Surveys not showing up in FieldEdge

How to get a NationBuilder survey to appear in the FieldEdge app

There are two main reason why a survey may not show up in FieldEdge:

1. Permissions
2. Survey page setup

Keep reading to see how we solve each situation.

## **Permission sets**

NationBuilder has recently changed the way their permission sets work as they apply to surveys. If you have used FieldEdge in the past, your Permission Sets may need updating. [See this article for more information](https://docs.fieldedgeapp.com/en/articles/681803-permission-sets) about the new minimum Permission Sets required for use with FieldEdge.

If your permission sets are correctly set, see below.

## Survey page setup

**​Here's a quick video overview to fixing this issue:**

{% embed url="<https://www.loom.com/share/e20664cad0594f1cba97537e608936f0>" %}

For a survey to work in FieldEdge it must be connected to a webpage (not just exist in the people section of your nation). This page can be *published* or it can be *unlisted*.

First, follow the steps to create a new page on your site. This process works the same regardless of what type of page you’re creating.

1\. Go to *Website* in the left-hand menu and click on the website you'd like to create the page on. Note that you can attach it to any website and it will appear in FieldEdge

2\. Click +New Page, give your page a name and select the *Survey* page type

3\. Ensure the page status is set to Unlisted (to avoid it from being shown on your website)

3\. Be sure neither of the "show in nav" tick-boxes are ticked

5\. Click the “Create new page” button.

6\. You’ll be taken to Survey settings > Basics. Select the survey in question from the Survey dropdown.

7\. Finally, be sure to save! (you can ignore all other settings)

\
​The survey should now appear in FieldEdge.

\
For more on creating surveys for use in FieldEdge, [see our article on Adding a survey](/guide-to-canvassing-and-calls/setup-and-core-workflows/adding-a-survey).


# Trouble Logging In?

If you can't access the app or login to your HQ Dashboard, try these simple fixes.

## How to login to FieldEdge <a href="#how-to-login-to-fieldedge" id="how-to-login-to-fieldedge"></a>

FieldEdge has several logins depending on if you are logging into the Dashboard or the mobile app, and if you are logging in as an Accountless user or not.

If you are a **field user**, see this [Quick Start for Field Users](/quick-start-for-field-users) guide or if you are running into a specific error, continue reading:

* [Important Concepts](#important-concepts)
* [Mobile App Errors](#mobile-app-errors)
* [HQ Dashboard Errors](#website-dashboard-errors)

## **Important Concepts**

### **What is a slug?**

Your slug is the first part of the URL when you are using the NationBuilder Dashboard, eg. [mycampaign](http://mycampaign.nationbuilder.com/)[.nationbuilder.com](http://mycampaign.nationbuilder.com/) ("mycampaign" is the slug in this case).

If you were sent an email from FieldEdge, it should have listed your campaign/organisation's slug.

### Activating your NationBuilder account

You may have been sent an invite from NationBuilder to activate your account. Before logging into FieldEdge, you will need to click the link in that email and set your password. Once this is done, you can use that password, along with your email address, to login to FieldEdge.

If you were never sent an invite from NationBuilder, don't know your slug or password, please touch base with your campaign/organisation. In most cases, we do not have this information.

### Accepting an invite to "manage a campaign"

If you received an invite to help ***manage*** a campaign using FieldEdge, you will need to accept your invite from FieldEdge. If you do not already have a FieldEdge account, you will be asked to create one. This login can be used across multiple campaigns and nations.

### Accepting an SMS invite

If you received an invite to download FieldEdge via SMS, there is no action required to accept the invite. Simply login as explained here: [Quick Start for Field Users](/quick-start-for-field-users)

## Mobile App Errors <a href="#mobile-app-errors" id="mobile-app-errors"></a>

#### Solutions for when you are having trouble signing in to the app on your mobile: <a href="#solutions-for-when-you-are-having-trouble-signing-in-to-the-app-on-your-mobile" id="solutions-for-when-you-are-having-trouble-signing-in-to-the-app-on-your-mobile"></a>

<details>

<summary>🛑 "You do not have permission to use this app"</summary>

✅ **Solution**

The NB account you are signing in with does not have permission to use third-party apps (this includes FieldEdge). Contact the person who added you to the nation and advise them to enable "API > sign into apps" on your associated permission set. Learn more about [FieldEdge and NationBuilder Permissions](/team-setup/permission-sets).

</details>

<details>

<summary>🛑 "We couldn't find a FieldEdge account for the nation"</summary>

✅ It appears the nation does not exist at the provided slug. Please check your spelling.

</details>

<details>

<summary>🛑 "After looking carefully, we could not find an active subscription for this nation."</summary>

​✅ If you have a trial with us, the trial may have expired Please contact us so we can check the status of your subscription in our system.

</details>

<details>

<summary>🛑 "This app is not registered for use by this nation."</summary>

You may have not signed up for an account on our website or your account is not connected your nation correctly. If you have not signed up for an account, please do so at <https://fieldedgeapp.com/pricing>.

​✅ If you already have an account, using an Admin account, login to your nation and go to "Setting > Apps > Install new app". Look for "FieldEdge 3" and click on the "Install" button.

Ensure you have the latest version of FieldEdge installed "FieldEdge **3"**

</details>

<details>

<summary>🛑 "An error has occurred: The client is not authorized to perform this request using this method"</summary>

You are using FieldEdge v2 which is no longer supported.

​✅ Please download FieldEdge v3 from your app store.

</details>

<details>

<summary>🛑 There is no error message but the app is stuck on a blank loading screen</summary>

**✅ Solutions to try**

1. Visit your nation's login page from your phone using your preferred browser. You login page can be found at <https://yourslug.nationbuilder.com/admin> – if it loads, move on to the next step. If it doesn't, NatioBuilder may be having connection issues.
2. Restart your phone and try logging in again
3. Check your [Location Permissions](/everything-else/other-guides/ensuring-fieldedge-access-to-gps-location-on-your-device)
4. Delete the app and reinstall it

</details>

## HQ Dashboard Errors <a href="#website-dashboard-errors" id="website-dashboard-errors"></a>

#### Solutions for when you are having trouble signing in to the Dashboard on our website: <a href="#solutions-for-when-you-are-having-trouble-signing-in-to-the-dashboard-on-our-website" id="solutions-for-when-you-are-having-trouble-signing-in-to-the-dashboard-on-our-website"></a>

Firstly, be sure you are logging in at [https://hq.fieldedgeapp.com](https://dashboard.fieldedgeapp.com/).

Ensure you are using the email address and password you signed up with. This is not your NationBuilder login details.

## Forgot Password?

If you have forgotten your password to login to FieldEdge or your Nation, see our [Resetting Your Password in FieldEdge](/everything-else/other-guides/resetting-your-password-in-fieldedge) guide.\
​

## Still having trouble? <a href="#still-having-trouble" id="still-having-trouble"></a>

If you are seeing an error not listed above, please reach out with your email address and nation slug and we'll get you sorted right away.


# Nation Disconnected

What to do when your nation becomes disconnected from FieldEdge

In rare cases, a nation can become disconnected from FieldEdge. When this happens, a **"Nation Disconnected"** dialog will appear when trying to access the nation.

## What Causes It

The connection between FieldEdge and your NationBuilder nation has been interrupted, typically due to NationBuilder API token changes or permission issues.

## How to Resolve It

A Campaign Manager needs to reconnect the nation by re-authorizing FieldEdge with NationBuilder:

1. Go to the **Switch Nation** menu
2. Select the disconnected nation
3. Follow the authorization prompts to reconnect

If the issue persists, contact <support@fieldedgeapp.com>.

{% hint style="info" %}
Accountless users cannot resolve a disconnected nation — a Campaign Manager must reconnect it.
{% endhint %}


# Batch update a list in NationBuilder

Resetting a list via NationBuilder for re-calling or re-canvassing

{% hint style="info" %}
**For canvass or calls that happened AFTER 11 April 2024**
{% endhint %}

### Step 1: Log in to NationBuilder and head to People

Start by logging into your NationBuilder account. Once logged in, navigate to the `People` section from the top menu.

### Step 2: Find or create a list of people to re-canvass

* In order to update the completion status, we need the people to be on a list
* You can update an existing list or create a new one using filters
* Click the list to open all of the options

{% hint style="info" %}
Keep in mind that someone "Completed" in FieldEdge can be of any status (answered, no answered) so you can target people with certain status using NationBuilder filters such as "Last Contact was No Answer" and then add those people to a list that is reset.
{% endhint %}

### Step 3: Batch update the list

* Head to the `Batch update` tab
* Select the `Tags` sub-tab
* Change `Action to take` to `Remove`
* Select one of the following tags as applicable
  * `FE:walk Complete` - People canvassed (any outcome)
  * `FE:walk Skipped` - People that were part of the canvass but were skipped
  * `FE:call Complete` - People called (any outcome)
  * `FE:call Skipped` - People that were part of the canvass but were skipped
* Press the button `Update tags X people`

Repeat for each tag or list that is applicable to your situation.

**You should now be able to re-canvass those people in FieldEdge.**


# FieldEdge Special Tags

Wondering what the "FEe:walk Completed" tag means? Learn why and how this tag is applied to people when using FieldEdge.

## The role of tagging in FieldEdge

To keep track of what people in your nation have been contacted during while canvassing or phone banking, FieldEdge "special FE tags" to reflect the interaction. The tag includes if it was a walk or call and if they were completed (any status) or skipped.

As of late April, these interactions apply across all lists and in proximity walks. So if a person was completed during a canvass on one list, they will be completed on another list or while using Proximity Walk.

In order to re-canvass or re-call a person, their completion status will need to be reset by removing the special FieldEdge tags. You can do this either using a **batch update to a list in NationBuilder** or by using [FieldEdge HQ' List Reset tool](/product-tour-or-hq/tools/list-reset).

| Notes                                                                                                                                  | Example Tag(s)                                                                                                                                                                                                 |
| -------------------------------------------------------------------------------------------------------------------------------------- | -------------------------------------------------------------------------------------------------------------------------------------------------------------------------------------------------------------- |
| Tags associated with a completing a person (with any status, eg. inaccessible) during a FieldEdge Canvass.                             | <p><code>FE:walk Completed</code> <strong>(NEWEST FORMAT)</strong><br><code>FE:walk0 Completed</code> <strong>(v3 FORMAT)</strong><br><code>fe:walk:20210822 canvassed</code> <strong>(v2 FORMAT)</strong></p> |
| Tags associated with skipping a person during a FieldEdge Canvass (normally used if you want to canvass a single person in the house). | <p><code>FE:walk Skipped</code><br><code>FE:walk:231 Completed</code><br><code>fe:walk:20210822 skipped</code></p>                                                                                             |
| Tags associated with completing person (with any status, eg. Not answered) during a FieldEdge Call Time Session.                       | <p><code>FE:call Completed</code><br><code>FE:call:7243 Completed</code></p>                                                                                                                                   |
| Tags associated with skipping person during a FieldEdge Call Time Session.                                                             | <p><code>FE:call Completed</code><br><code>FE:call:323 Completed</code></p>                                                                                                                                    |

## **Re-canvassing a contact**

If you would like to re-canvass contacts after the change, remove any FieldEdge tags from the contact in NationBuilder. See our [guide here](/everything-else/other-guides/batch-update-a-list-in-nationbuilder).

## Changes Made 11 April 2024

{% hint style="warning" %}
In order the facilitate better collaboration with FieldEdge teams, we recently made a change to the way FieldEdge tracks canvass and call time completions.

The transition should be fairly seamless for most. Continue reading to learn more about the transition.
{% endhint %}

### **Current Workflow in Summary**

When a person is completed or skipped during a canvass walk or call time session, they are considered completed/skipped for the current list only. If that person is added to a new list, people are not considered completed/skipped.

### **New Workflow in Summary**

When a person is completed or skipped during a canvass walk or call time session, people are **considered completed/skipped across all lists** including proximity walks.

### **Benefits of the Changes**

**The downsides of the current approach:**

* if a person was a member of multiple lists and were completed on one list, they wouldn’t be completed on the other lists which could easily lead to canvassing someone multiple times.
* It also meant that while using Proximity Walk, completed houses weren’t reflected by peers and vice-versa.

**With the new changes, the benefits are:**

* Campaign managers can spend less time managing lists and worrying about people being accidentally re-canvassed because once they are completed/skipped, that will be reflected everywhere in FieldEdge.
* Behind the scenes, FieldEdge applies a tag in NationBuilder to indicates the status of a contact. The current approach involves dynamic tagging which leads to lots of different tags in your nation. After the change, the app will only apply a few static tags (FE:walk Completed, FE:call Completed,FE:walk Completed, FE:call Skipped) which makes it easier to manage.

### **What about existing data?**

Existing people who have been completed or skipped in FieldEdge 2 or 3, will be shown as completed/skipped across all lists, including proximity walks.

### **What about my old tags?**

Right now if you’re a heavy FieldEdge users, you may have a lot of tags in your nation you’d like cleaned up. We hope to offer the ability to clean up old tags using the tool mentioned above.


# Customer Advisory & Beta Testing

## Join Our Customer Advisory Panel and Become a Beta Tester

At FieldEdge, we truly value the feedback and insights from our users. To keep improving our products and services, we invite you to join our Customer Advisory Panel and become a beta tester. This exclusive opportunity allows you to be among the first to try out our latest features and updates, giving us feedback that helps shape FieldEdge's future.

### Why Join the Customer Advisory Panel?

By joining our Customer Advisory Panel, you get to:

* **Influence Product Development**: Your feedback will help shape the future of FieldEdge, ensuring it meets your needs and those of other users.
* **Early Access to New Features**: Be the first to try out our latest features and updates before they are released to everyone else.
* **Exclusive Communication Channel**: Gain access to a dedicated channel where you can share your thoughts directly with our product team.
* **Recognition and Rewards**: Receive special recognition for your contributions and enjoy exclusive rewards for your participation.

### Beta Testing

As a beta tester, you’ll have the opportunity:

* **Test New Features**: Use and test the latest features and updates to our products.
* **Provide Feedback**: Share your thoughts on your experience, including any issues you find and ideas for improvement.
* **Report Bugs**: Help us out by identifying and reporting any bugs or inconsistencies.
* **Participate in Surveys and Interviews**: Occasionally take part in surveys or interviews to provide deeper insights into your experience and needs.

{% hint style="info" %}
Individuals can join the beta program and in 99% of cases it will not affect other people using FieldEdge in the same nation. In rare cases that it does, we will inform you.
{% endhint %}

### How to Join

Joining our Customer Advisory Panel and becoming a beta tester is easy.

**Step 1**

Send an email to <support@fieldedgeapp.com> expressing your interest in joing the Customer Advisory Panel and we'll get things setup.

**Step 2**

Install the Beta app by [guide on installing FieldEdge Beta on iOS and Android](/everything-else/other-guides/customer-advisory-and-beta-testing/how-to-install-fieldedge-beta-on-ios-and-android).


# How to Install FieldEdge Beta on iOS and Android

Joining the FieldEdge beta program is a great way to get early access to new features and updates. Follow the steps below to install the FieldEdge beta on your iOS or Android device.

### Installing FieldEdge Beta on iOS

1. **Install TestFlight**
   * Open the App Store on your iOS device.
   * Search for "TestFlight" and install the app developed by Apple.
2. **Join the FieldEdge Beta**
   * Open this link on your iOS device: [Join the Beta on iOS](https://testflight.apple.com/join/Sn5ZlSry).
   * Tap "Accept" to join the beta testing program for FieldEdge.
3. **Install the FieldEdge Beta App**
   * After joining the beta, TestFlight will open automatically.
   * Tap "Install" next to the FieldEdge app to download and install the beta version on your device.
4. **Using the Beta App**
   * Once the installation is complete, you can open and use the FieldEdge beta app as you normally would.
   * If you encounter any issues or have feedback, use the TestFlight app to submit your comments.

### Installing FieldEdge Beta on Android

1. **Join the FieldEdge Beta**
   * Open this link on your Android device: [Join the Beta on Android](https://play.google.com/store/apps/details?id=com.fieldedge3\&hl=en_AU) or search for FieldEdge 3 in the Play Store.
   * Sign in with your Google account if prompted.
   * Tap "Become a tester" to join the beta testing program.
2. **Install the FieldEdge Beta App**
   * After joining the beta, go to the Google Play Store.
   * Search for "FieldEdge" and open the app page.
   * If you are already a beta tester, you will see an option to update the app to the beta version. Tap "Update" to install the beta app.
   * If you do not have the FieldEdge app installed, tap "Install" to download and install the beta version.
3. **Using the Beta App**
   * Once the installation is complete, you can open and use the FieldEdge beta app as you normally would.
   * If you encounter any issues or have feedback, use the Google Play Store to submit your comments.

### Providing Feedback

Your feedback is crucial in helping us improve FieldEdge. You can provide feedback via:

1. The Feedback menu in the mobile app
2. Use chat on the website or FieldEdge HQ
3. Send us an email <support@fieldedgeapp.com>

Thank you for participating in the FieldEdge beta program and helping us make FieldEdge better for everyone!


# How to Install a Beta APK from FieldEdge via Google Drive

### Introduction

If you're part of our beta testing team or need to install a specific version of the FieldEdge app, you might receive a Google Drive link from FieldEdge Support. This guide will walk you through the steps to download and install the APK file on your Android device.

### Preparing Your Device

Before installing the APK, you need to allow your device to install apps from sources other than the Google Play Store.

#### For Android 8 and Newer (Including Android 11 and 12):

1. **Access Settings**: Swipe down and tap the gear icon.
2. **Select 'Biometrics and Security'**: The name might vary slightly.
3. **Choose 'Install Unknown Apps'**: You'll see a list of apps.
4. **Pick Your Browser/File Manager**: Select the app you'll use for the download.
5. **Enable 'Allow from this Source'**: Switch it on.

#### For Android 7 and Earlier:

1. **Open Settings**: Swipe down and tap the gear icon.
2. **Navigate to 'Security'**: It might be under a different name.
3. **Activate 'Unknown Sources'**: This allows installations from outside the Google Play Store.

### Downloading the APK

1. **Open the Google Drive Link**: Use the link sent by FieldEdge Support.
2. **Download the APK File**: Tap the download button in Google Drive.

### Installing the APK

1. **Open File Manager**: Go to 'Downloads' or your default download location.
2. **Locate the APK File**: Find the downloaded file.
3. **Tap on the APK File**: This opens the installation window.
4. **Select 'Install'**: Follow any additional prompts.

### Troubleshooting

* **Can't Find the APK?**: Ensure the file has fully downloaded.
* **Installation Blocked?**: Check 'Unknown Sources' settings as described above.
* **App Not Installing?**: Ensure enough storage space and remove any existing app versions.

### Conclusion

Once installed, you can start using the beta version of FieldEdge. Your feedback is crucial to us, so please don't hesitate to reach out to FieldEdge Support if you encounter any issues.


# Compliance best practices for sending SMS messages

FieldEdge’s SMS feature is a powerful tool for reaching voters directly, however, sending SMS requires care to maintain compliance, avoid carrier spam flags, and avoid people reporting your messages.

{% hint style="info" %}
It's important to know, sending SMS via FieldEdge (using Call Time or directly from a person's profile), uses your phone's carrier plan and number.
{% endhint %}

### 1. Avoid Repetitive Content

Carriers are increasingly flagging identical, repetitive messages as spam. Adding variety and personalization not only avoids this but also increases engagement.

* Use the recipient’s name or reference their district.
* Rotate message wording to reduce identical copies.
* Add personalized touches to every message by reviewing past interactions, tags and data from their profile.

### 2. Avoid Overloading Recipients

Sending too many messages in a short period can irritate voters and lead to complaints. Stick to a reasonable frequency:

* 1–2 messages per week is generally acceptable unless you’ve had prior engagement.
* Avoid sending multiple messages in a single day unless it’s urgent.

### 3. Always Identify Yourself

Ensure that recipients know who you are and why you’re messaging them. Transparency builds trust and prevents confusion. This is critical to avoiding people manually marking your message as SPAM.

### 4. Respect Opt-Out Requests

When using personal numbers in a political setting, providing a formal “Reply STOP” mechanism isn’t required in most regions but being mindful of opt-outs is still important.

* If someone asks not to receive messages, respect their request immediately.
* Update their profile using FieldEdge or NationBuilder to reflect their preference.

### 5. Keep Messages Clear and Concise

Call Time allows for direct, impactful communication. Avoid overwhelming recipients with lengthy messages.

By using Call Time strategically and following these best practices, you can run a successful and compliant SMS campaign that fosters meaningful voter engagement while avoiding common pitfalls like spam complaints or carrier blocks.

### 6. Monitor and Respond to Replies

One of FieldEdge's strengths is facilitating direct engagement. Many recipients will reply to your messages, so:

* Be prepared to answer questions promptly and politely.
* Log responses via Call Time or using Log Contact to track engagement and identify trends.

### 7. Know the Rules in Your Region

Lastly, While political messages often have exemptions, some guidelines still apply. As of writing this, we understand that:

* **United States:** Messages sent manually are generally exempt from TCPA restrictions but must be respectful and responsible.
* **Canada:** CASL exempts political messages, but identification and courtesy opt-out handling are encouraged.

**Before starting your messaging, review the regulations in your region.**

###


# People missing from Canvass or Call Time list

Do your list numbers not match what's showing in NationBuilder? Here's why.

If you appear to be missing people from a list in Canvass or Call Time, and the number of people showing doesn't match what you see in NationBuilder, there's likely a good reason. Both Canvass and Call Time filter these list automatically for people who don't meet certain requirements.

### Requirements

#### Call Time

* Must have a valid phone number

#### Canvass

* Must have valid address
* Must be geocoded with mapping coordinates (check geocoding status [here](https://support.nationbuilder.com/en/articles/2308835-geocoding-addresses))

### How can I confirm, exclude or identify these people

You can run a NationBuilder filter that combines a condition of list membership with a condition that says a data point exists or does not exist, like so:

<figure><img src="https://3317596624-files.gitbook.io/~/files/v0/b/gitbook-x-prod.appspot.com/o/spaces%2Fmd1HR6LZFUYuK3fPHLXC%2Fuploads%2FSva72QINsOOYVRDK61aP%2FCleanShot%202025-02-27%20at%2008.55.49%202%402x.png?alt=media&amp;token=2fe0c6a6-384f-47e6-bffc-9d48542b1f66" alt=""><figcaption><p>Filter for just list membership returns 932 people</p></figcaption></figure>

<figure><img src="https://3317596624-files.gitbook.io/~/files/v0/b/gitbook-x-prod.appspot.com/o/spaces%2Fmd1HR6LZFUYuK3fPHLXC%2Fuploads%2Fqt46anV0IHnDfBB0yrNs%2FCleanShot%202025-02-27%20at%2008.55.40%202%402x.png?alt=media&amp;token=ac489d64-6e16-40e6-9b68-a2d10ad356ec" alt=""><figcaption><p>Filter for list membership and an phone number exists return 894 people</p></figcaption></figure>

If the problem does not appear to be due to data requirements, it may be another factor like permissions that is removing them from the app completely. See [this article](/everything-else/other-guides/missing-people-or-organisations-in-people-section) for more information.


# Battery Usage Tips While Using FieldEdge

When you're out canvassing, it's essential to be mindful of your phone’s battery usage. FieldEdge relies on your device's GPS and mapping features to show you where to go and track your progress — but these features can use significant battery power. This isn’t unique to FieldEdge; any app that uses maps and location tracking, like Google Maps or Apple Maps, will drain your battery in a similar way.

To help you stay powered up while canvassing, here are some best practices and tips:

## Why Battery Usage is Higher When Canvassing

When FieldEdge is in use, especially in **Maps View**, your device's GPS is constantly running in the background to:

* Track your location in real-time
* Display map data and route information
* Update your progress as you knock on doors

This ongoing location tracking is battery-intensive and can reduce your phone’s battery life faster than usual.

## Tips to Maximize Battery Life

Here are a few ways to help conserve battery power while using FieldEdge:

### 1. Fully Charge Your Phone Before You Start

Before you head out to knock doors, make sure your phone is charged to 100%. Starting with a full battery will give you more time in the field without worrying about running out of power.

### 2. Bring a Power Bank / Portable Charger

A portable power bank is one of the best ways to stay charged throughout the day. Keep a cable handy and plan to top up your battery when you take breaks.

### 3. Use **List View** Instead of **Map View**

If you don’t need real-time maps, switch to **List View** in FieldEdge. **List View** uses less battery because it doesn’t need to load and update the map or constantly track your location.

<figure><img src="https://3317596624-files.gitbook.io/~/files/v0/b/gitbook-x-prod.appspot.com/o/spaces%2Fmd1HR6LZFUYuK3fPHLXC%2Fuploads%2Ftvfm57aJ4h3eC9jCkwHp%2FIMG_24E6D94D8D9E-1.jpeg?alt=media&amp;token=744531ed-2904-4383-82f8-e1b32841dfff" alt=""><figcaption><p>Switch to List View to save some battery</p></figcaption></figure>

### 4. Close Unnecessary Apps

Running multiple apps in the background can drain your battery faster. Before canvassing, close any apps you won’t need during your shift.

### 5. Lower Screen Brightness

Dimming your screen can make a big difference over the course of a few hours. Reduce brightness manually or turn on **Auto-Brightness** to help your phone adapt.

### 6. Use Low Power Mode

Both iOS and Android offer **Low Power Mode** (or **Battery Saver Mode**) to help extend battery life. You can enable this mode before or during your canvassing shift to limit background activity and reduce battery consumption.

### 7. Adjust Location Settings (Optional — Use With Caution)

If you're using **iOS**, you can reduce battery drain by turning off **Precise Location** for FieldEdge. However, **this will make your location on the map less accurate**, which can impact how the app recommends nearby houses. FieldEdge may show you doors that aren’t actually close to you, making your canvassing less efficient.

If you still want to try this option:

1. Go to **Settings > Privacy & Security > Location Services**.
2. Find and tap **FieldEdge**.
3. Toggle off **Precise Location**.

For **Android** users, the equivalent setting is to reduce **Location Accuracy**:

1. Go to **Settings > Location > Location Services > Google Location Accuracy**.
2. Turn off **Improve Location Accuracy**.

{% hint style="warning" %}
**Important:** Lowering your location accuracy will cause your current position on the map to be less precise. This can lead to FieldEdge selecting doors that aren't actually nearby, which may result in a frustrating canvassing experience. We only recommend this option if you are very familiar with the area and don’t need accurate mapping.
{% endhint %}


# Mobile Data Usage While Using FieldEdge

## Overview

This article gives a single reference comparison for how much cellular data FieldEdge can use relative to a common maps app, and explains how campaigns can measure their own usage if data caps are a concern.

In one side-by-side measurement, data use was approximately:

| App / activity                            | Approx. data |
| ----------------------------------------- | ------------ |
| **FieldEdge**                             | **5.3 MB**   |
| **Google Maps** (turn-by-turn directions) | **6.28 MB**  |

Note: Actual usage varies with list size, time online, map use, and sync activity—treat any published figure as *illustrative*, not a guarantee for every session.

## If you are concerned about data usage

We recommend running a short pilot with a few volunteers. Have them canvass—or simulate part of a typical shift the way they normally would.

### How to measure data usage

* **iPhone and iPad:** See Apple's guide: [Use cellular data on your iPhone or iPad](https://support.apple.com/en-us/HT4146).
* **Android:** See Google Pixel docs: [Reduce & manage mobile data usage](https://support.google.com/pixelphone/answer/2819524)

## Related articles

* [Offline capabilities](/product-tour-or-mobile-app/offline-capabilities)
* [Battery usage tips while using FieldEdge](/everything-else/other-guides/battery-usage-tips-while-using-fieldedge)
* [Canvassing overview](/guide-to-canvassing-and-calls/canvassing-overview)


# Route suggestions while canvassing

## Overview

This article explains how FieldEdge chooses the next household (the blue pin on the map) while you are on a walk, and what to do when that suggestion does not match the path you would take on foot.

## Why the next stop might not be the house “right in front of you”

While you are at a door, you may notice that FieldEdge suggests visiting a household that looks farther away on the street, even though another house on your list is obviously next door or across the street. That can feel like the app is sending you the wrong way.

That behavior is usually not because the app is ignoring nearby doors. It is because of how distance is calculated (see below).

## How the suggested route is designed

FieldEdge’s next-household suggestion is a best guess based on straight-line distance—often described as “as the crow flies.”

In practice that means:

* The app uses the shortest line between two map points (your location and each household’s geocoded address), not walking distance along sidewalks, one-way streets, cul-de-sacs, or blocks you cannot cut through.
* It does not optimize for turn-by-turn walking or driving routes the way a dedicated maps directions app does.

## What you can do in the field

Choose a different next household: If the blue pin is not where you want to go next, tap the household on the map that you prefer to canvass. FieldEdge will treat that as your next stop.

## Tips for campaigns

* Brief canvassers that the blue pin is a straight-line proximity hint, not a guaranteed optimal walking loop—so they should tap ahead when the map order does not match the block.
* List and turf design (how households are grouped and assigned) still matter for efficient coverage; the suggestion logic does not replace good turf planning.

## Related articles

* [Quick Start for Field Users](/quick-start-for-field-users) (blue dot, blue pin, and tapping another household)
* [Canvassing overview](/guide-to-canvassing-and-calls/canvassing-overview)
* [Creating walk lists](/guide-to-canvassing-and-calls/setup-and-core-workflows/creating-walk-lists)


# How to Adjust Text Size on iOS and Android

If you would like larger or smaller text in the FieldEdge app, you can adjust the font size at the operating system (OS) level on your device. FieldEdge supports system-wide font scaling, so changes made in your device settings will be reflected in *most* places throughout the app.

***

### 📱 On iOS Devices

To adjust text size for the FieldEdge app on your iPhone or iPad:

1. Open the **Settings** app.
2. Tap **Accessibility**.
3. Select **Display & Text Size**.
4. Tap **Larger Text**.
5. Use the slider to increase or decrease text size.
6. For more size options, toggle on **Larger Accessibility Sizes**.

> **Quick Access Tip:**\
> You can add a **Text Size control** to your Control Center:

* Go to **Settings > Control Center**.
* Tap the green **+** next to **Text Size**.
* Now swipe down from the top-right corner and tap the **“aA”** icon to adjust text size quickly.

***

### 🤖 On Android Devices

To change the font size for the FieldEdge app on Android:

1. Open the **Settings** app.
2. Tap **Display**.
3. Tap **Font size** (or **Font Size and Style** on some devices).
4. Move the slider to adjust the text size to your preference.

> On certain Android devices, font settings may also be found under:\
> **Settings > Accessibility > Text and display > Font size**


# Resetting Your Password in FieldEdge

How you reset your password depends on **where and how you're logging in**. Follow the steps below based on your login method.

***

### FieldEdge Mobile App

#### Logging in with a **NationBuilder Account**

1. Open the **FieldEdge mobile app** (or a browser on your phone or computer)
2. Enter your **NationBuilder slug** (e.g. `yourcampaign.nationbuilder.com`) and tap **Next**.
3. Tap **Log in with NationBuilder Account**.
4. On the NationBuilder login page, click **Forgot your password?**
5. Enter your email address.
6. NationBuilder will send you a password reset link via email.
7. Click the link and follow the steps to set a new password.
8. Return to the FieldEdge app and log in with your new credentials.

> 💡 Your NationBuilder password is managed securely by NationBuilder. FieldEdge does not store or manage this password directly.

***

#### Logging in with **Accountless Login (SMS-based)**

1. On the FieldEdge mobile app, select **Accountless Login**.
2. Enter your **mobile phone number**, then tap **Next**.
3. You'll receive a one-time code via SMS.
4. Enter the code in the app to log in.

✅ **No password is needed**, so no reset is required.

> 🛠 If you're not receiving the code, check with your campaign administrator to confirm your number is linked to a valid user.

***

### FieldEdge HQ Dashboard

FieldEdge Dashboard uses **magic link authentication**, so you don’t need a password to log in although you can optionally login with a password if you have previously set one.

#### To log in:

1. Go to <https://dashboard.fieldedgeapp.com>.
2. Enter your email address.
3. You'll receive a **magic link** via email.
4. Click the link to log in — no password required!

#### To set or reset your password (optional):

1. On the login screen, click **Forgot your password?**
2. Enter your email address.
3. You’ll receive a password reset link.
4. Follow the instructions to set a new password (useful if you want an alternative to the magic link).

> 🔐 Setting a password is optional — but if you'd like to use one, you can reset it anytime.

***

### NationBuilder Control Panel

If you're logging into your NationBuilder control panel:

1. Go to your NationBuilder control panel in a browser (e.g. `yourcampaign.nationbuilder.com/admin`).
2. Click **Forgot your password?** on the login screen.
3. Enter your email address.
4. Check your inbox for the reset link from NationBuilder.
5. Follow the instructions to set a new password.

> 🧩 NationBuilder handles this login directly — FieldEdge respects the permissions and credentials set in NationBuilder.

***

### Summary Table

| Where You're Logging In                  | Login Method           | Password Required | How to Reset                                                    |
| ---------------------------------------- | ---------------------- | ----------------- | --------------------------------------------------------------- |
| FieldEdge Mobile App (**NationBuilder**) | Email + Password       | Yes               | Use **Forgot your password?** on NationBuilder login            |
| FieldEdge Mobile App **(Accountless**)   | SMS Code (no password) | No                | No password; login via SMS                                      |
| FieldEdge HQ Dashboard                   | Magic Link / Password  | Optional          | Use **Forgot your password?** link on the login page to set one |
| NationBuilder Site (Desktop)             | Email + Password       | Yes               | Use **Forgot your password?** on your NationBuilder login page  |

***

### ❓ Still Need Help?

If you're not sure how your account is configured or are having trouble logging in, reach out to your **campaign manager** or contact **FieldEdge Support** for assistance.


# FieldEdge 3.1: Smarter workflows, less admin

## Introducing FieldEdge 3.1

At FieldEdge, we know that every second in the field counts. That’s why version **3.1** is all about making canvassing and call time more efficient, intuitive, and powerful. This update brings a fresh new look to profiles, easier access to voter history, smarter status updates, and brand-new features designed to streamline your outreach.

### A Fresh New Look

We’ve redesigned the Canvass and Call Time Profile experience to make it even easier for anyone to use, whether their new to campaigning or a seasoned pros.

#### Key Information Card Updated

Voter information that matters most—sex, age, support level, and party affiliation—now sits front and center. With critical details visible at a glance, canvassers can feel more prepared and confident before every conversation.

<div align="left"><figure><img src="https://3317596624-files.gitbook.io/~/files/v0/b/gitbook-x-prod.appspot.com/o/spaces%2Fmd1HR6LZFUYuK3fPHLXC%2Fuploads%2F0aIOETypKLQSMlfnenap%2Fimage.png?alt=media&amp;token=7536afe2-3f80-488f-89d8-379b26c49ce8" alt="" width="188"><figcaption></figcaption></figure></div>

#### Current & History Tabs

We’ve introduced two simple tabs: **Current** and **History**.

* **Current**: A streamlined contact status menu, with options neatly grouped under “available” and “unavailable.” This makes logging interactions quicker and more consistent.
* **History**: A complete record of past interactions, including dates, contact methods, and notes. Dig deeper anytime with the new “show more” option.

<figure><img src="https://3317596624-files.gitbook.io/~/files/v0/b/gitbook-x-prod.appspot.com/o/spaces%2Fmd1HR6LZFUYuK3fPHLXC%2Fuploads%2FGdS6RHJg7JDdfx452EYZ%2Fimage.png?alt=media&amp;token=590ce353-1ab0-4a3c-b5e9-ffde84678fb3" alt=""><figcaption></figcaption></figure>

Together, these updates give you a clear snapshot of where you stand with each voter.

#### Organized Contact Statuses: Available / Unavailable

We’ve improved the outcome buttons to make logging results more intuitive. Whether you connected, left a note, or marked someone as unavailable, your results are now clearer and easier to track.

{% embed url="<https://youtube.com/shorts/UqmVko_OKM8?feature=share>" fullWidth="false" %}

### Introducing New Pins

You can now see the status of any household or person at a glance. Updated map and status icons now highlight progress at a glance. For example, you can see all the people you’ve recently attempted to contact but did not answer.

<div align="left"><figure><img src="https://3317596624-files.gitbook.io/~/files/v0/b/gitbook-x-prod.appspot.com/o/spaces%2Fmd1HR6LZFUYuK3fPHLXC%2Fuploads%2FIvSSOyutI1N7LcWoawe6%2Fimage.png?alt=media&amp;token=1c7bdecc-ffc2-49e0-9127-b2a81f6fa88b" alt=""><figcaption></figcaption></figure></div>

### New Flexibility for Less Admin

#### On devices re-canvassing

Sometimes one conversation isn’t enough. Previously, people would need to be reset via our HQ Dashboard or NationBuilder. Now, with our new in-app re-canvassing feature, you can log new interactions right away, keeping previous contact in place.

#### Editing Recently Completed Person (quickly make changes)

Need to make a change to some information you logged? Now you can. Simply tap the Make Changes button, make your tweaks and Save Changes. The interaction will be sync’d back to NationBuilder.

Note: the person will need to be completed on your device recently in order to edit the interaction.

<div align="left"><figure><img src="https://3317596624-files.gitbook.io/~/files/v0/b/gitbook-x-prod.appspot.com/o/spaces%2Fmd1HR6LZFUYuK3fPHLXC%2Fuploads%2FaC6JFHqgIaBhTbwOioxV%2Fimage.png?alt=media&amp;token=8ad65687-f293-4a8b-afb1-e1e6b49c703f" alt="" width="188"><figcaption></figcaption></figure></div>

FieldEdge 3.1 isn’t just a facelift—it’s about helping campaigns, advocacy groups, and organizers organize more effectively, with less administrative burden.

***

👉 Ready to try the new features? Update to **FieldEdge 3.1** and experience a smarter, faster way to canvass.

{% hint style="info" %}
This feature may still be in Beta. You can join our Beta program here: [Customer Advisory & Beta Testing](/everything-else/other-guides/customer-advisory-and-beta-testing)
{% endhint %}


# Changelog

We're always working make to FieldEdge better than ever so you can win in the field!

## Mobile 3.1.12

**🆕 New:** Suggested address picker — edit immediately after selecting

**🆕 New:** Address line 3 and country-specific formats (including New Zealand)

**🆕 New:** Search on Point Person screen

**🆕 New:** User-submitted addresses displayed; addresses without lat/lng shown

**⚡ Tweak:** Edit phone screen re-enabled

**⚡ Tweak:** Improved search and keyboard spacing on forms

**⚡ Tweak:** RSVP screen updates

**🛠️ Fix:** Offline queue replay reliability

**🛠️ Fix:** Poor internet handling when creating log contact

**🛠️ Fix:** Canvass offline completion flow

**🛠️ Fix:** Phone/address required event validation

**🛠️ Fix:** Numerous stability improvements in canvass profile and map

Released Apr 27, 2026 · patches through May 21, 2026

***

## Mobile 3.1.10

**🆕 New:** RSVP screen improvements — loading states, event sorting

**⚡ Tweak:** Edit contact flow updates

**⚡ Tweak:** Email handling when editing a person

**🛠️ Fix:** Android number keyboard on list screens

**🛠️ Fix:** Duplicate contact creation on rapid save

Released Apr 18, 2026

***

## Mobile 3.1.8

**🆕 New:** Log contact from People screen saves support level

**🆕 New:** Sync in proximity screen

**⚡ Tweak:** Call time button labels

**⚡ Tweak:** System text size and navigation bar handling

**⚡ Tweak:** Clearer RSVP error messages

**🛠️ Fix:** Set priority on canvass profile

**🛠️ Fix:** Person list stays in sync after saving

**🛠️ Fix:** Stability improvements (rapid 3.1.6–3.1.7 builds consolidated)

Released Apr 11, 2026

***

## Mobile 3.1.5

**🆕 New:** Save-first offline — survey and completion results saved locally before syncing

**🆕 New:** View full profile from canvass profile

**🆕 New:** RSVP events (API v2) with event caching

**🆕 New:** Ballot, voting districts, custom fields, language, and additional address/email screens re-enabled

**⚡ Tweak:** Australia phone code support

**⚡ Tweak:** Improved connectivity detection

**🛠️ Fix:** Survey responses not being saved in some cases

**🛠️ Fix:** Apple App Store login navigation requirement

**🛠️ Fix:** Contact status display overflow

**🛠️ Fix:** Empty walk preview with party-only filter

**🛠️ Fix:** Xiaomi device caching issue

Released Apr 1, 2026

***

## Mobile 3.1.3

**🆕 New:** Proximity flow, cold walk, and multi-person canvass completion re-enabled after offline migration

**🆕 New:** Re-canvass completed houses

**⚡ Tweak:** Large list performance improvements

**⚡ Tweak:** Improved offline sync when logging out and back in

**🛠️ Fix:** Data migration for users on previous offline storage

**🛠️ Fix:** Canvass map — completed house tap, marker selection, keyboard overlap

**🛠️ Fix:** Offline dialogs and connectivity handling

Released Dec 2025

***

## Mobile 3.1.2

**🛠️ Fix:** Google login issue

Released Nov 2, 2025

***

## Mobile 3.1.1

**🛠️ Fix:** Map marker displaying too small

Released Oct 21, 2025

***

## Mobile 3.1.0

**🆕 New:** A new layout for the Canvass/Call Time profile

**🆕 New:** View interaction history easily while in canvass/call time via the new History tab

**🆕 New:** Outcomes are organized into Answer/No Answer buttons

**🆕 New:** Re-canvass houses without having to reset a list

**🆕 New:** Change the outcomes of a recently completed interaction

**🆕 New:** Change the outcomes of a recently completed interaction

⚡ **Tweak:** Accountless users can now login without a list assigned

**🛠️ Fix:** Crash when using “Open in NB” Action on Android

**🛠️ Fix:** Pull to refresh Lists for Accountless users

Submitted for release 12 Oct 2025

***

## HQ Dashboard

**🆕 New:** Upgraded List Reset tool that’s faster & more reliable!

**🛠️ Fix:** Tabbing between email and password on main login form

Released Jun 28, 2025

***

## HQ Dashboard

**🆕 New:** Ability to send a custom message when inviting Accountless users

**🆕 New:** New App Customization: toggle Contact Status on and off

Released Mar 21, 2025

***

## Mobile 3.0.63

**⚡️ Tweak:** Improved spacing on Canvass and Call Time profile screen

**🛠️ Fix:** Formatting issues on profile screen

**🛠️ Fix:** Fixed a formatting issue when no search results were found on Tags screen

**🛠️ Fix:** Bug when tapping next button on survey screen multiple times

**🛠️ Fix:** App freezing when creating new contact and don’t enter any required fields

**🛠️ Fix:** Sometimes crash when editing a completed interactions

**🛠️ Fix:** Sometimes crash when viewing Voting History

Submitted for beta release Jan 20, 2025

Submitted for public release Jan 27, 2025

***

## Mobile 3.0.62

**⚡️ Tweak:** Refresh lists when adding a new Walk or Call Time session

**⚡️ Tweak:** Deselect Support Level on Canvass/Call Time completion screen

**⚡️ Tweak:** Improved enter slug screen on small screens

**⚡️ Tweak:** Added large list warning for Call Time lists over 500

**⚡️ Tweak:** Better display of longer labels on various lists

**⚡️ Tweak:** Hide FieldEdge special tags from tag edit screen

**⚡️ Tweak:** Moved list view button to top of stack for better visibility

**⚡️ Tweak:** Replaced Null with Empty when no value for a profile field

**🛠️ Fix:** Prevent multiple contacts from being added when tapping new many times

**🛠️ Fix:** Call Time progress counter on overview screen reset to 0/0

**🛠️ Fix:** Issue where No Lists Found displayed after refreshing

**🛠️ Fix:** Home Phone value disappearing after save

**🛠️ Fix:** Blank More Email screen on Edit Contact screen\
\
Submitted for beta release Dec 21, 2024

Submitted for public release Jan 2, 2025

***

## Mobile 3.0.61

**🆕 New:** Download updates from team members in Call Time with the new sync button

**⚡️ Tweak:** Progress or resets made by other team members are now reflected when reopening a Call Time session

**⚡️ Tweak:** Added total number of people on Call Time list to progress stats

**🛠️ Fix:** Left Message is no longer switched to Lit Drop when in Call Time using an Accountless login

Submitted for release Dec 17, 2024

***

## Mobile 3.0.60

**⚡️ Tweak:** Better display of notes area when keyboard is active in Call Time and Canvass

**🛠️ Fix:** Bug that prevented our special Completed tag from being applied when contact had a lot of existing tags

*Submitted for release Nov 24, 2024*

***

## Mobile 3.0.59

**⚡️ Tweak:** Smarter validation when adding and editing a person’s email address

**⚡️ Tweak:** Better handling of surveys native fields after completing survey

**🛠️ Fix:** Duplicate contacts when sorting in Call Time

Submitted for release Nov 11, 2024

***

## Mobile 3.0.58

🆕 **New:** App Customization: enable person’s full profile access from Canvass/Call Time when people menu hidden

🆕 **New:** Inject [native fields](/guide-to-canvassing-and-calls/setup-and-core-workflows/adding-a-survey) (such as a contact's name) into survey questions

⚡️ **Tweak:** Added Party field to profile card (and removed City)

⚡️ **Tweak:** Added person’s address to top of Call Time profile

⚡️ **Tweak:** Added person’s name to the top of the survey screen

🛠️ **Fix:** Various other fixes

Submitted for release Nov 1, 2024

***

## Mobile 3.0.57

**🆕 New:** All new surveys with new powerful features. Learn more: <https://felink.me/surveydocs>

**🆕 New:** Edit details of interaction after completing a person during a Walk or Call Time session

**🆕 New:** Grant the FieldEdge support team access to your NationBuilder login for up to 24 hours to help troubleshoot account specific issues quicker

**⚡️ Tweak:** Only display control panel users under Point Person & Recruited By

**⚡️ Tweak:** Made surveys available while offline

**⚡️ Tweak:** Added sort order to voting history to make it easier to read

**⚡️ Tweak:** Added pull to refresh list of surveys

**⚡️ Tweak:** Show coordinates in address fields when full address not available

**⚡️ Tweak:** Remove Save for Later button on Walk/Call Preview screens when not applicable

⚡️ **Tweak:** Only show dates in the past for the DOB field

🛠️ **Fix:** Issue saving Party Member field

🛠️ **Fix:** an issue with syncing offline activity in some cases

🛠️ **Fix:** Issue when adding new households in Cold Walk

🛠️ **Fix:** Bug where Next Household button was showing when adding a new household

🛠️ **Fix:** Issue with Contact Status card not displaying in some cases

🛠️ **Fix:** Issue with Contact Status card not displaying in some cases

🛠️ **Fix:** Issue where new households weren’t always added to map

🛠️ **Fix:** Issue syncing when NB token refreshed while offline

🛠️ **Fix:** Issue where selected options weren’t displaying correctly when completing many people

Submitted for release Oct 8, 2024

***

{% hint style="info" %}
Fixed version numbering so each release is a sequential number :)
{% endhint %}

## Mobile 3.0.42

⚡️ Tweak: Improve the way surveys display with a lot of multiple choice answers and zoomed text.

Submitted for release Jul 17, 2024

***

## Mobile 3.0.41

⚡️ **Tweak**: Start Canvass Household will autoselect all people in household (if setting is turned on)

⚡️ **Tweak**: Improved login screen to stop accidental swipes from taking you back

Submitted for released Jul 13, 2024

***

## Mobile 3.0.36

🆕 **New:** Open recently canvassed person to view outcomes of canvass

⚡️ **Tweak:** NationBuilder login no longer breaks if login button double tapped

⚡️ **Tweak:** Moved map buttons to a more accessible position

⚡️ **Tweak:** Added Next Household button to half card position

🛠️ **Fix:** Team household status sync when filtered applied

🛠️ **Fix:** Start Household Canvass completion reliability

Submitted for release May 16, 2024

***

## Mobile 3.0.33

⚡️ **Tweak:** Changes to the way we track household completions. Completion now apply across all lists and proximity walks.

🆕 **New:** Introducing Walk & Call Time Filters! You can now apply filters to your walks and call time sessions. Filter by sides of the street, party, tags & support level (or a combination)! Find the filter options in the top right hand corner of the Walk or Call Time Session Preview screen.

🆕 **New:** Sort a List or Call Time Session by Last name

⚡️ **Tweak**: Quicker sorting while canvassing in list view

Submitted for release Apr 9, 2024

***

## Mobile 3.0.26

🆕 **New:** added average donation and last donation to Support tab

🛠️ **Fix:** you can now login with allowing the Location permission

🛠️ **Fix:** correct contact method sent during call time when no call/text made

🛠️ **Fix:** Field activity is now saved and sent when back online

⚡️ **Tweak:** profile flags are now shown at the start of the flags list

⚡️ **Tweak:** a completed house can now be tapped to view the names of people completed

⚡️ **Tweak:** existing support level is no longer pre-set on canvass walk & call time sessions so you can capture the new level

⚡️ **Tweak:** we no longer make you wait for the list to down before telling you its too big

⚡️ **Tweak**: the action button has been moved so it doesn’t overlap with other elements

⚡️ Other tweaks & under the hood changes

Submitted for release Jan 23, 2024

***

## Mobile 3.0.25

🆕 **New:** Profile images now display if available

🛠️ **Fix:** Accountless users are now logged out shortly after being removed from team

🆕 **New:** Ability to delete a Walk or Call Time Session

🆕 **New:** Added turnout and support probability fields

⚡️ **Tweak:** Moved Voting info to Support Tab

🛠️ **Fix:** Attempting to fix issue with unexpected Walk Completion popup

Submitted for release Dec 13, 2023

***

## Mobile 3.0.24

🛠️ **Fix:** Fixed an issue with current location not moving

🛠️ **Fix:** Fixed an issue with progress counter after syncing with team

⚡️ **Tweak:** Improved feedback when login errors for accountless users

🆕 **New:** Added Precinct Code next to Precinct Name

🆕 **New:** Added Language selector to login screen

Submitted for release Dec 5, 2023

***

## Mobile 3.0.20

⚡️ **Tweak:** Loads map regardless of location relative to next house

⚡️ **Tweak:** Improved phone number compatibility for Accountless login

🛠️ **Fix:** Fixed issue with Call Time Contact Status display

Submitted for release Nov 17, 2023

***

## Mobile 3.0.17

🛠️ **Fix:** Inability to login with some phone numbers resolved

Submitted for release Nov 11, 2023

***

## Mobile 3.0.16

🛠️ **Fix:** Critical fix to prevent data being sent to NationBuilder multiple times when connection drops

Submitted for release Nov 5, 2023

***

## Mobile 3.0.13

⚡️ **Tweak:** Directions feature removed due to increased cost; markers improved for clarity

🆕 **New:** Added a button to get directions via Google Maps

🆕 **New:** Add a new house by tapping on the map (first steps towards listless canvassing)

⚡️ **Tweak:** Various under the hood fixes and improvements

Submitted for release Oct 14, 2023

***

## Mobile 3.0.5

⚡️ **Tweak:** Sort households in apartment buildings in true numerical order

⚡️ **Tweak:** Allow a user to deselect a multiple-choice survey answer by tapping on it again

⚡️ **Tweak:** Show the Accountless user’s name on the Account page instead of the proxy account user name

🛠️ **Fix:** A few typos fixed

Submitted for release Jun 22, 2023

***

## Mobile 3.0.4

🛠️ **Fix:** Addressed a bug with Accountless login

Submitted for release May 29, 2023

***

## Mobile 3.0.3

🛠️ **Fix:** Addressed a bug preventing adding contacts with the same name

Submitted for release May 20, 2023

***

## Mobile 3.0.1

🛠️ **Fix:** Fixed a bug with Accountless login international phone numbers

Submitted for release May 8, 2023

***

## Mobile 3.0.0

The all new 3.0 version has arrived!

Submitted for release Apr 11, 2023


---

[Next Page](/llms-full.txt/1)